Respiratory Protection Toolbox Talk Template

Start with a free 30-day trial. No credit card required.
This Respiratory Protection Toolbox Talk is an easy-to-use form that your workers can use to discuss respiratory hazards, exposure controls, and proper respirator use before starting work in dusty, smoky, fume-filled, or poorly ventilated areas. Record important toolbox talk details such as the work activity, airborne hazards, control measures, respirator type, fit checks, filter or cartridge requirements, cleaning and storage, worker questions, attendance, and sign-offs in this free form.
Working around dust, fumes, gases, smoke, or other airborne contaminants on your site? Looking for a respiratory protection toolbox talk sample to help guide your next safety meeting? This Respiratory Protection Toolbox Talk helps teams document important discussion points such as when respirators are required, how to check the fit, when filters should be changed, how respirators should be cleaned, and what workers should do if they have breathing difficulty or equipment issues. Then, you can even share the completed toolbox talk with supervisors, safety managers, and other stakeholders by exporting it to PDF or CSV.
 100% fully editable Respiratory Protection Toolbox Talk
Export your Respiratory Protection Toolbox Talk to PDF or CSV
Access Respiratory Protection Toolbox Talk Form on mobile, tablet or computer
Trusted by companies, projects and teams of all sizes















What is Respiratory Protection Toolbox Talk?
A Respiratory Protection Toolbox Talk is a document used by supervisors, safety managers, and site teams to guide short safety discussions about respiratory hazards and respirator use. This toolbox talk usually includes discussion points on dust, fumes, gases, smoke, ventilation, exposure controls, respirator selection, fit checks, filter changes, cleaning, storage, and worker responsibilities.
Due to the health risks that come with breathing in harmful airborne contaminants, workers need to understand when respiratory protection is required and how it should be used before work begins. This makes Respiratory Protection Toolbox Talks highly relevant in construction, demolition, manufacturing, mining, welding, painting, maintenance, utilities, and industrial work, where airborne hazards are commonly created by work activities or site conditions.
Compare this Respiratory Protection Toolbox Talk Form with Excel, PDF, and email-based safety documentation
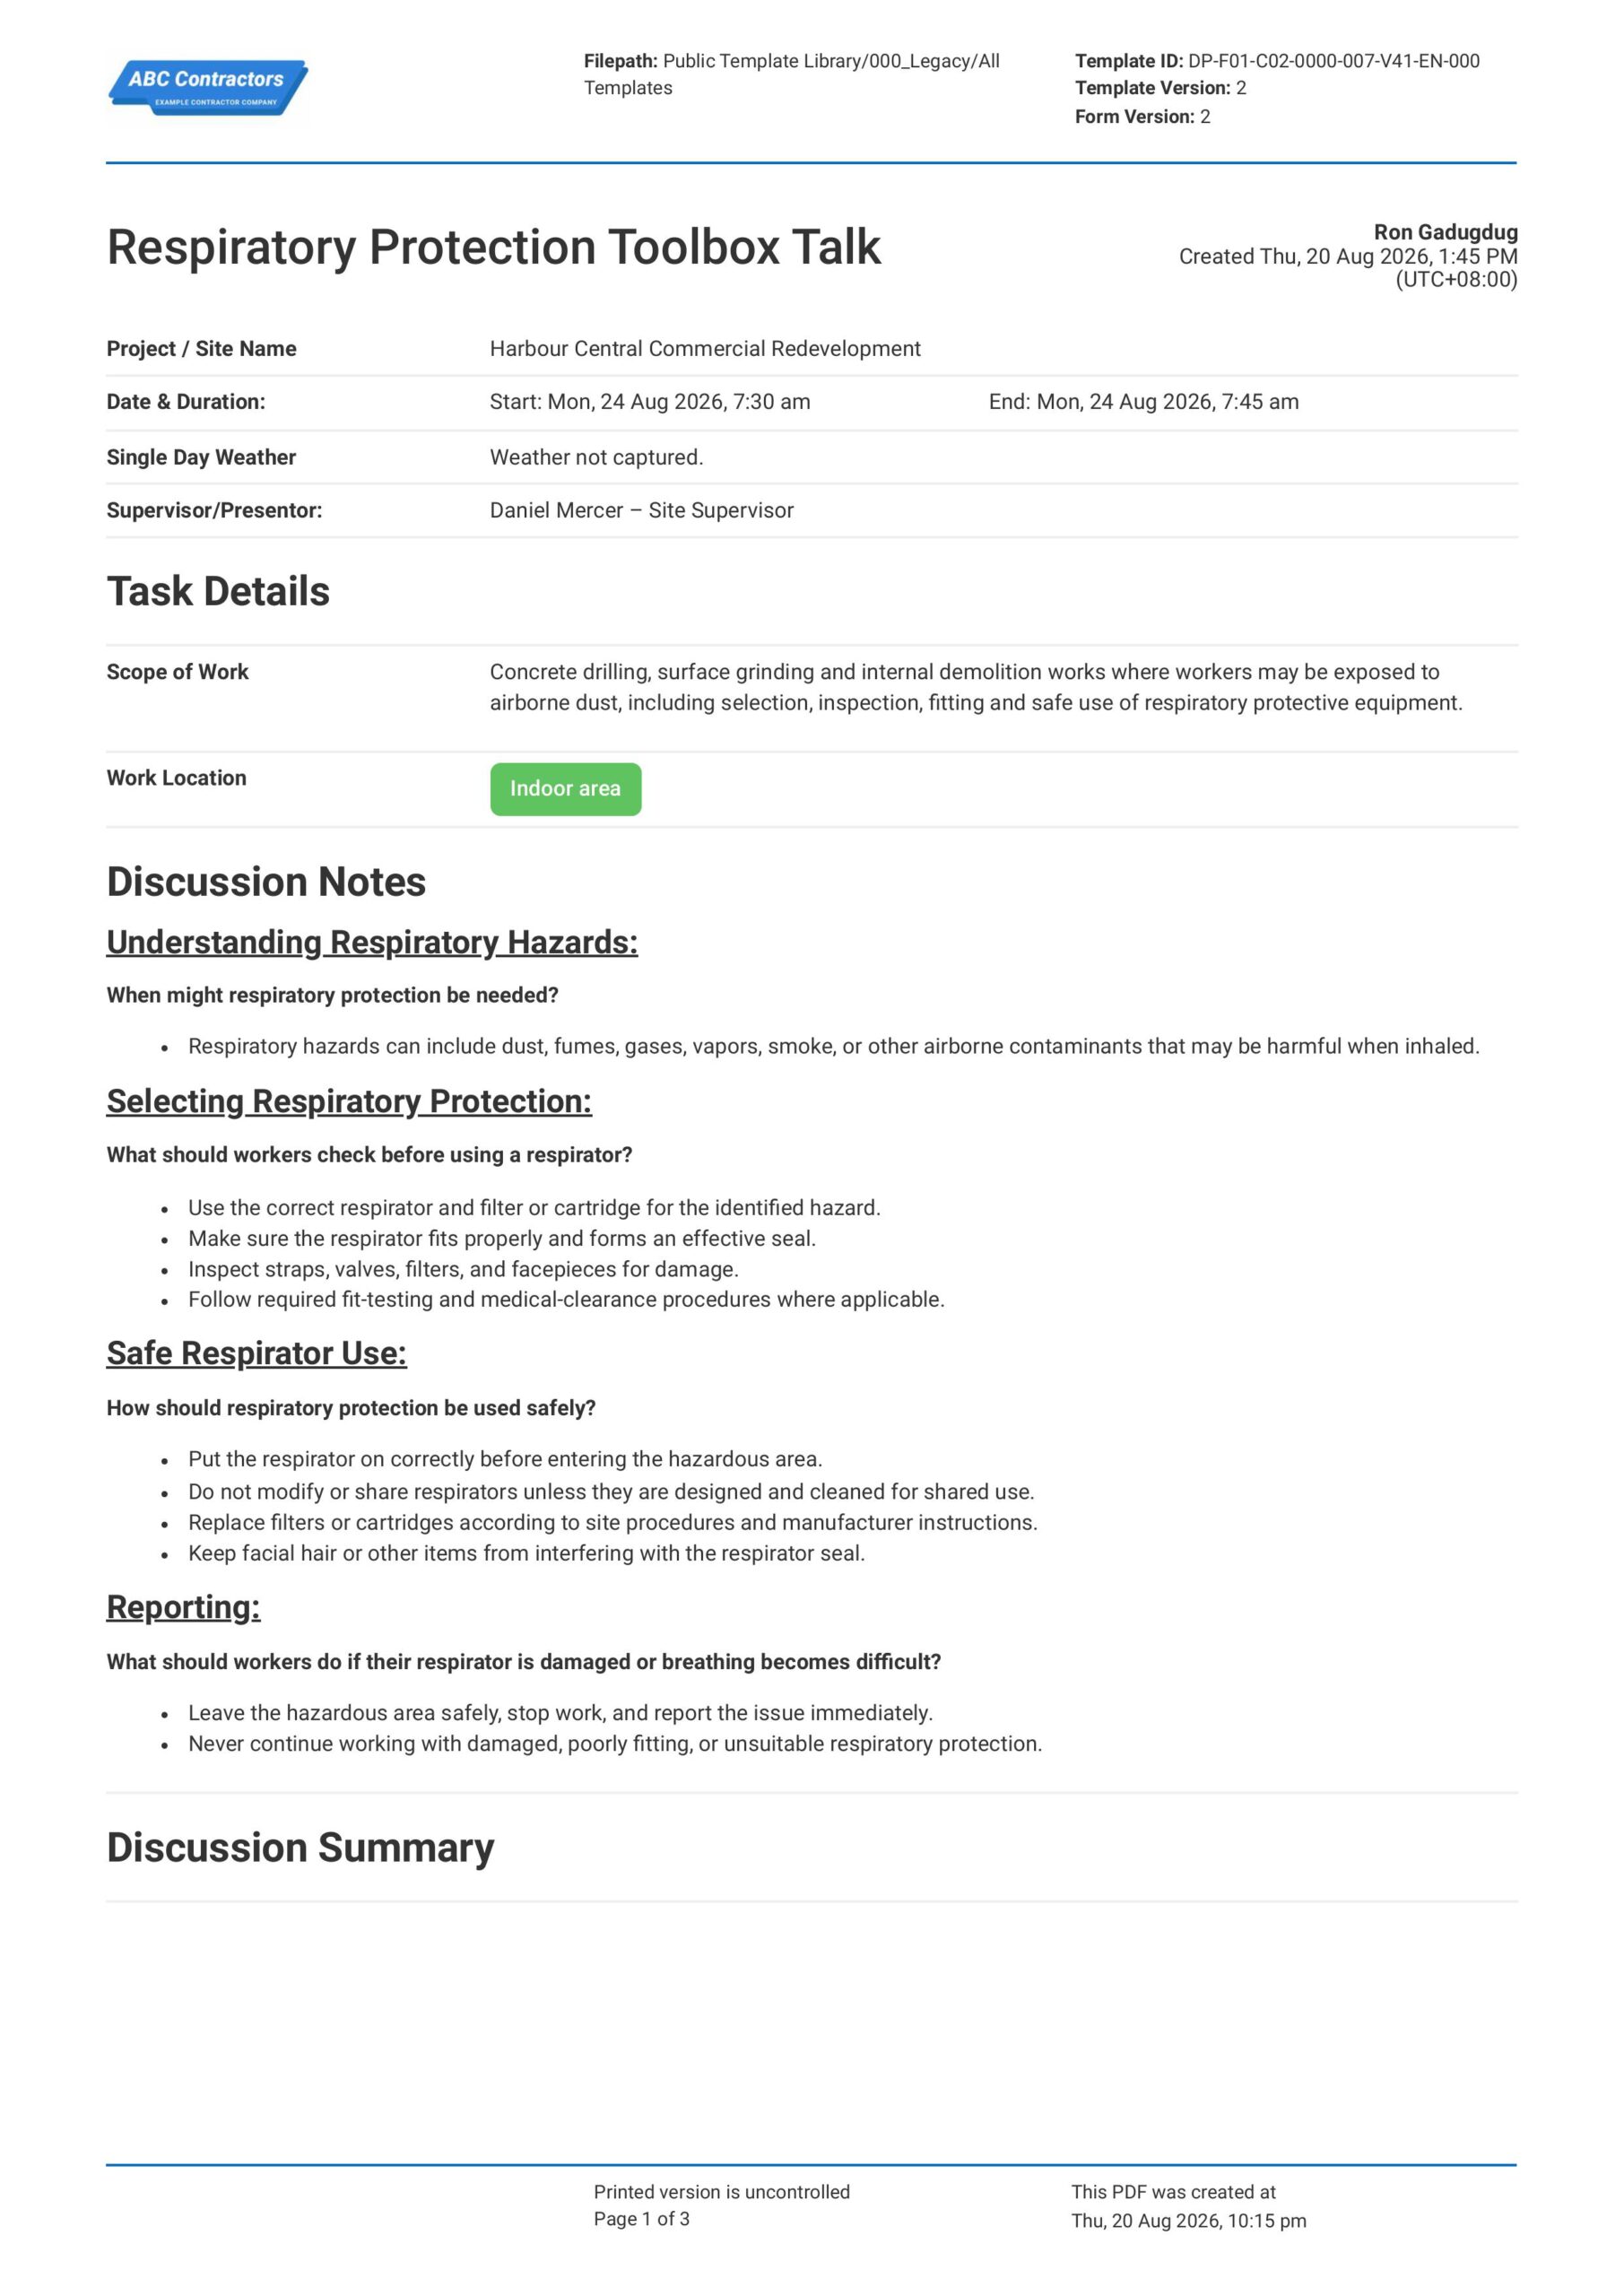
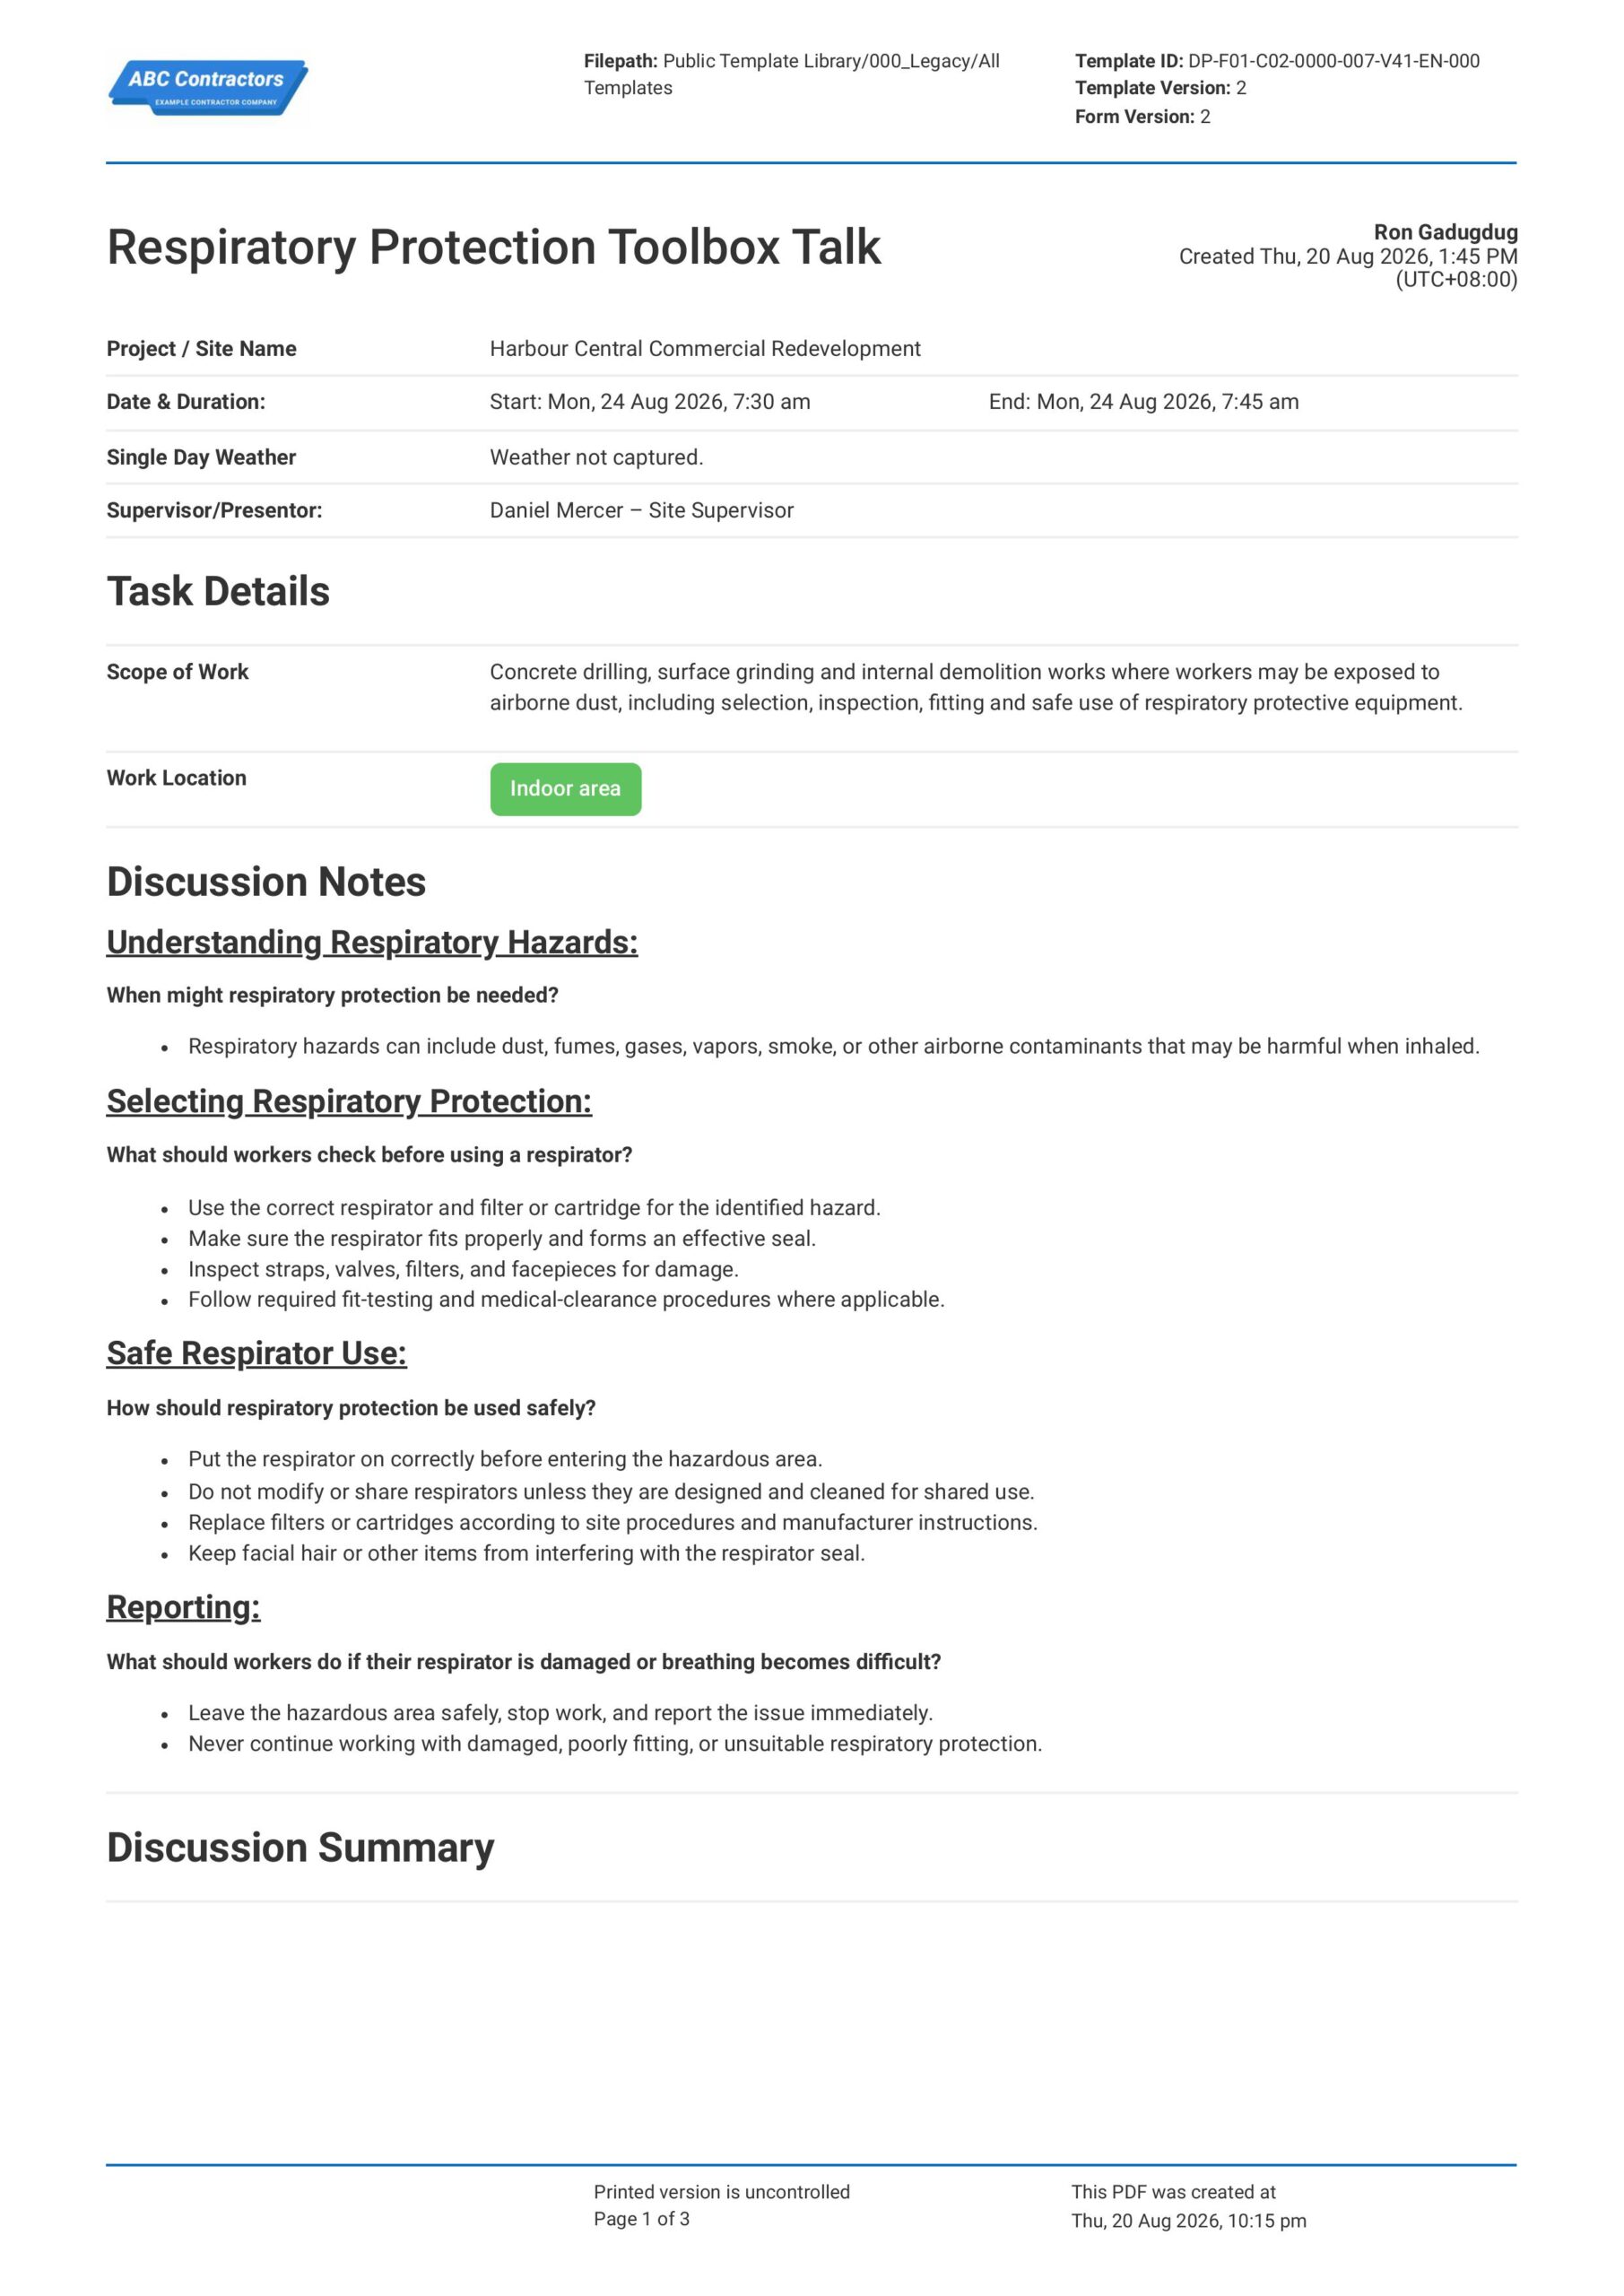
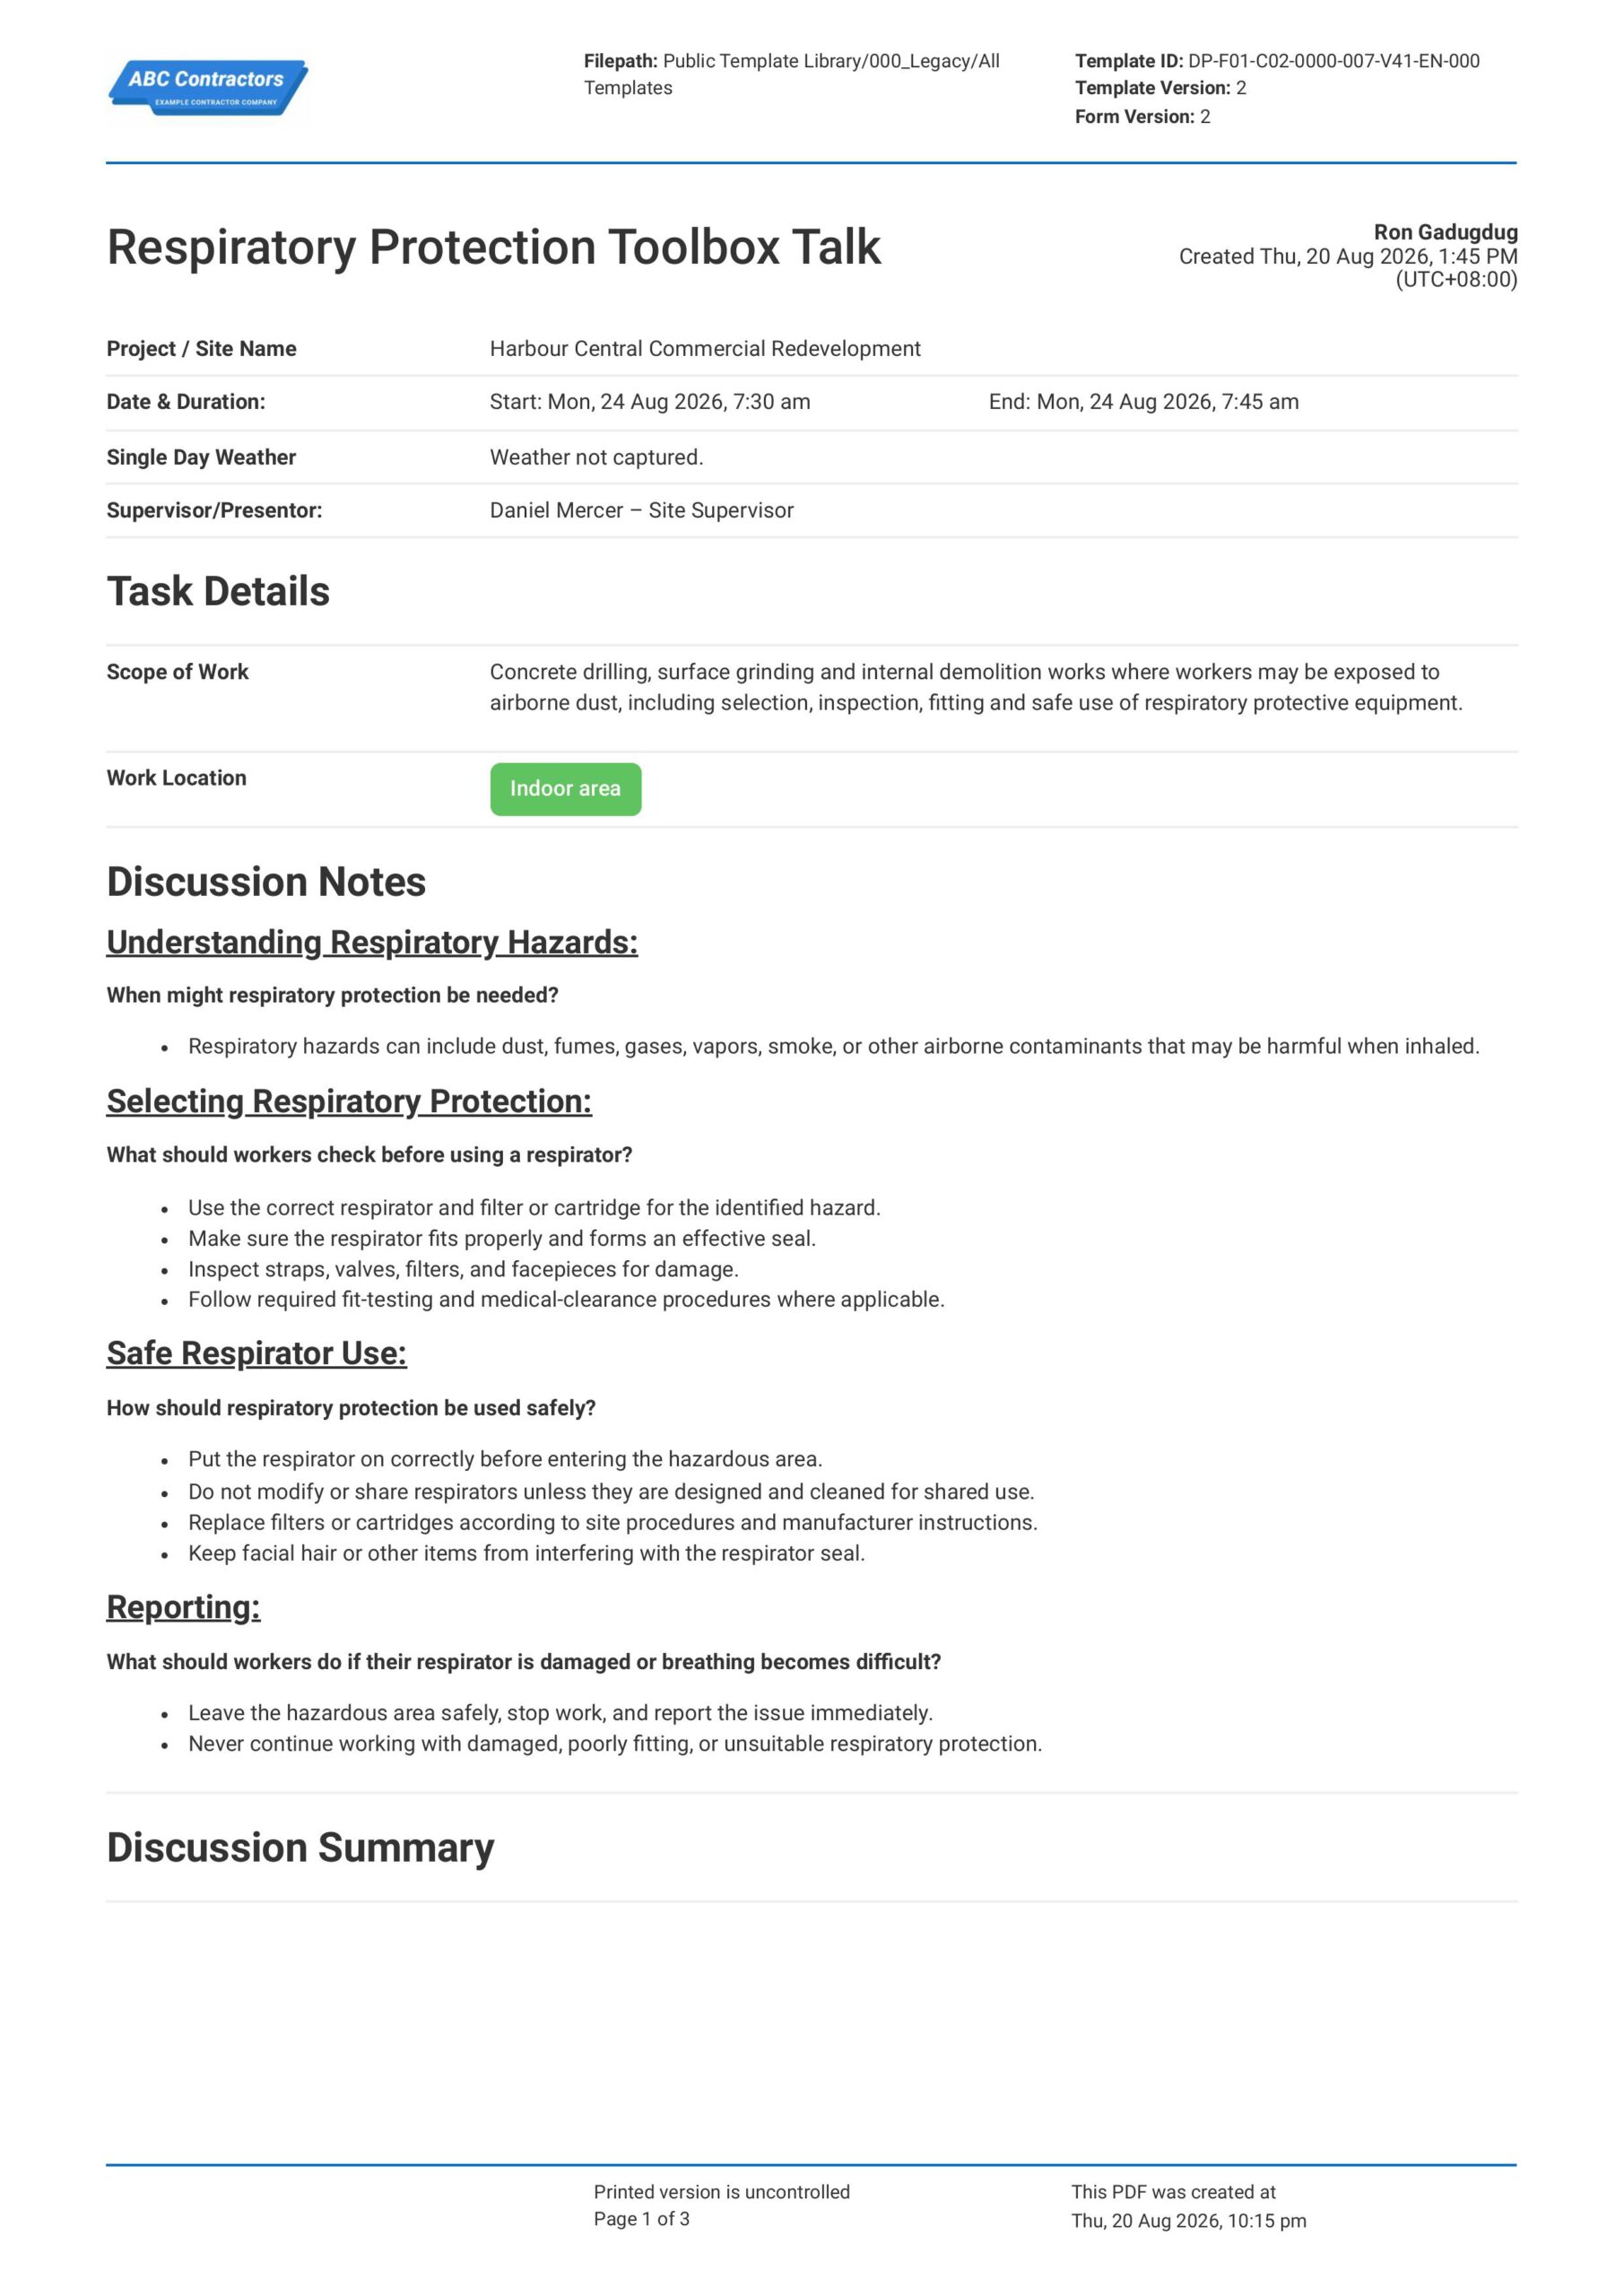
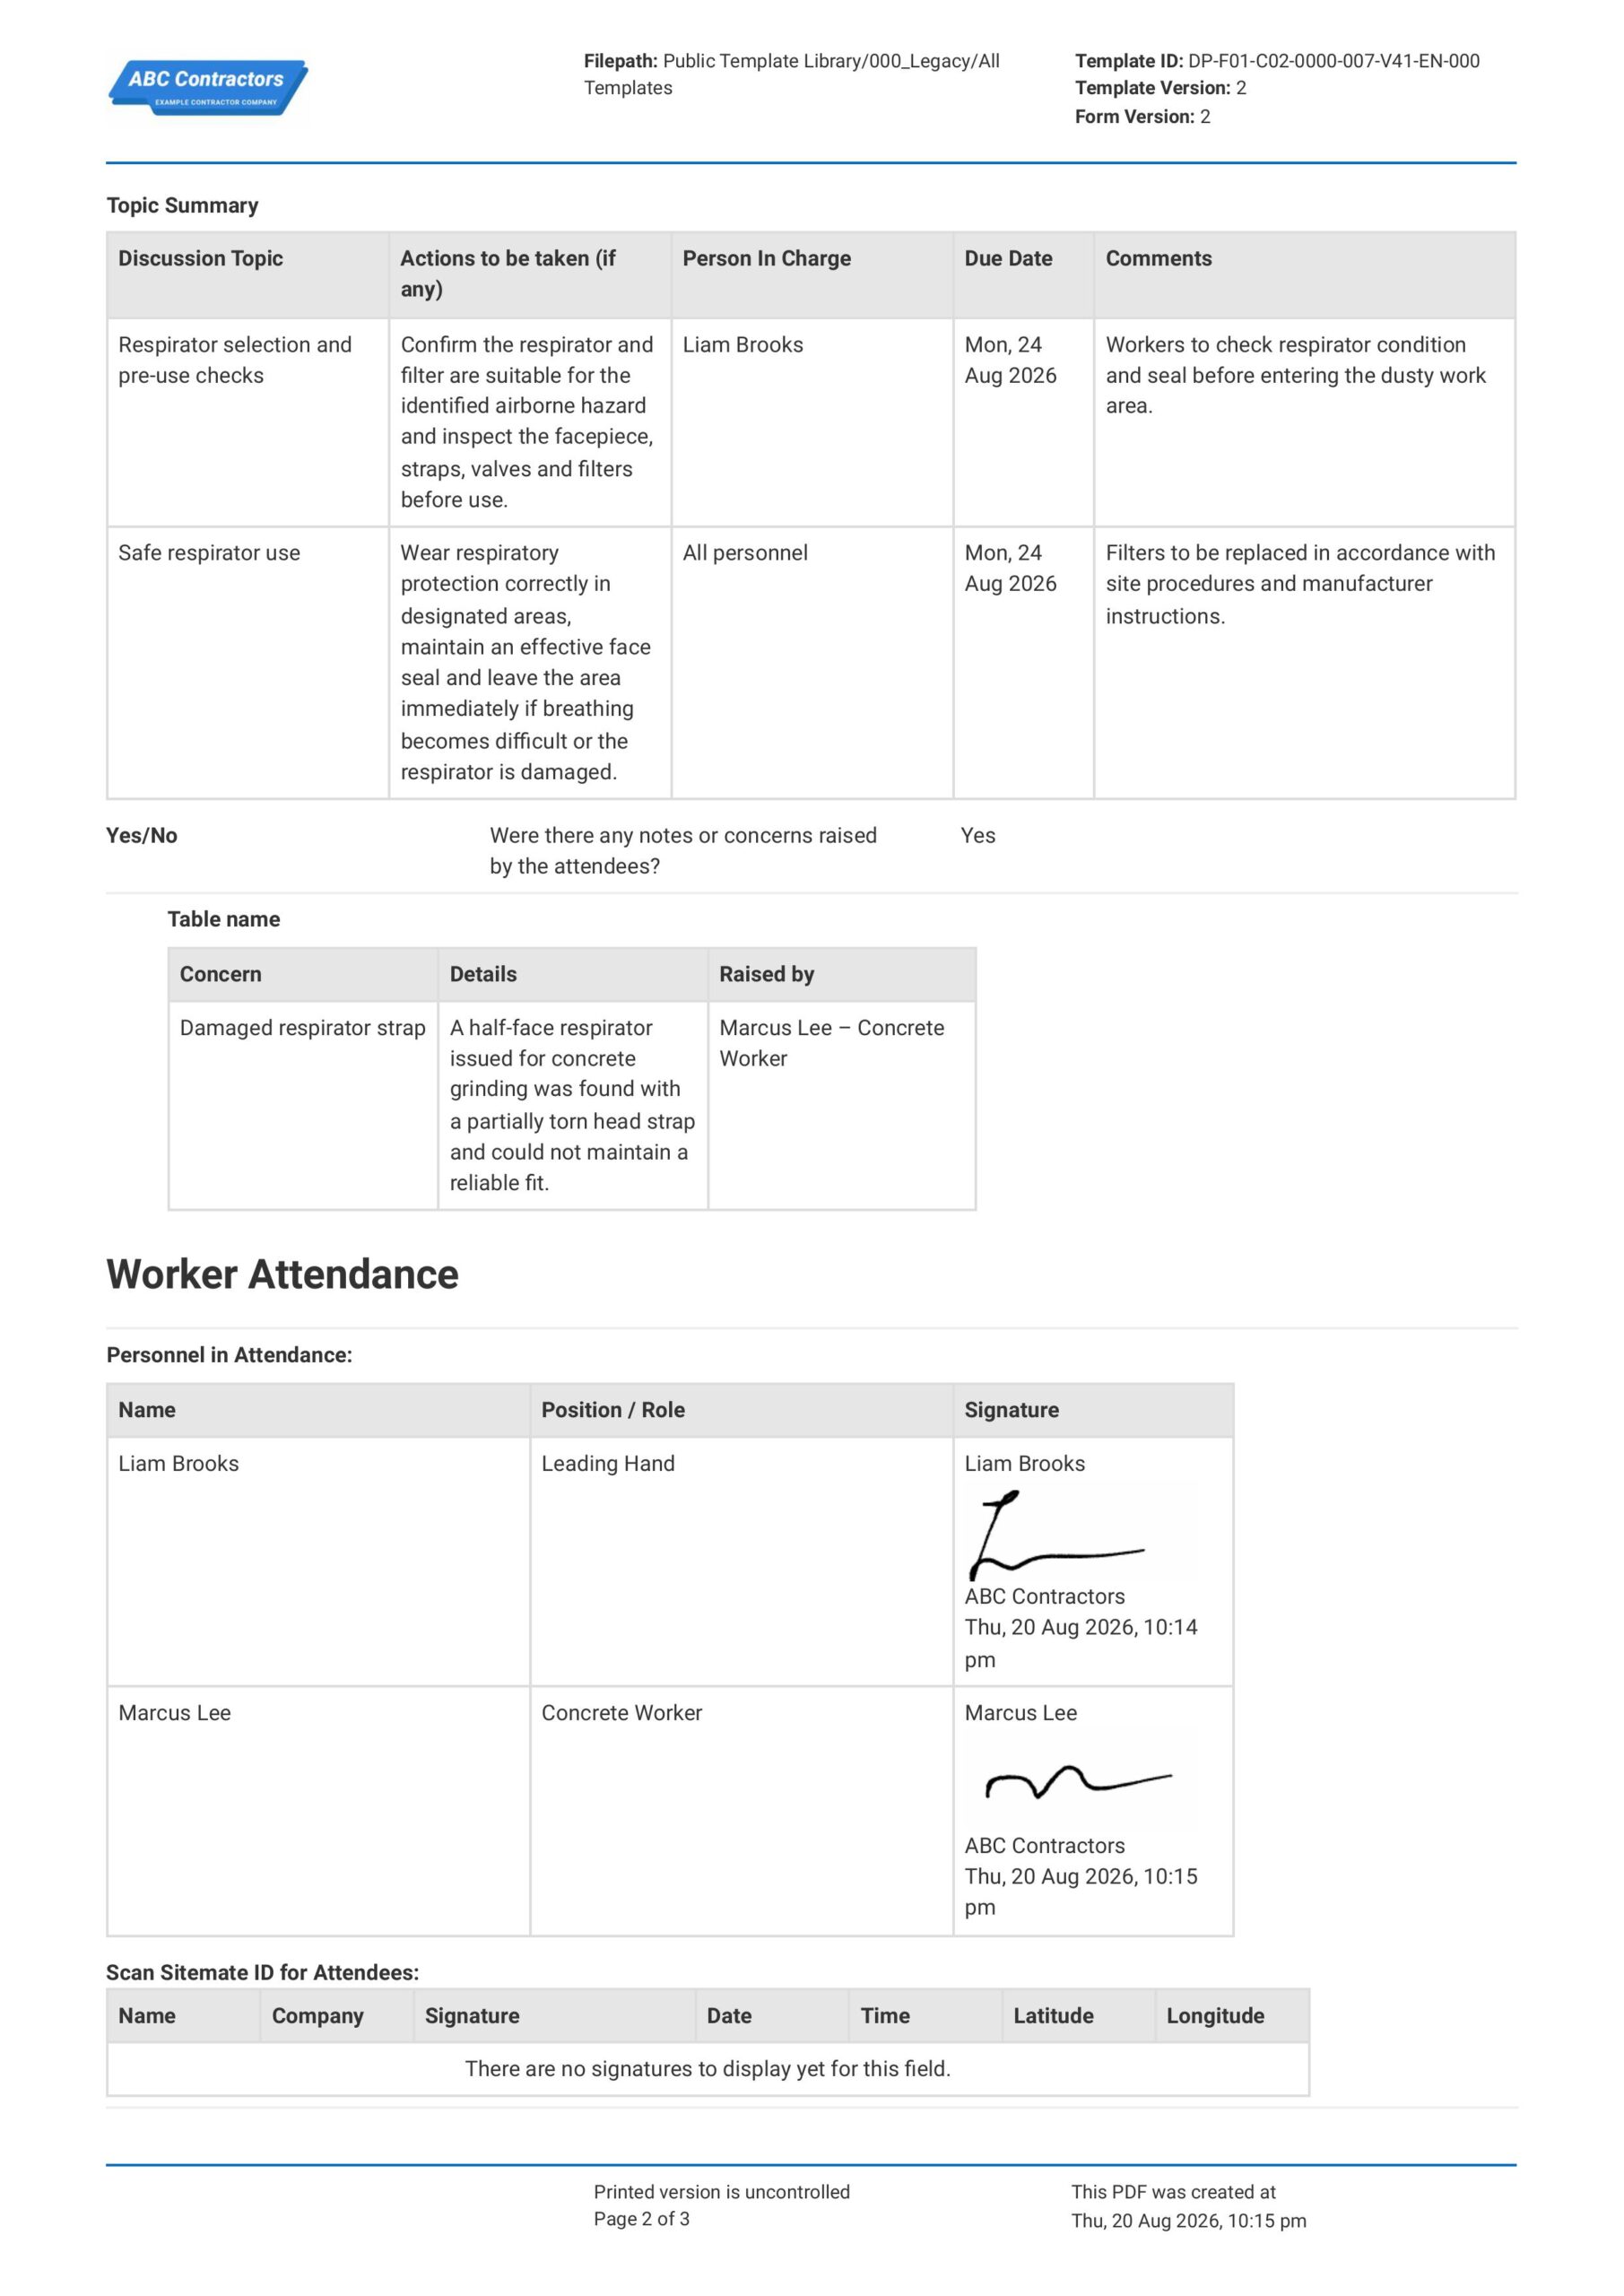
Preview this Respiratory Protection Toolbox Talk below and see how it's so much easier to create and navigate the toolbox talk form.
Curious to see how this Respiratory Protection Toolbox Talk works? Check out the free preview below and see how it could streamline your toolbox talk process.
Use this Respiratory Protection Toolbox Talk template for free

Generate this template automatically with Storm
You don't have to build the Toolbox Talk Process field by field. Let Storm, the AI Data Capture Agent inside Dashpivot, build the template for you in seconds.
Describe what you need
Tell Storm the form you want in plain language and it builds a structured digital template from scratch, with fields, tables, and signatures in place.
Upload what you already use
Drop in your existing PDF, Word, Excel, or even a photo of a paper form. Storm rebuilds it as a smart digital template with the structure intact.
 Storm
Storm
Generate a Toolbox Talk Process form template that I can use for my business
Applicable Standards and Policies for Respiratory Protection Toolbox Talk
There are generally no explicit formatting requirements for a Respiratory Protection Toolbox Talk. However, most workplace safety laws require employers to train workers on airborne hazards, respirator selection, fit testing, inspection, maintenance, and proper use where respiratory protection is needed. A Respiratory Protection Toolbox Talk is a good document to support compliance with this.
• OSHA 29 CFR 1910.134 covers respiratory protection requirements in the USA
• OSHA 29 CFR 1926.103 covers respiratory protection in construction work in the USA
• UK COSHH Regulations 2002 require employers to control exposure to hazardous substances
• Safe Work Australia guidance covers respirator selection, fit testing, and airborne contaminants
• Local WHS laws commonly require exposure controls, PPE training, and safe use of respirators
Staff Members and Parties that use Respiratory Protection Toolbox Talk
A Respiratory Protection Toolbox Talk is primarily used by project teams that manage dust, fumes, gases, silica, asbestos, chemicals, or other airborne hazards. Here are examples of other common parties that use a Respiratory Protection Toolbox Talk:
• Site supervisors and project managers
• Workers using respirators
• Health and safety teams
• Industrial hygiene teams
• Contractors and subcontractors exposed to airborne hazards
Business Risks Reduced by Respiratory Protection Toolbox Talk
Using a Respiratory Protection Toolbox Talk helps reduce the risk of hazards such as dust exposure, fumes, gases, poor respirator fit, incorrect filter selection, and unsafe use of respiratory equipment. Ultimately, this can help businesses to:
• Reduce risk of illness, injury, or respiratory exposure incidents
• Avoid non-compliance with respiratory protection and workplace safety requirements
• Prevent unsafe work caused by poor fit testing, damaged respirators, or incorrect filter use
• Lower exposure to legal claims, enforcement action, and incident-related costs
• Reduce project delays caused by exposure incidents, inspections, or shutdowns
Business Opportunities Created by Respiratory Protection Toolbox Talk
A well-prepared Respiratory Protection Toolbox Talk helps businesses improve worker awareness and control over airborne hazards. Here are some ways a well-designed Respiratory Protection Toolbox Talk can help businesses:
• Improve worker confidence when using respirators or working near airborne hazards
• Strengthen contractor prequalification and tender-offer competitiveness
• Improve coordination between supervisors, safety teams, workers, and hygiene teams
• Build trust with clients, regulators, insurers, and project stakeholders
What Should be Included in a Respiratory Protection Toolbox Talk?
There are no single global requirements that cover the exact format of a Respiratory Protection Toolbox Talk. Rather, requirements can vary across regions, industries, project types, and exposure standards. However, there are some core topics that are typically included that you should know about:
- Common airborne hazards such as dust, silica, fumes, vapours, gases, asbestos, and chemical mists
- Tasks that may require respiratory protection such as cutting, grinding, welding, spraying, sanding, demolition, and chemical handling
- Respirator selection requirements based on the hazard, exposure level, filter type, and task being performed
- Fit testing, seal checks, cleaning, storage, and replacement of filters or cartridges
- Worker responsibilities for wearing the correct respirator, checking for damage, and reporting breathing hazards
What Tasks Require Respiratory Protection?
Respiratory protection may be required when workers perform tasks that create dust, fumes, vapours, gases, mists, or other airborne hazards. This is especially important when the hazard cannot be fully controlled through safer materials, isolation, ventilation, extraction, or wet methods.
Common tasks include cutting, grinding, drilling, sanding, welding, spraying, demolition, asbestos removal, concrete work, chemical handling, and working in confined or poorly ventilated spaces. Essentially, respiratory protection should be selected based on the specific hazard, exposure level, task duration, and the type of filter, cartridge, or respirator needed for the work.
How to Build a Respiratory Protection Toolbox Talk
Building effective Respiratory Protection Toolbox Talk forms requires the right structure and information. In this section, we explain how to create your own toolbox talk forms from scratch.
Before starting your Respiratory Protection Toolbox Talk form, the following pre-requisites should be ready.
- Project or site details are required.
- Respiratory hazards and work activities must be listed.
- Required respirator types and filter needs must be stated.
- Fit testing and correct use requirements must be covered.
- Inspection, cleaning, and storage rules must be included.
- Breathing health, comfort, and reporting needs must be noted.
- Attendee names and signatures must be recorded.
Start with Toolbox Talk and Worksite Information
First, you need to place high-level general information at the beginning of your Respiratory Protection Toolbox Talk to help establish context for the discussion. Here are some examples of core elements that you can use:
- Project name and site location
- Date and time of the toolbox talk
- Work activity being discussed
- Respiratory hazard or task being covered
- Name and role of the person leading the talk
Identify Respiratory Hazards
It is important that potential respiratory hazards are identified before work starts so the appropriate safety control measures can be implemented. Common hazards that you should look out for include:
- Dust from cutting, grinding, drilling, or demolition
- Fumes from welding, cutting, or hot works
- Vapours from paints, solvents, fuels, or chemicals
- Gases from confined spaces, plant, or equipment
- Poor ventilation in enclosed or partially enclosed areas
Discuss Respiratory Protection Requirements
After the hazards are identified, you will want to determine the appropriate respiratory protection needed for the task. For example, you will want to cover the following information in your Respiratory Protection Toolbox Talk:
- Type of respirator or mask required for the task
- Filter, cartridge, or mask rating requirements
- Fit testing or seal checks, where required
- Limits of the selected respiratory protection
- When respiratory protection must be worn
Confirm Safe Use, Inspection, and Storage
Next, you will want to explain how respiratory protection should be used, checked, and stored before and during the work. Be sure to document the following information in your toolbox talk:
- Pre-use checks for damage, dirt, or missing parts
- Proper fit and seal before entering the work area
- Replacement of filters, cartridges, or disposable masks
- Clean storage away from dust, moisture, and chemicals
- Reporting damaged or unsuitable respiratory protection
Review Worker Duties and Site Rules
Confirming worker duties helps make sure everyone understands how respiratory protection must be used on site. This section should be practical and linked to the task being completed.
- Wear respiratory protection in designated areas
- Do not share reusable respirators unless they have been cleaned properly
- Leave the work area if breathing becomes difficult
- Report uncontrolled dust, fumes, vapours, or gases immediately
- Follow supervisor instructions and site safety procedures
Complete Attendance, Questions, and Sign-Off
Complete your toolbox talk with attendance, worker questions, and a sign-off section to confirm that the respiratory protection discussion was delivered and understood. Here are some examples of fields you can include:
- Names and signatures of attendees
- Questions or concerns raised by workers
- Actions assigned after the discussion
- Supervisor or facilitator sign-off
- Date and time of completion
Frequently asked questions
How to create Toolbox Talk Process in an App or Software System
A well-designed toolbox talk process ensures that workers are well-informed and well-equipped to deal with possible risks at the job site, and that your team can easily document and share outcomes of the talks.
15–20 minutes
Easy difficulty
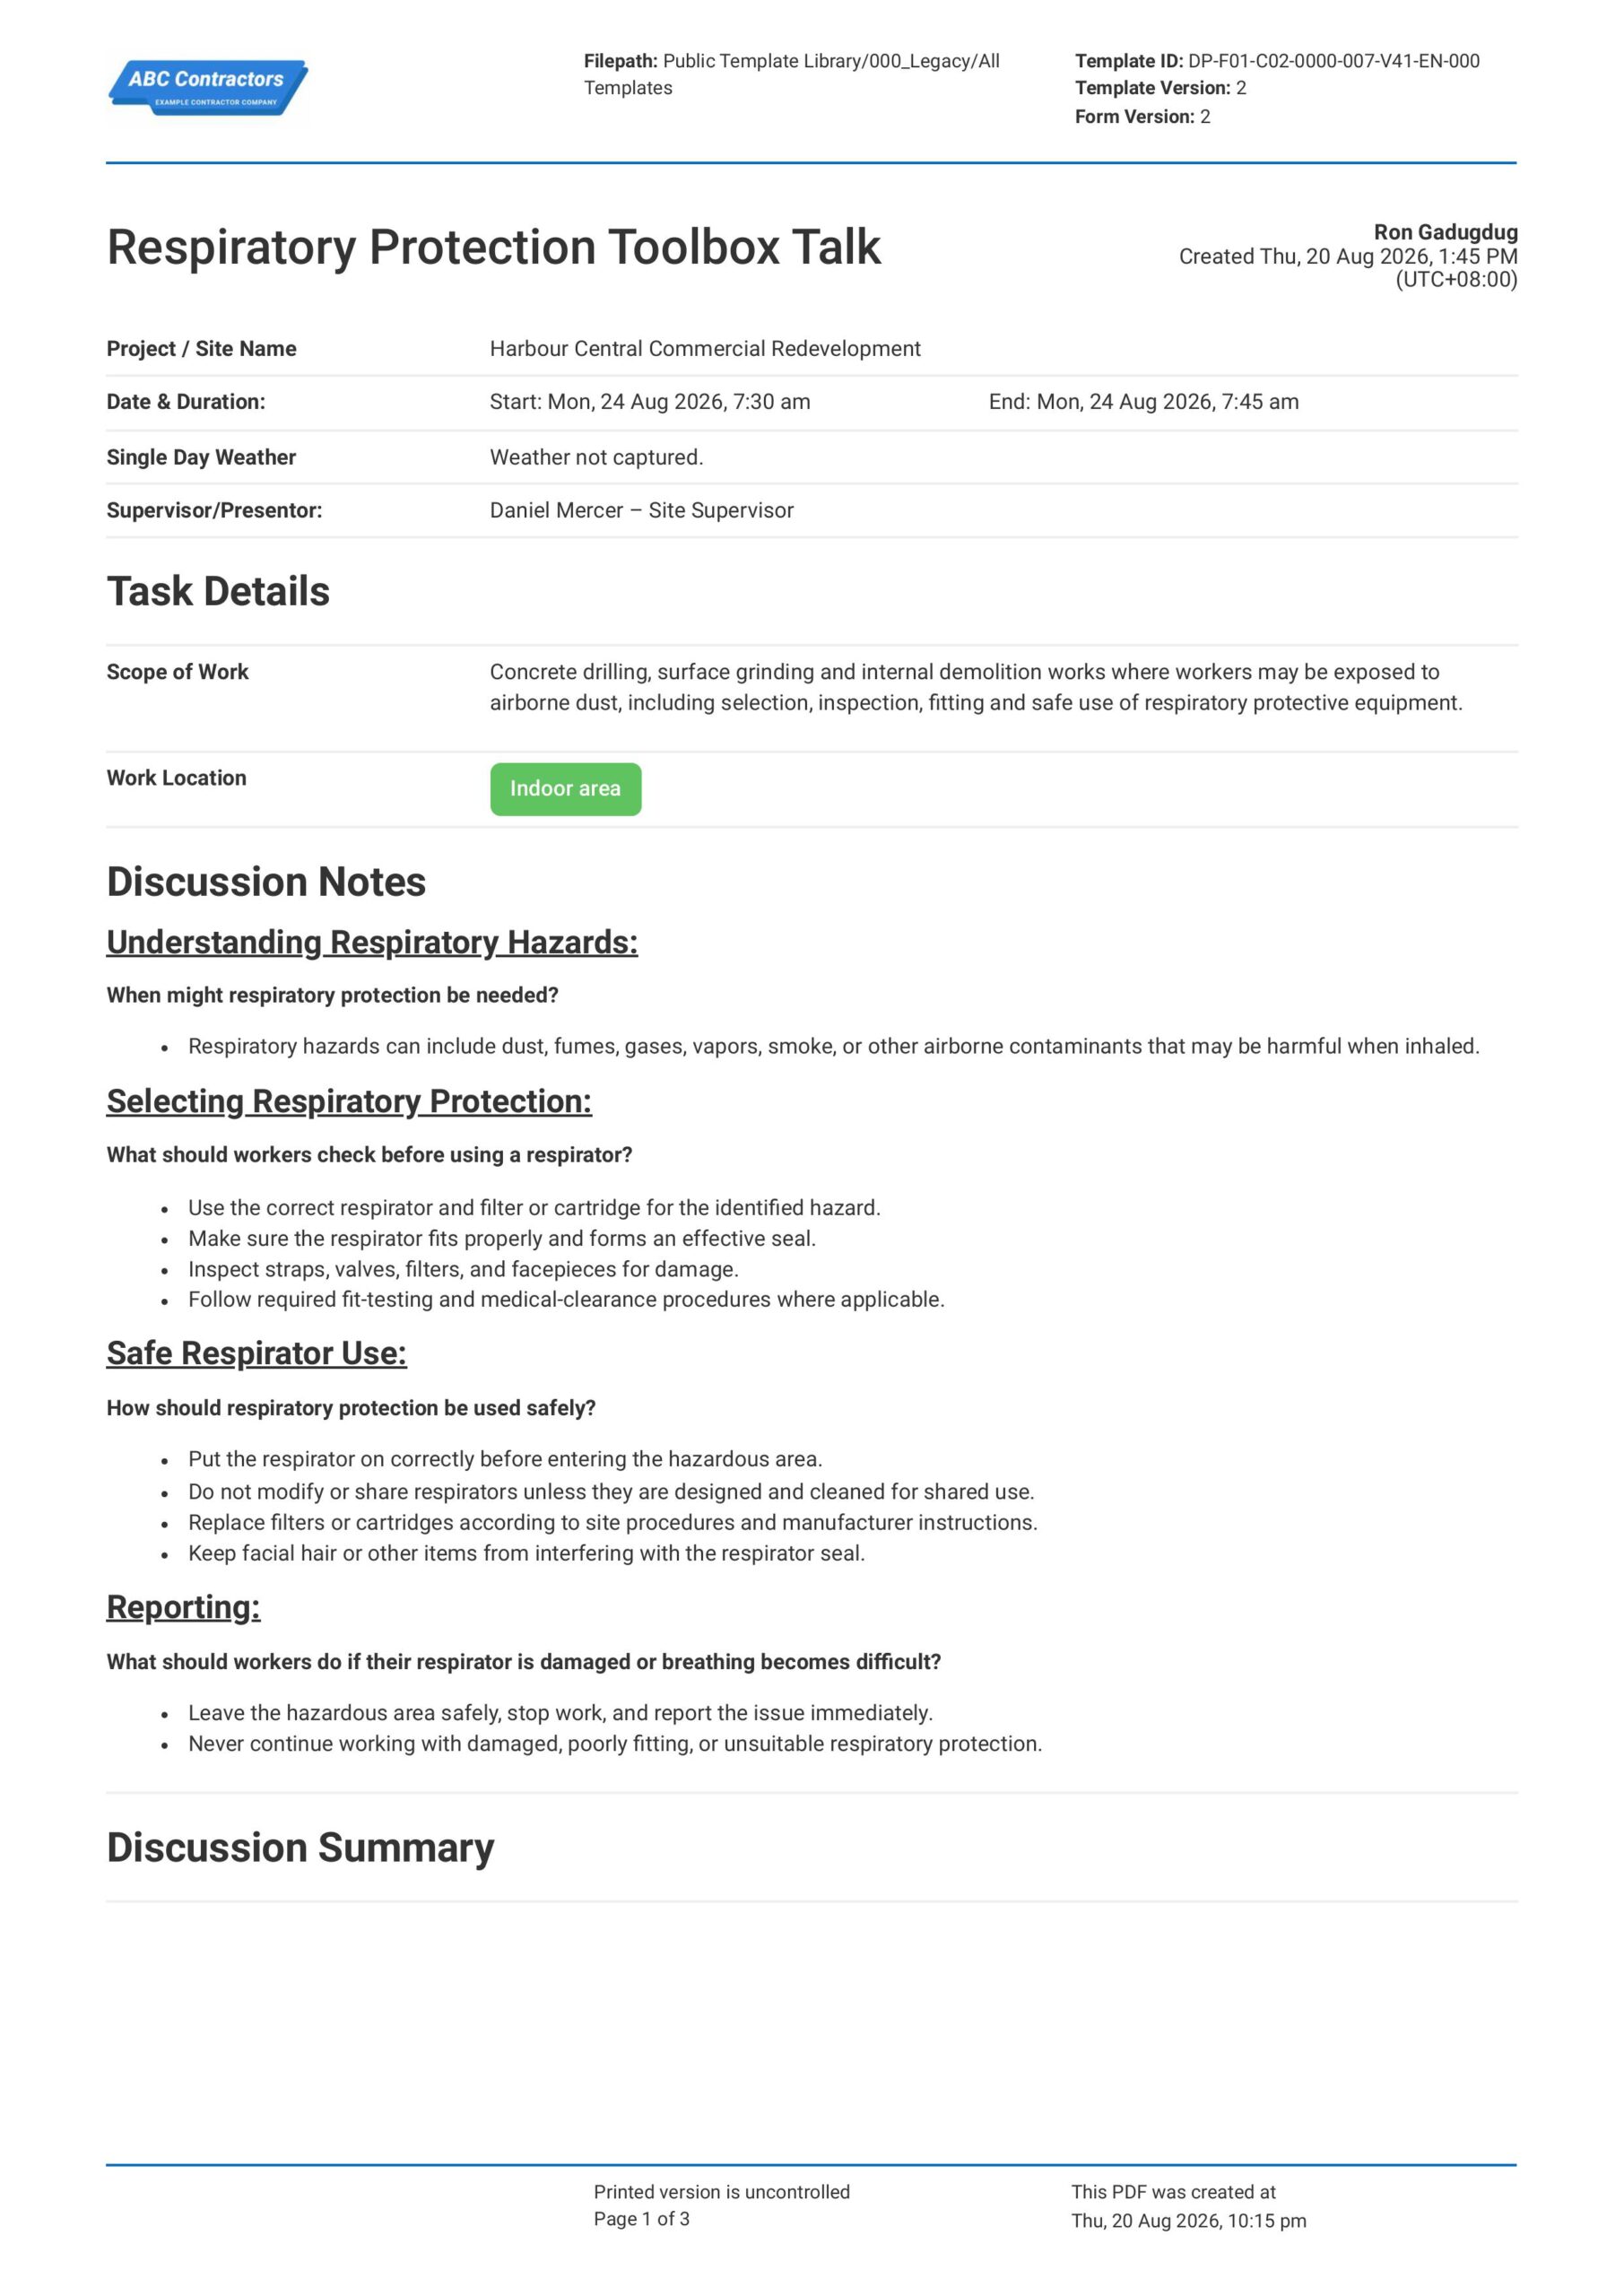
Start your Toolbox Talk with General Information and Task Details
It is important to begin your Respiratory Protection Toolbox Talk with key project, timing, supervisor, and work activity details so the talk can be traced to the correct site and crew. This section should use simple text, date, and location selector fields for fields such as:
- Text field for Project / Site Name
- Date and time selector fields for Date & Duration Start and End
- Text field for Single Day Weather
- Text field for Supervisor/Presenter
- Multi-line text field for Scope of Work, with a multiple-choice selector field for Work Location
Create a Section for Respiratory Protection Discussion Notes
Next, create a section where users can input discussion points they can use on all their respiratory protection toolbox talks. Presenters can use these notes to guide the talks, so be sure to add pre-filled text fields for:
- Understanding Respiratory Hazards and when respiratory protection may be needed
- Respiratory hazards, including dust, fumes, gases, smoke, and other airborne contaminants
- Respirator selection checks, including the correct respirator, filter, or cartridge for the identified hazard
- Pre-use checks for fit, seal, straps, valves, filters, facepieces, fit testing, and medical clearance where applicable
- Reporting requirements for damaged respirators, difficult breathing, poor fit, or unsuitable respiratory protection
Create a Table for the Topic Summary
Users will next need to list the main discussion topics that were discussed during the toolbox talk. We highly recommend using a table for this section, with the following formatting for the columns:
- First column for Discussion Topic
- Second column for Actions to be taken
- Third column for Person In Charge
- Fourth column for Due Date
- Fifth column for Comments
Create a Section for Notes or Concerns Raised by Attendees
After the topic summary, add fields where users can record whether workers raised any notes or concerns during the toolbox talk. If your software or app allows, we highly recommend using a Yes/No ticker field with conditional logic so the concern table only appears when attendees raise a concern.
- Yes/No field for if there were any notes or concerns raised by the attendees
- Conditional table for attendee concerns when Yes is selected
- First column for Concern
- Second column for Details
- Third column for Name of the attendee who raised the concern
Create a Section for Worker Attendance and Photos
Next, create an attendance section so the toolbox talk can record who attended, what role they had on site, and any photo evidence from the talk. We highly recommend using an automatic scan-to-sign-on table so each attendee can confirm their attendance in the same form, but alternatively have a manual sign-on table as well.
- Scan ID Sign-on table for Attendees
- Alternate Manual Sign-on Table for Personnel in Attendance with columns for Name, Position / Role, and Signature
- Company field for each attendee sign-on
- Automatic date and time stamp fields for each attendee sign-on
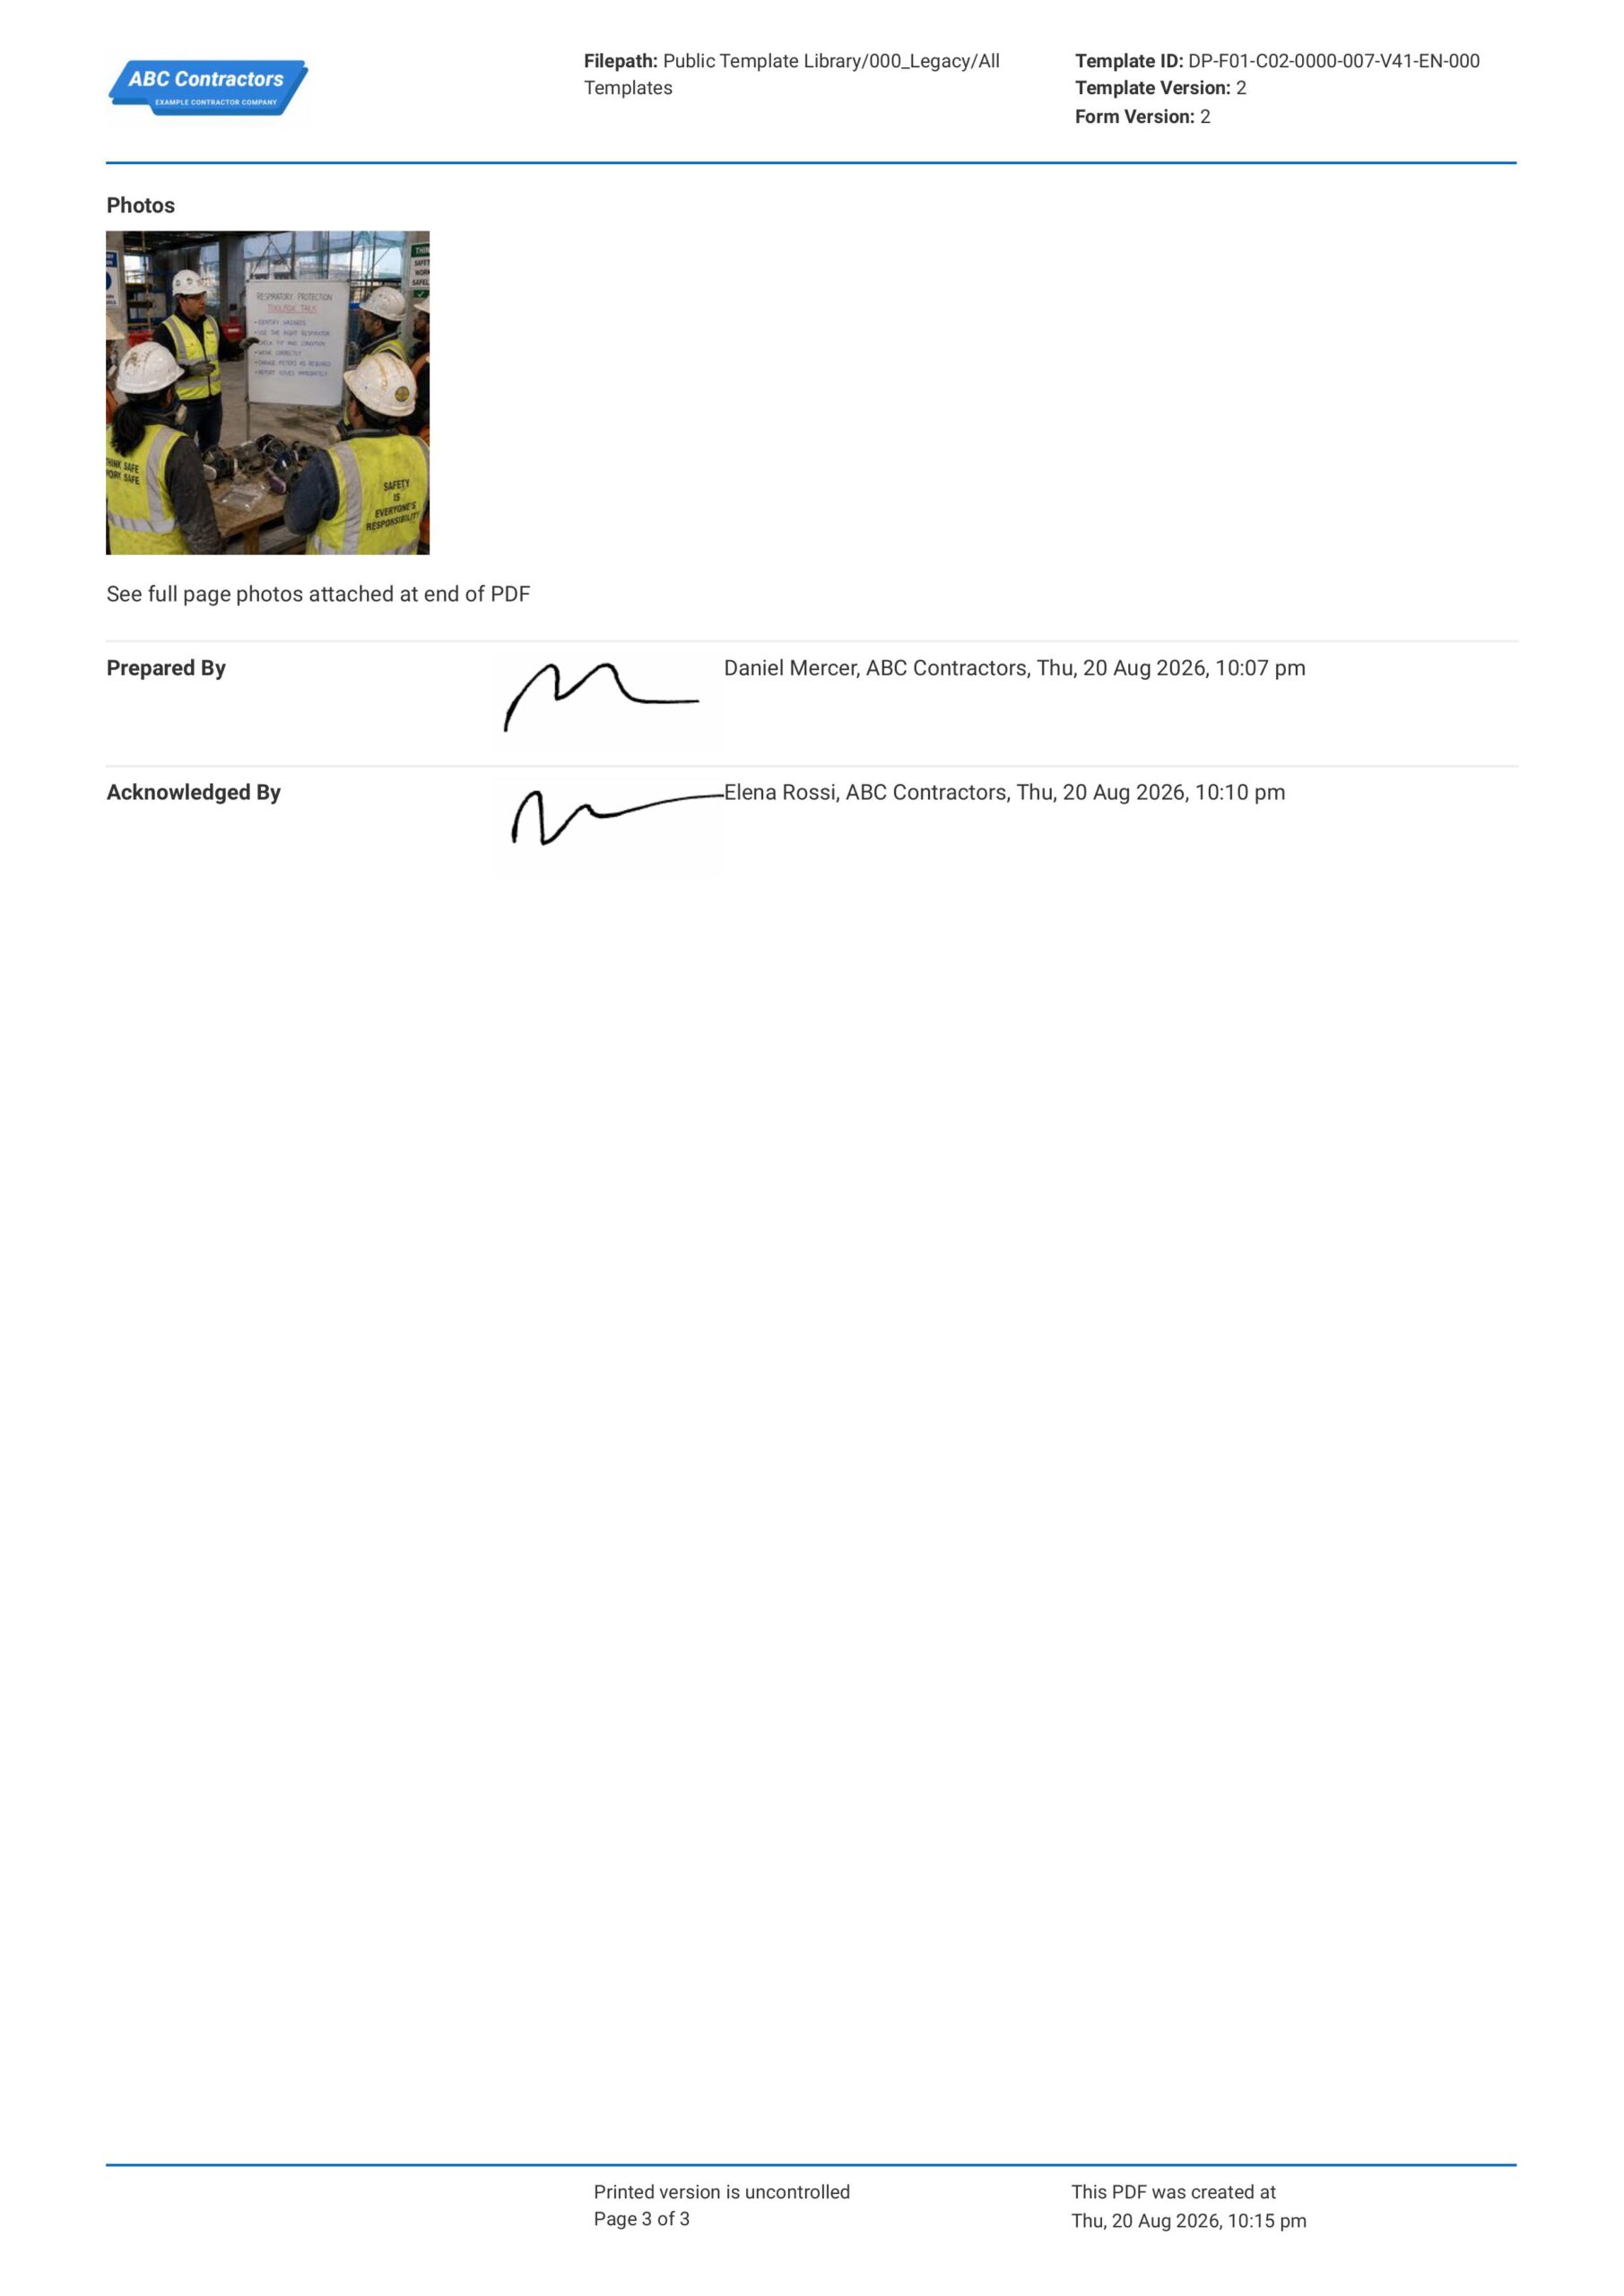
- Photo upload field for Photos
End your Toolbox Talk with Supervisor Sign-offs
Finally, complete the Respiratory Protection Toolbox Talk with sign-off fields for the personnel preparing and approving the talk. If your app or software allows, use automatic e-signature fields and include fields like:
- E-signature field for the team Supervisor or toolbox talk Presenter
- E-signature field for the Approver or Manager
- Automatic date and time stamp fields for each sign-off
About the author

Ron Gadugdug
Engineering Content Writer

Education:
Cebu Institute of Technology - University - Civil Engineering
Bio:
Ron is a Civil Engineer with 6 years of experience in the construction industry, primarily focused on quantity surveying, cost estimation, project management, quality control, contract administration, and property & engineering insurance. At Sitemate, he writes about practical applications of evolving technologies and digital solutions that support construction professionals in improving efficiency, compliance, and project delivery across the built world.
Project Details:
Quantity Surveying & Cost Engineering
Performed quantity take-offs of several high-rise and horizontal structures using sheets and applications like Revit and Bluebeam Revu, and spearheaded trials with Building Information Modeling (BIM) software.
Project Management & Consultancy
Coordinated with project management teams during the construction of local projects such as a 4-tower hotel & resort, a 22 storey condominium project, and a school dormitory project.
Contract Administration
Assisted during contract biddings and negotiations with general contractors and sub-contractors, and oversaw progress reporting, billings, and payment.
Property & Engineering Insurance
Dedicated non-life claims handler, overseeing property and contractor all-risk insurance claims, risk management, and bonds.
Version History:
Other popular templates you can use and edit for free

This toolbox talk form was generated with Dashpivot software
- Access, edit and complete your Toolbox Talk Process from any device - mobile, tablet or computer.
- Print, download or send your Toolbox Talk Process as perfectly formatted PDF documents with your company logo.
- Store your Toolbox Talk Process securely online, where they can be searched and found in seconds
- Invite internal and external parties to see, edit and sign off on Toolbox Talk Process online.

 English (United States)
  English (Australia)
  English (UK)
  English (New Zealand)
  English (South Africa)
  German