Excavation Safe Work Method Statement Template

Start with a free 30-day trial. No credit card required.
Looking for a ready-to-use Excavation Safe Work Method Statement that still fits how your team works? This template comes pre-written with the sections an excavation SWMS needs, including scope of work, training and responsibilities, plant and equipment, underground services verification, a job step risk assessment, a pre-start checklist, and emergency contacts, so your team is not starting from a blank page. You can edit any part of it to match your site conditions, excavation depth, and equipment, and the finished document will still hold up against the Australian and New Zealand health and safety regulations you would be audited on.
This Excavation Safe Work Method Statement, or Excavation SWMS, is an easy-to-use form that your workers can use to plan and control the hazards of trenching and excavation work before digging begins. Workers can confirm underground services have been located, record the plant and equipment involved, work through each job step with its hazards, risk ratings, and control measures, complete the pre-start checklist, and collect the required sign-offs in one organised record.
 100% fully editable Excavation Safe Work Method Statement
Export your Excavation Safe Work Method Statement to PDF or CSV
Access your Excavation Safe Work Method Statement on mobile, tablet or computer
Trusted by companies, projects and teams of all sizes















What is Excavation Safe Work Method Statement?
An Excavation Safe Work Method Statement is a document that improves the excavation operations of a company because it helps them standardise the control measures and best practices aligned with the standards and regulations they follow. Every type of work or activity related to excavation should follow the proper safety procedures as written in an Excavation Safe Work Method Statement to keep everyone safe and mitigate the risks and hazards of this high-risk activity.
Compare this digital Excavation Safe Work Method Statement to traditional Word/Excel documents
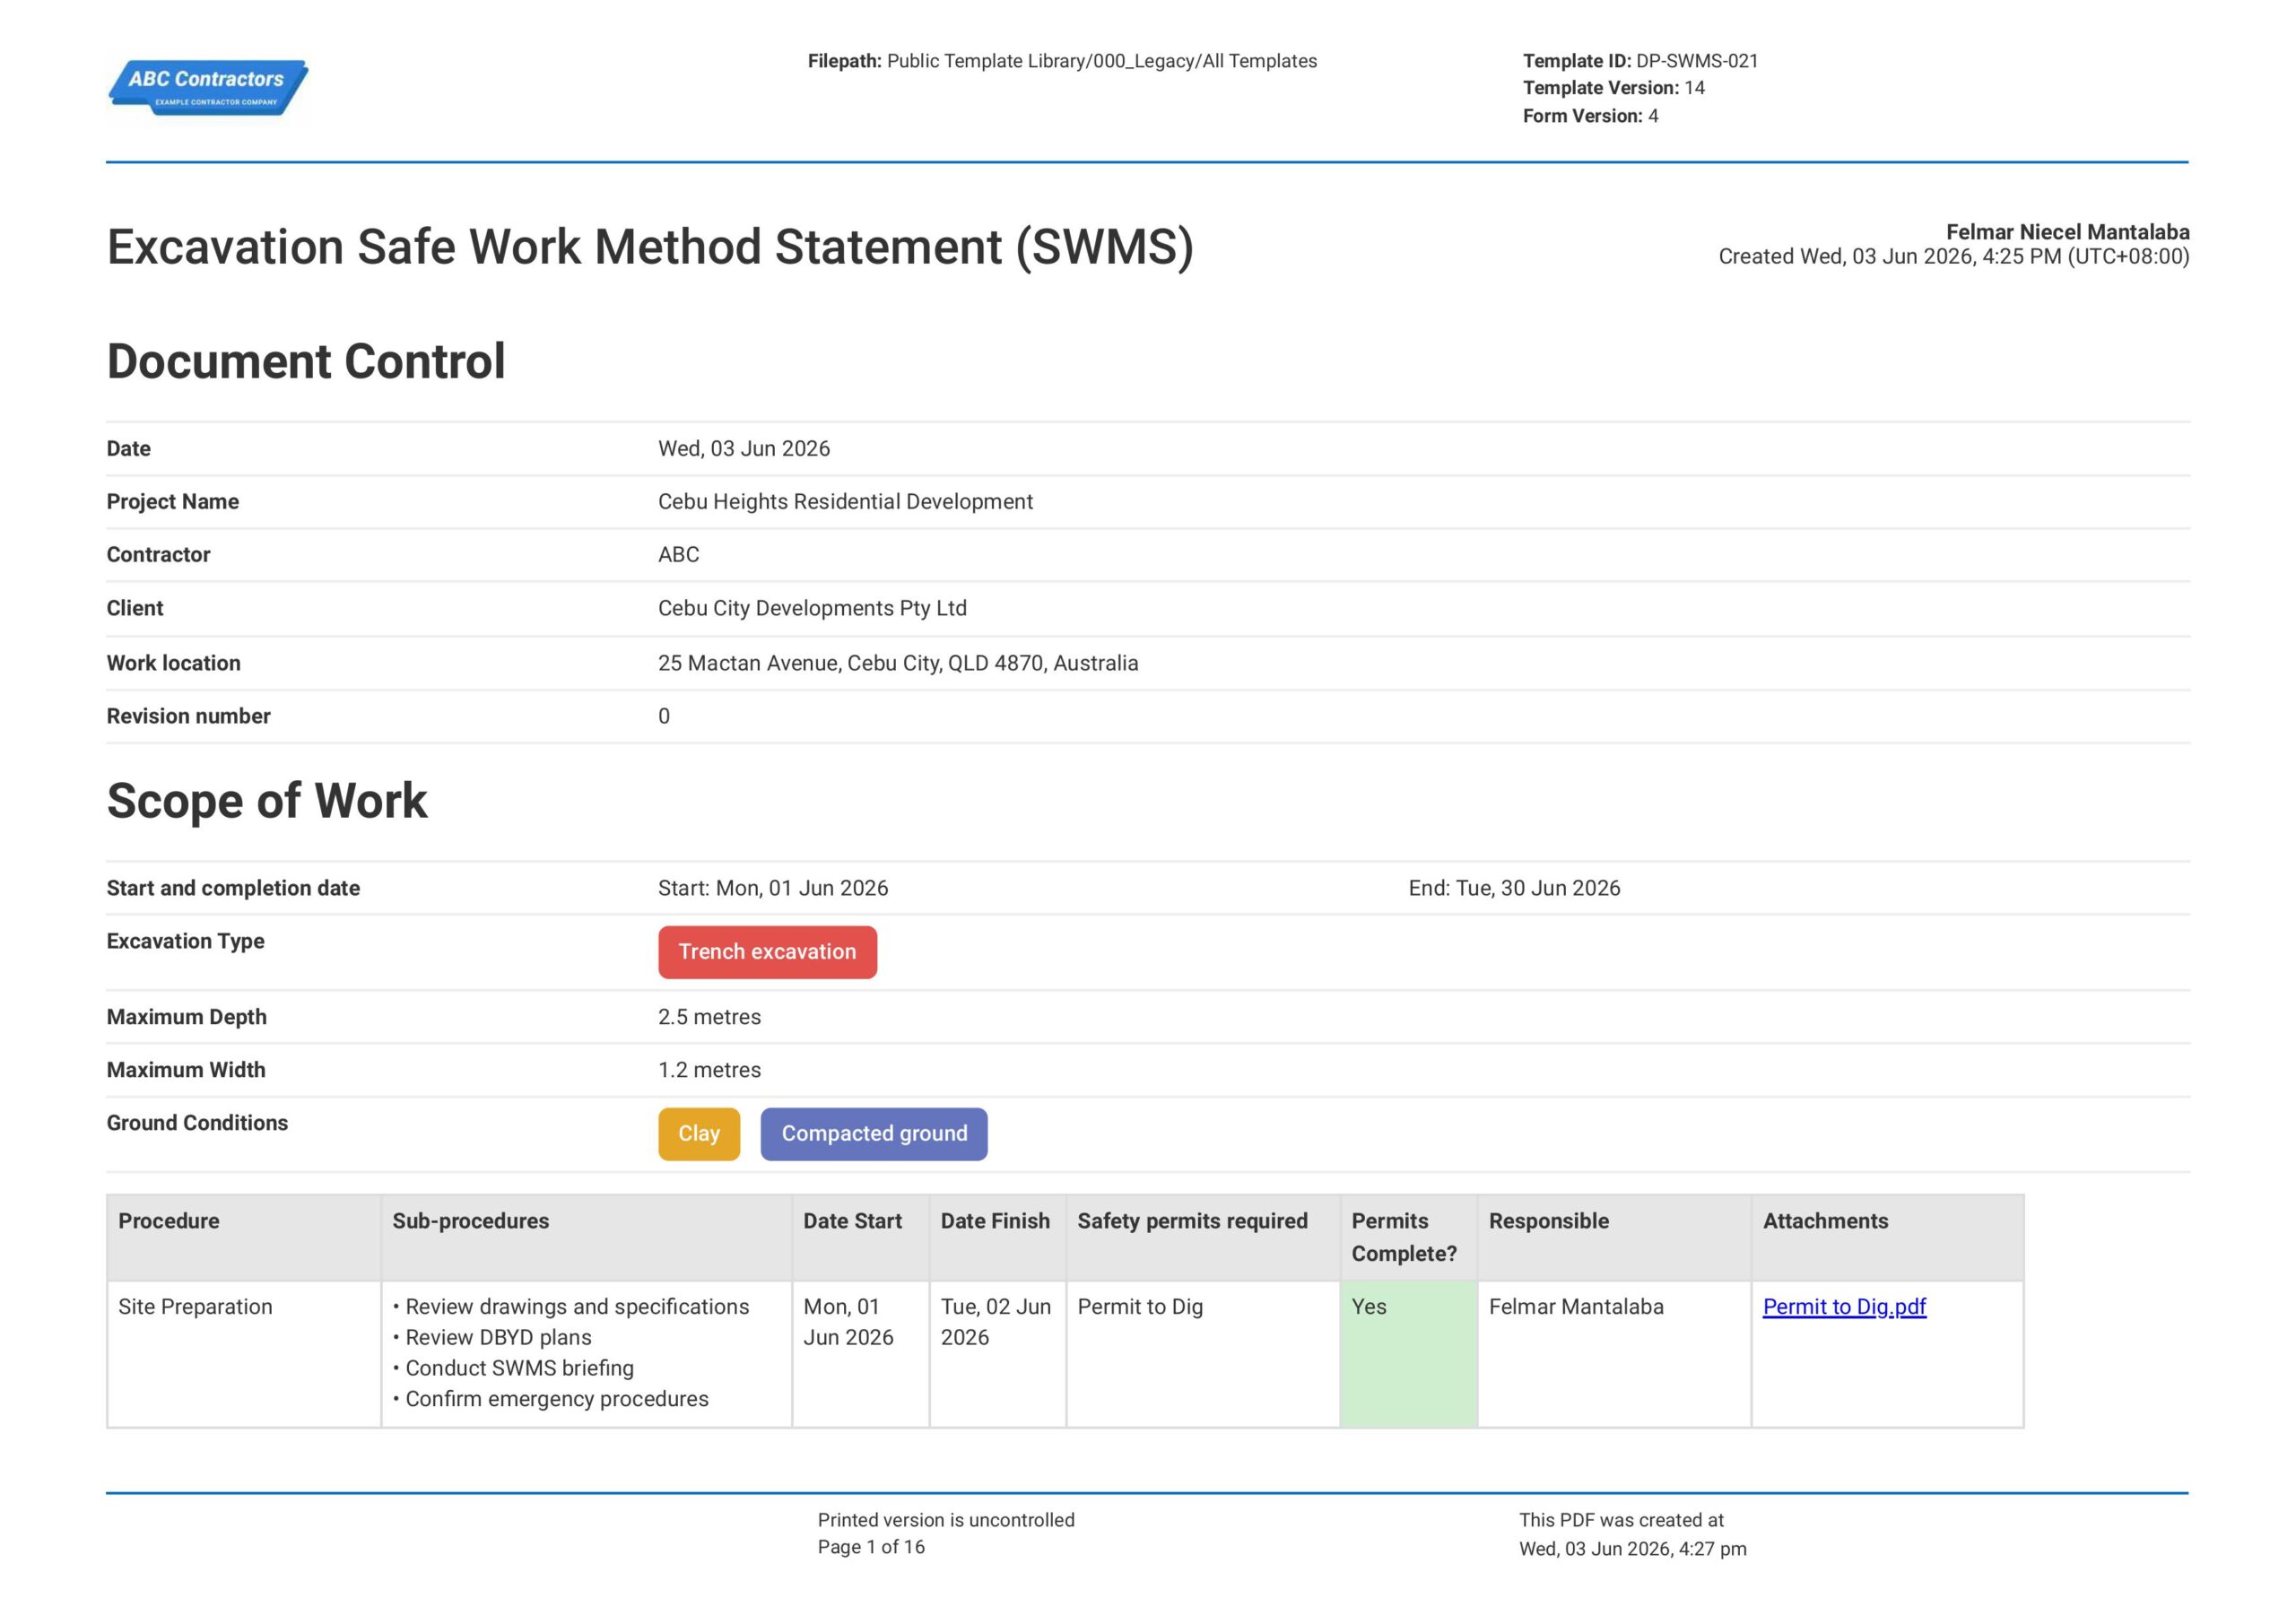
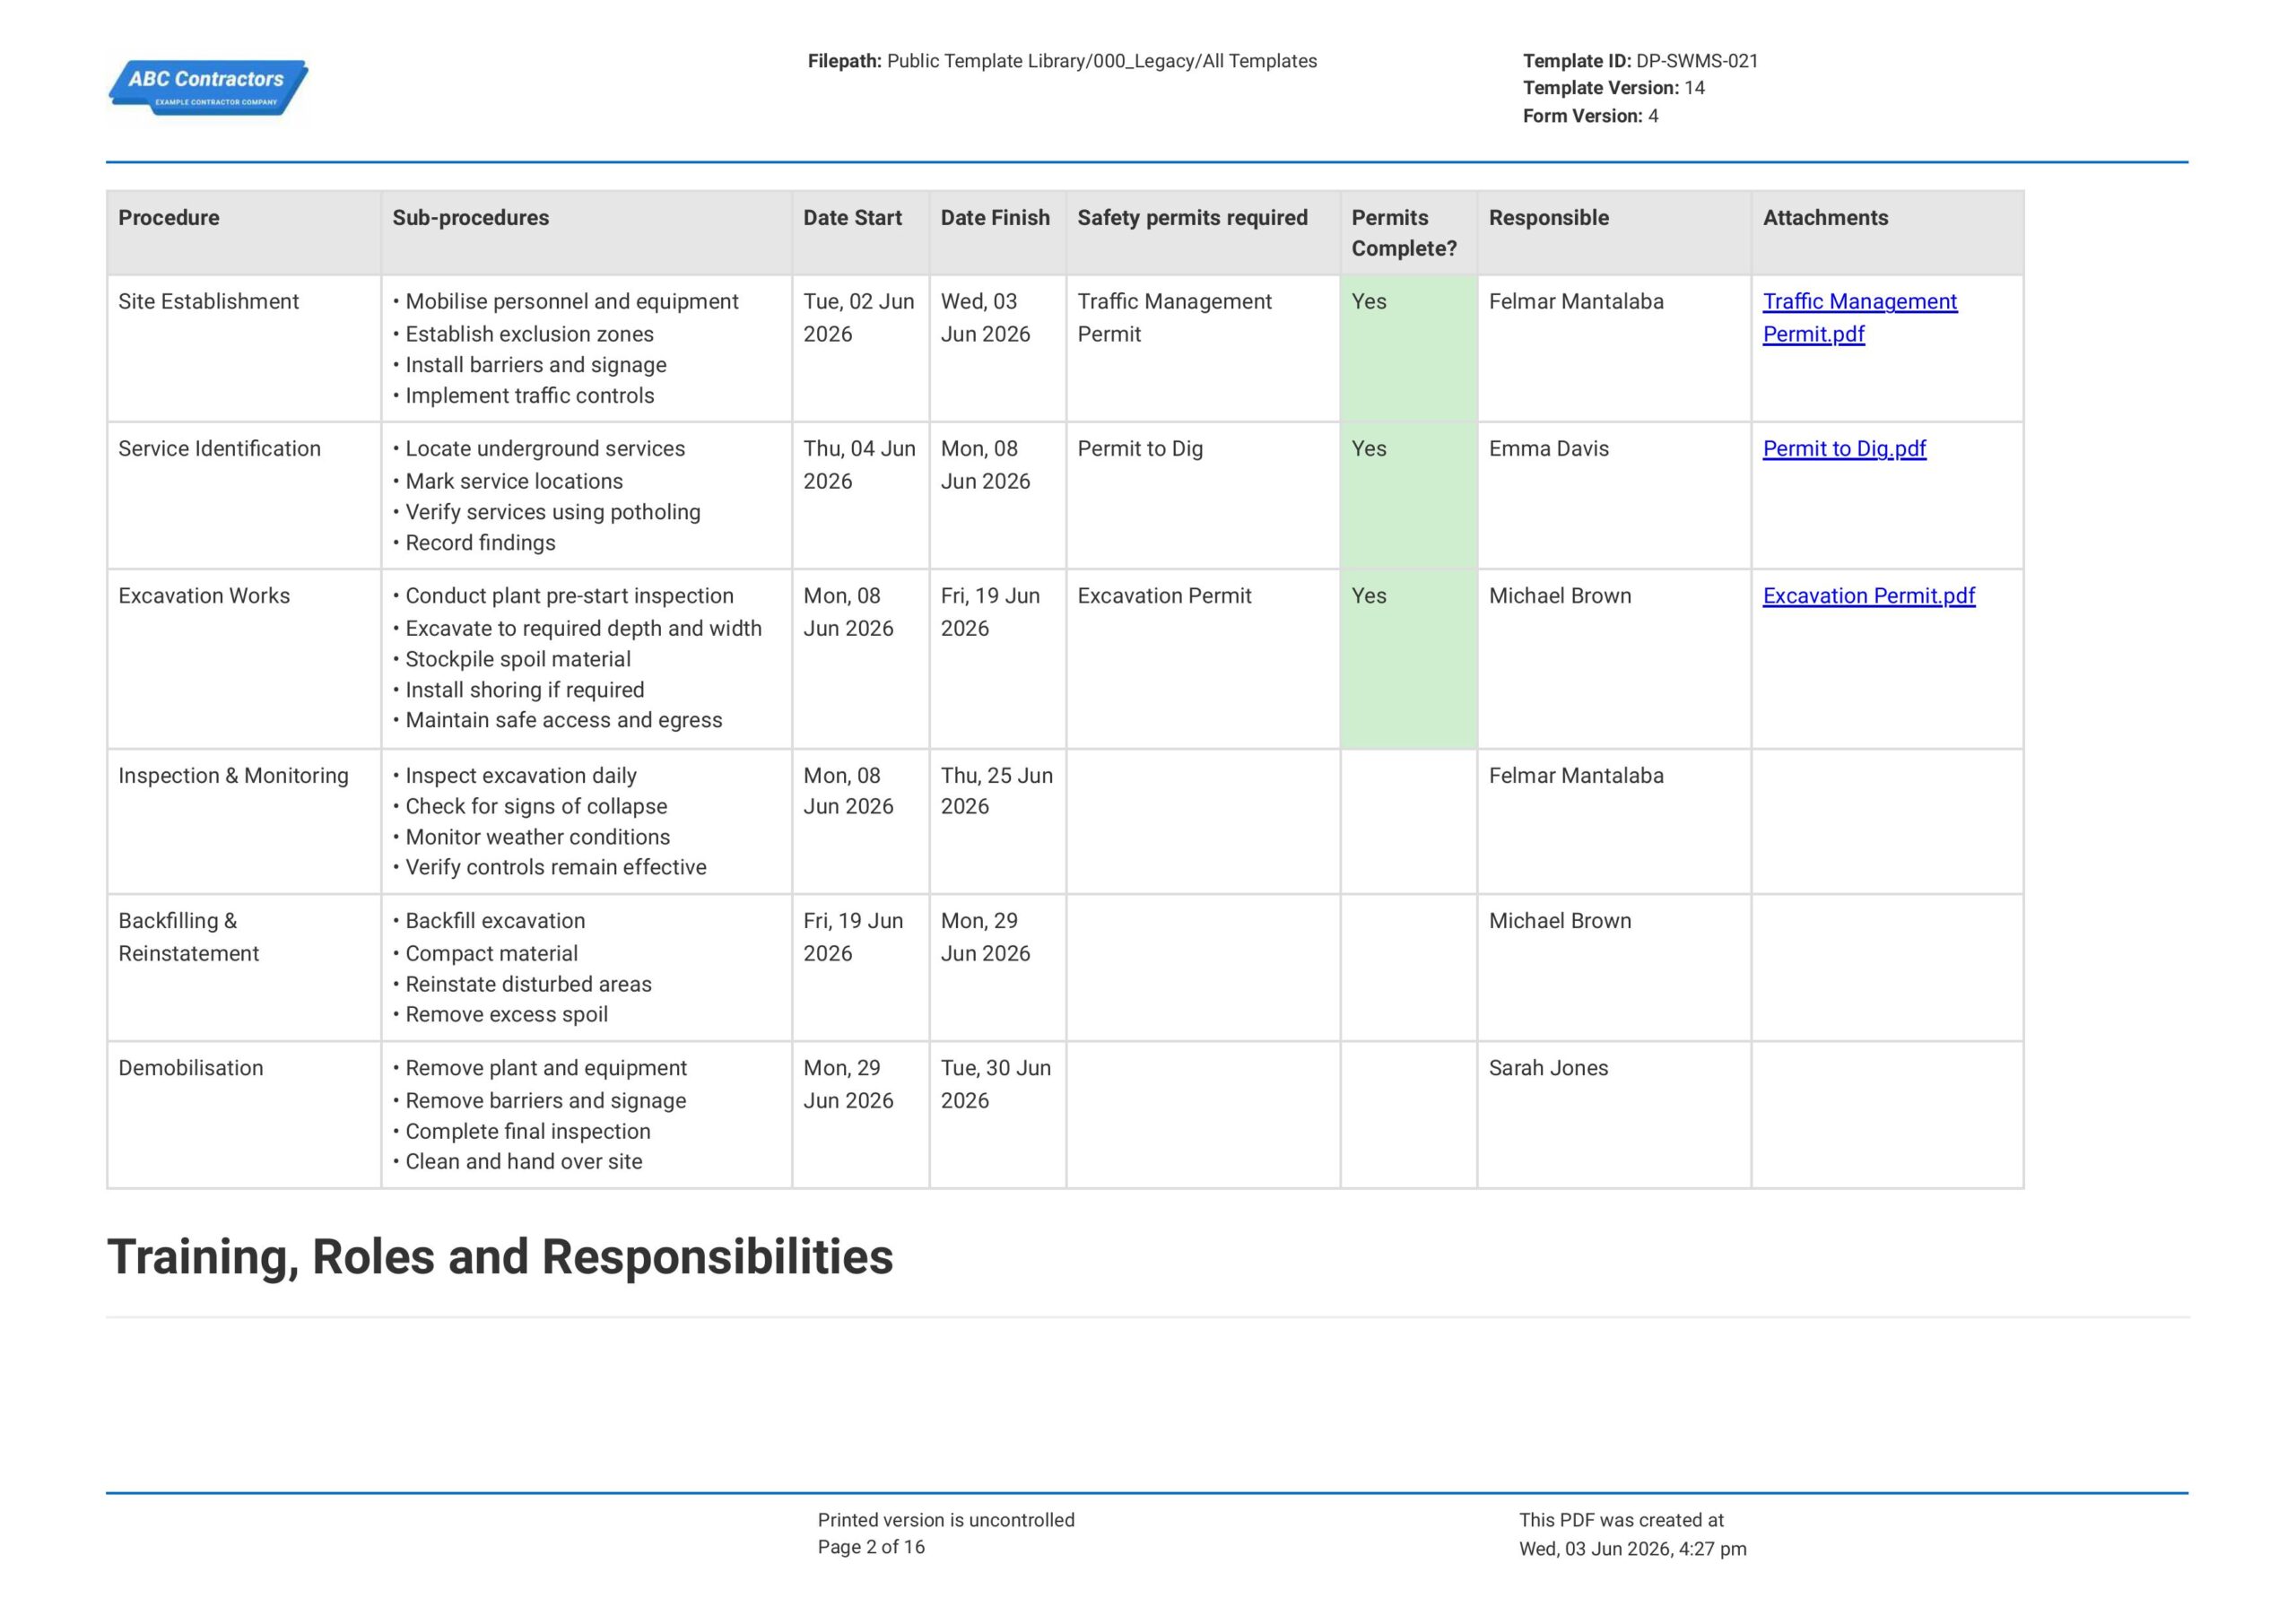
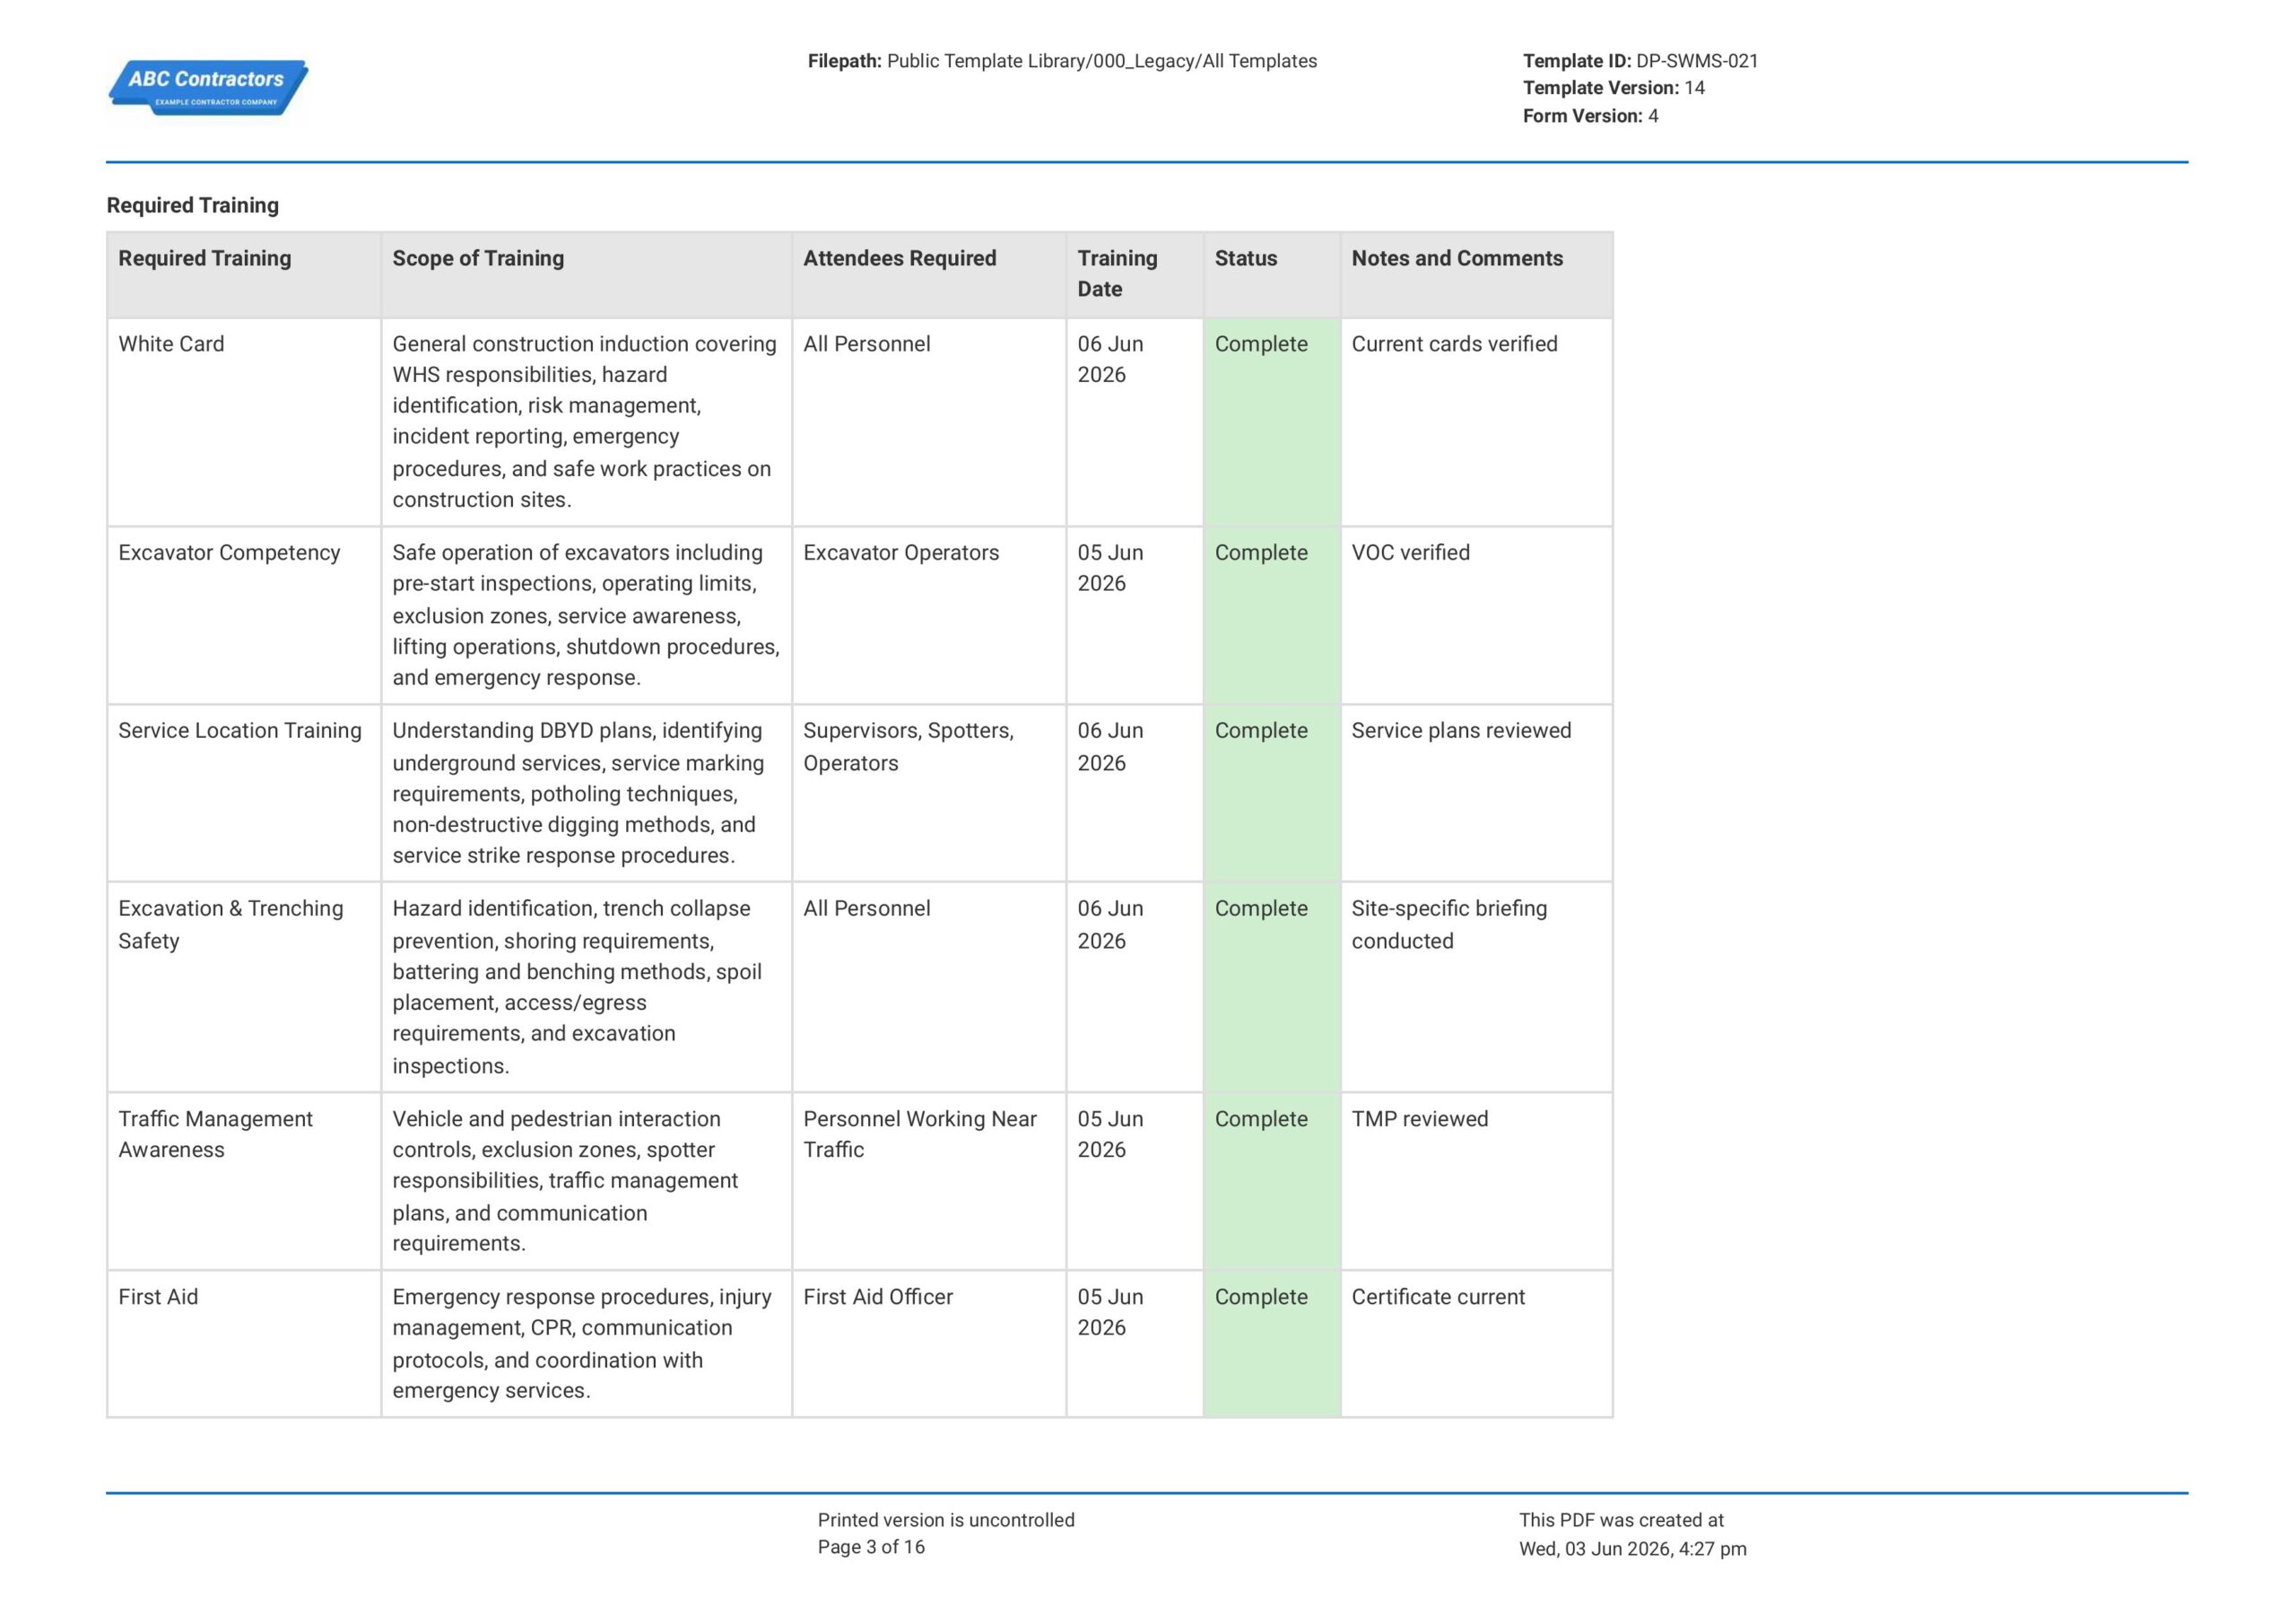
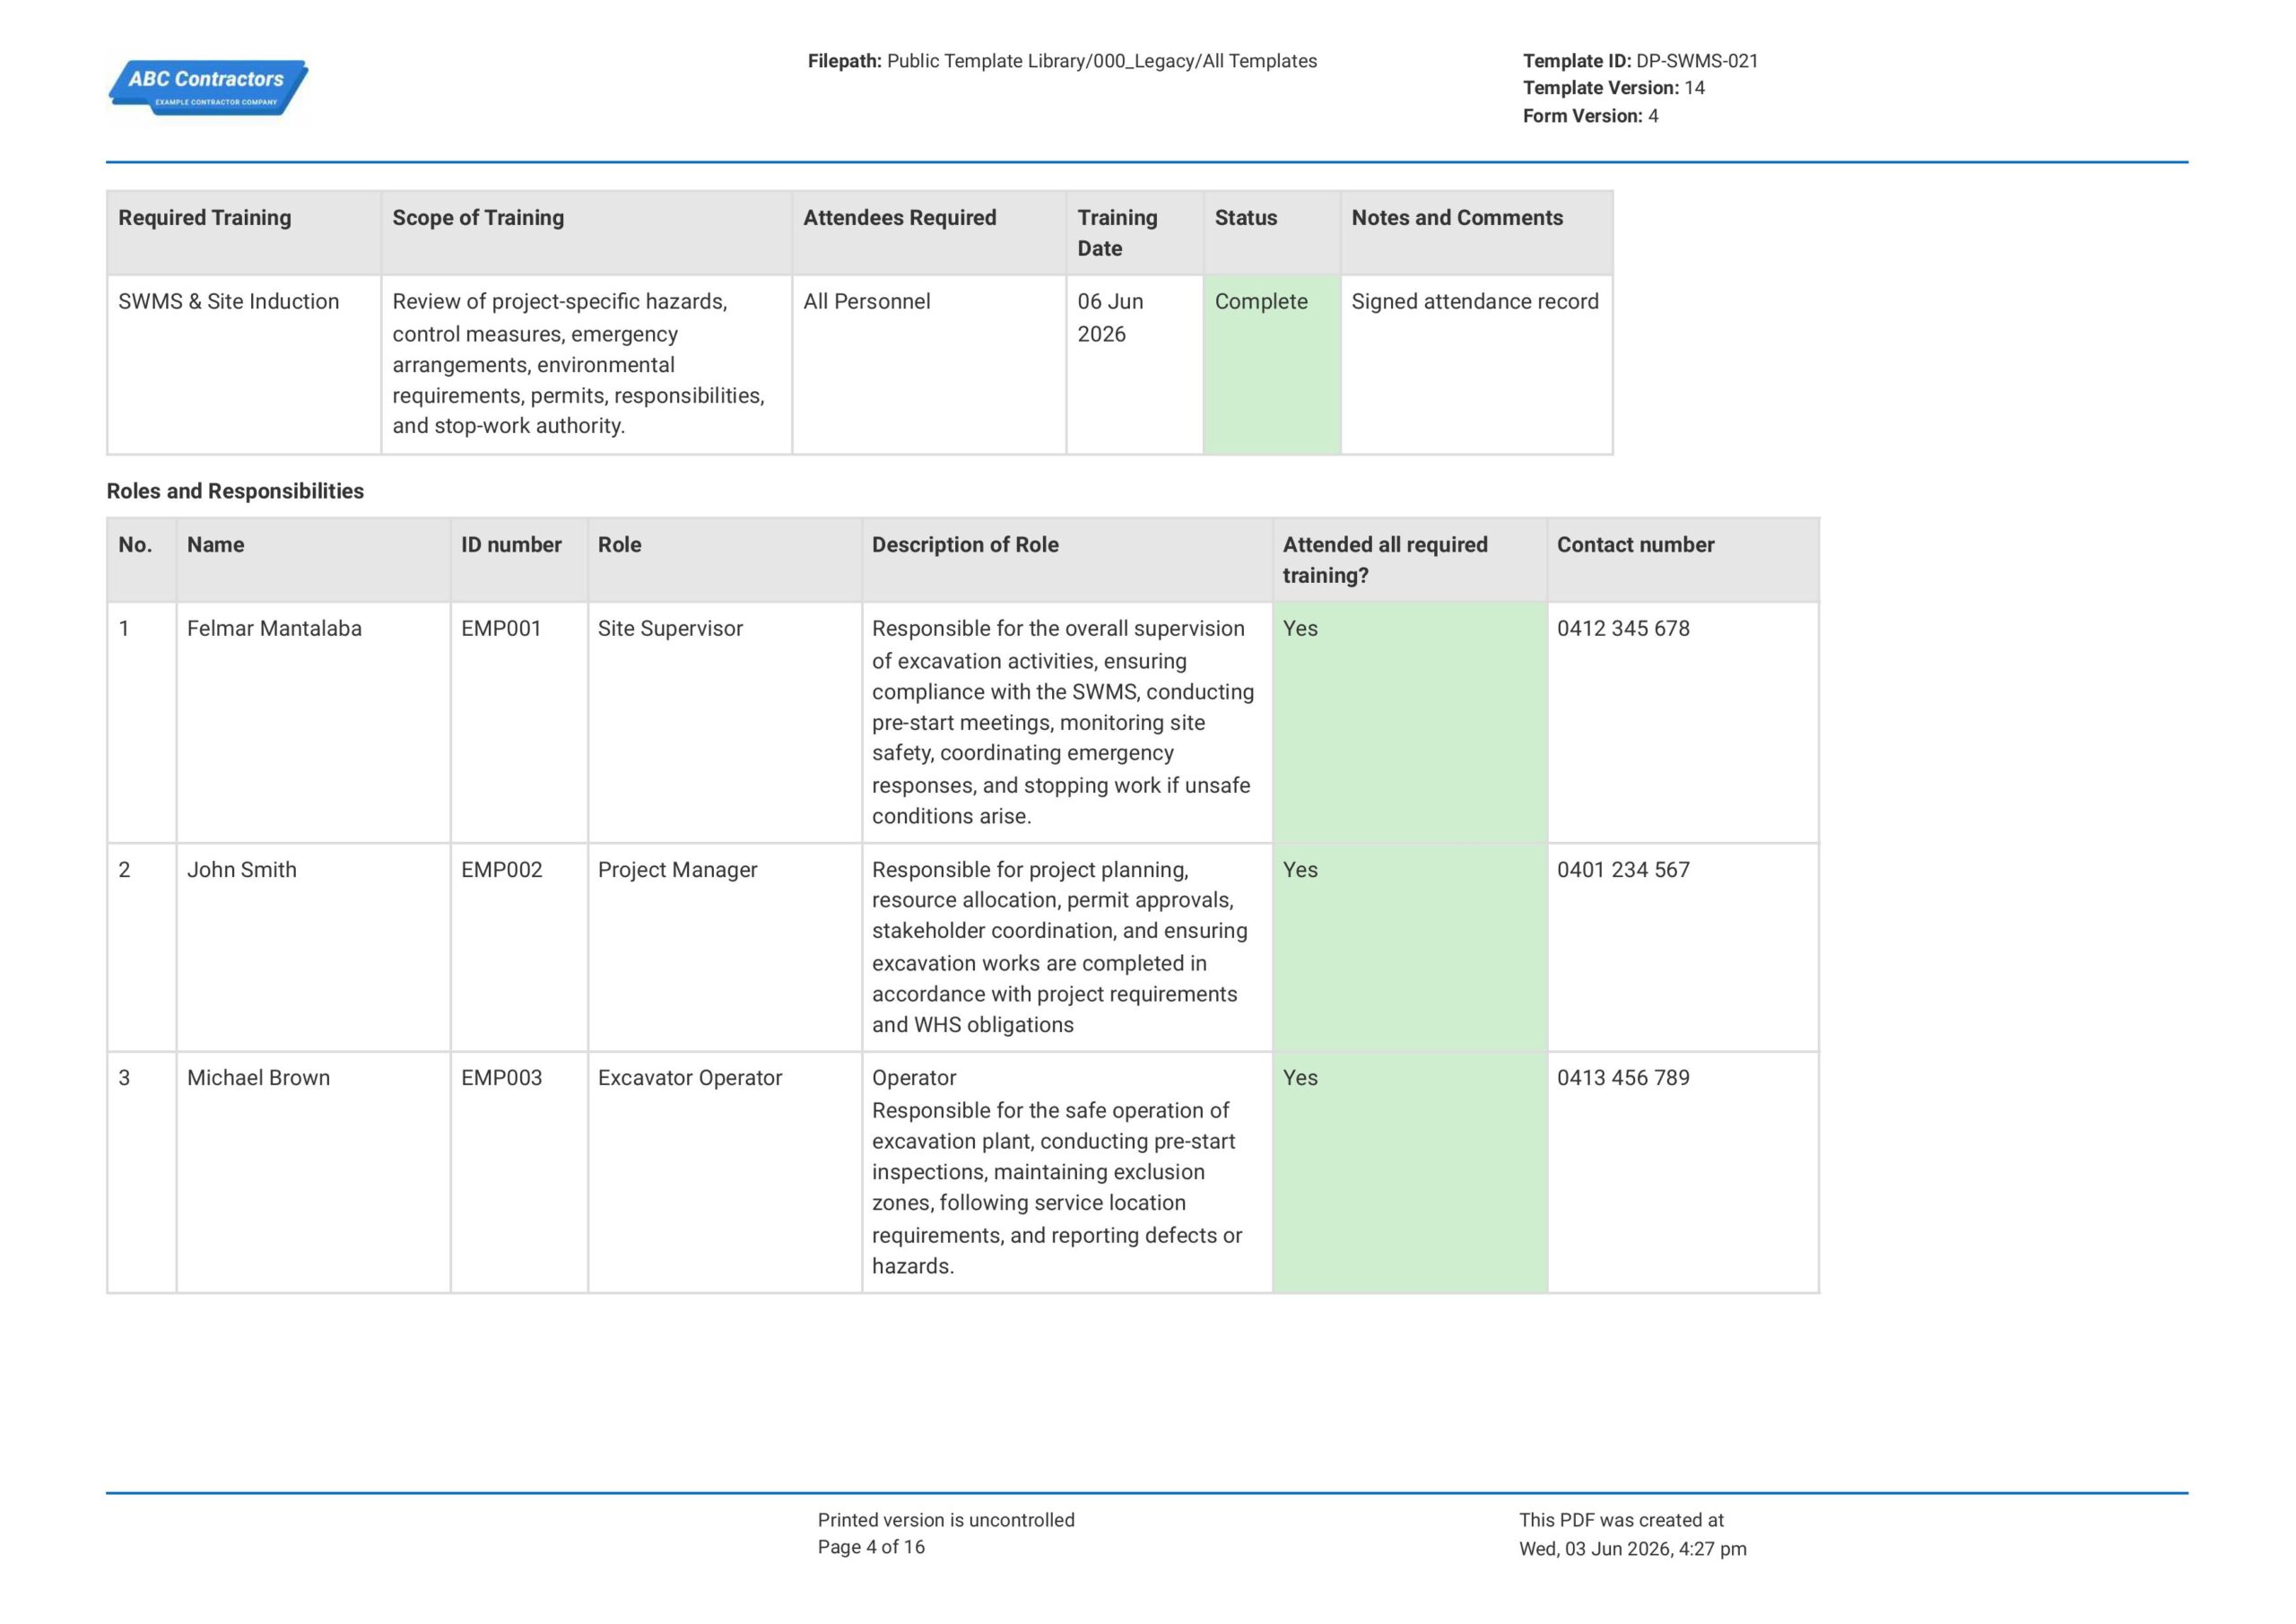
Curious how this Excavation Safe Work Method Statement works? Check out the example below to see exactly what comes pre-filled and how the form is structured across job steps, hazards, and control measures for excavation work. You can generate your own version, export it as your own custom form, and fill in your site and company details to have a ready-to-use Excavation SWMS in minutes.
Use this Excavation Safe Work Method Statement template for free

Generate this template automatically with Storm
You don't have to build the Excavation Safe Work Method Statement field by field. Let Storm, the AI Data Capture Agent inside Dashpivot, build the template for you in seconds.
Describe what you need
Tell Storm the form you want in plain language and it builds a structured digital template from scratch, with fields, tables, and signatures in place.
Upload what you already use
Drop in your existing PDF, Word, Excel, or even a photo of a paper form. Storm rebuilds it as a smart digital template with the structure intact.
 Storm
Storm
Generate a Excavation Safe Work Method Statement form template that I can use for my business
Applicable Standards and Policies for Excavation Safe Work Method Statement
Excavation activities are relatively hazardous, which is why regulatory bodies in Australia and New Zealand require businesses to take concrete actions and control measures to isolate and remove hazards. These have become mandatory requirements, as stated in the following provisions in Australia and New Zealand that require an Excavation SWMS:
- WHS Regulation 2011, Regulation 299—This provision in Australia requires establishments to create a Safe Work Method Statement for high-risk construction work.
- WHS Regulation 2011, Regulation 291—This is a provision in Australia that defines and classifies high-risk construction work, which also includes excavation work deeper than 1.5 meters.
- WHS Regulation 2011, Regulation 304—This provision in Australia lays out the requirements for identifying underground services before any excavation work.
- Health and Safety at Work Act (HSWA) 2015, section 30—This is a provision in New Zealand that describes the requirements to control risks that affect health and safety.
- Health and Safety at Work Act (HSWA) 2015, section 36—This legislation is a provision in New Zealand that requires persons conducting a business or undertaking to ensure the health and safety of workers affected by the hazards found at work.
Staff Members and Parties that use Excavation Safe Work Method Statement
The effectiveness of creating and completing an Excavation Safe Work Method Statement relies heavily on the involvement of the following staff members:
- Project Manager: The project manager oversees operational requirements on a high level. He is responsible for ensuring sufficient resources, planning, and compliance requirements (quality, health, and safety) are effectively in place.
- Site Manager: Their role includes planning and managing safety in the workplace, which is why it is their responsibility to implement the SWMS. They review and approve the SWMS, especially for the excavation requirements.
- Operators: Operators are the primary controllers of the machinery used in each shift activity. Part of their duty is to guarantee that the machine performs smoothly and safely throughout each activity; therefore, their participation in creating and completing the SWMS is essential. Their exposure and firsthand knowledge of the machinery also enable them to provide diverse perspectives on the observable hazards encountered when operating machines.
- Safety Officers: These are the individuals who assess the effectiveness and efficiency of controls offered in all activities, particularly those involving machines. It is their responsibility to guarantee that safety management measures are adequate and sufficient to protect all workers engaging in machine-related activities.
Business Risks Reduced by Excavation Safe Work Method Statement
Keeping everyone safe also means keeping the business safe. Employers must commit to the duty to protect the firm against various hazards, in addition to the employees, who are the company’s lifeblood. Committing to the practice of conducting risk assessments for machines lowers the following business risks:
- Increased expense owing to unanticipated downtime.
- Increased expense due to accidents and injuries.
- Increased expense owing to non-compliance with regulations.
- Increased rate of lost time incidents (LTI).
- Delayed timetables and deadlines
- Negative impact on company reputation
Business Opportunities Created by Excavation Safe Work Method Statement
The Excavation Safe Work Method Statement can provide all of the necessary safety measures to adequately safeguard employees from potential hazards during excavation activities. However, compliance with this assessment provides more than just protection. Businesses can greatly benefit from this simple yet effective tool. Compliance with this evaluation creates the following commercial opportunities:
- More cost savings over time.
- Longer machine life
- Lower insurance premiums
- Stronger relationships among employers, employees, and stakeholders.
- Better output quality.
- Enhances the company’s reputation
Essential Elements for Excavation Safe Work Method Statement Completion
These are the sections that must be found inside an Excavation Safe Work Method Statement:
- Document control information
- Scope of work
- Training, roles, and responsibilities
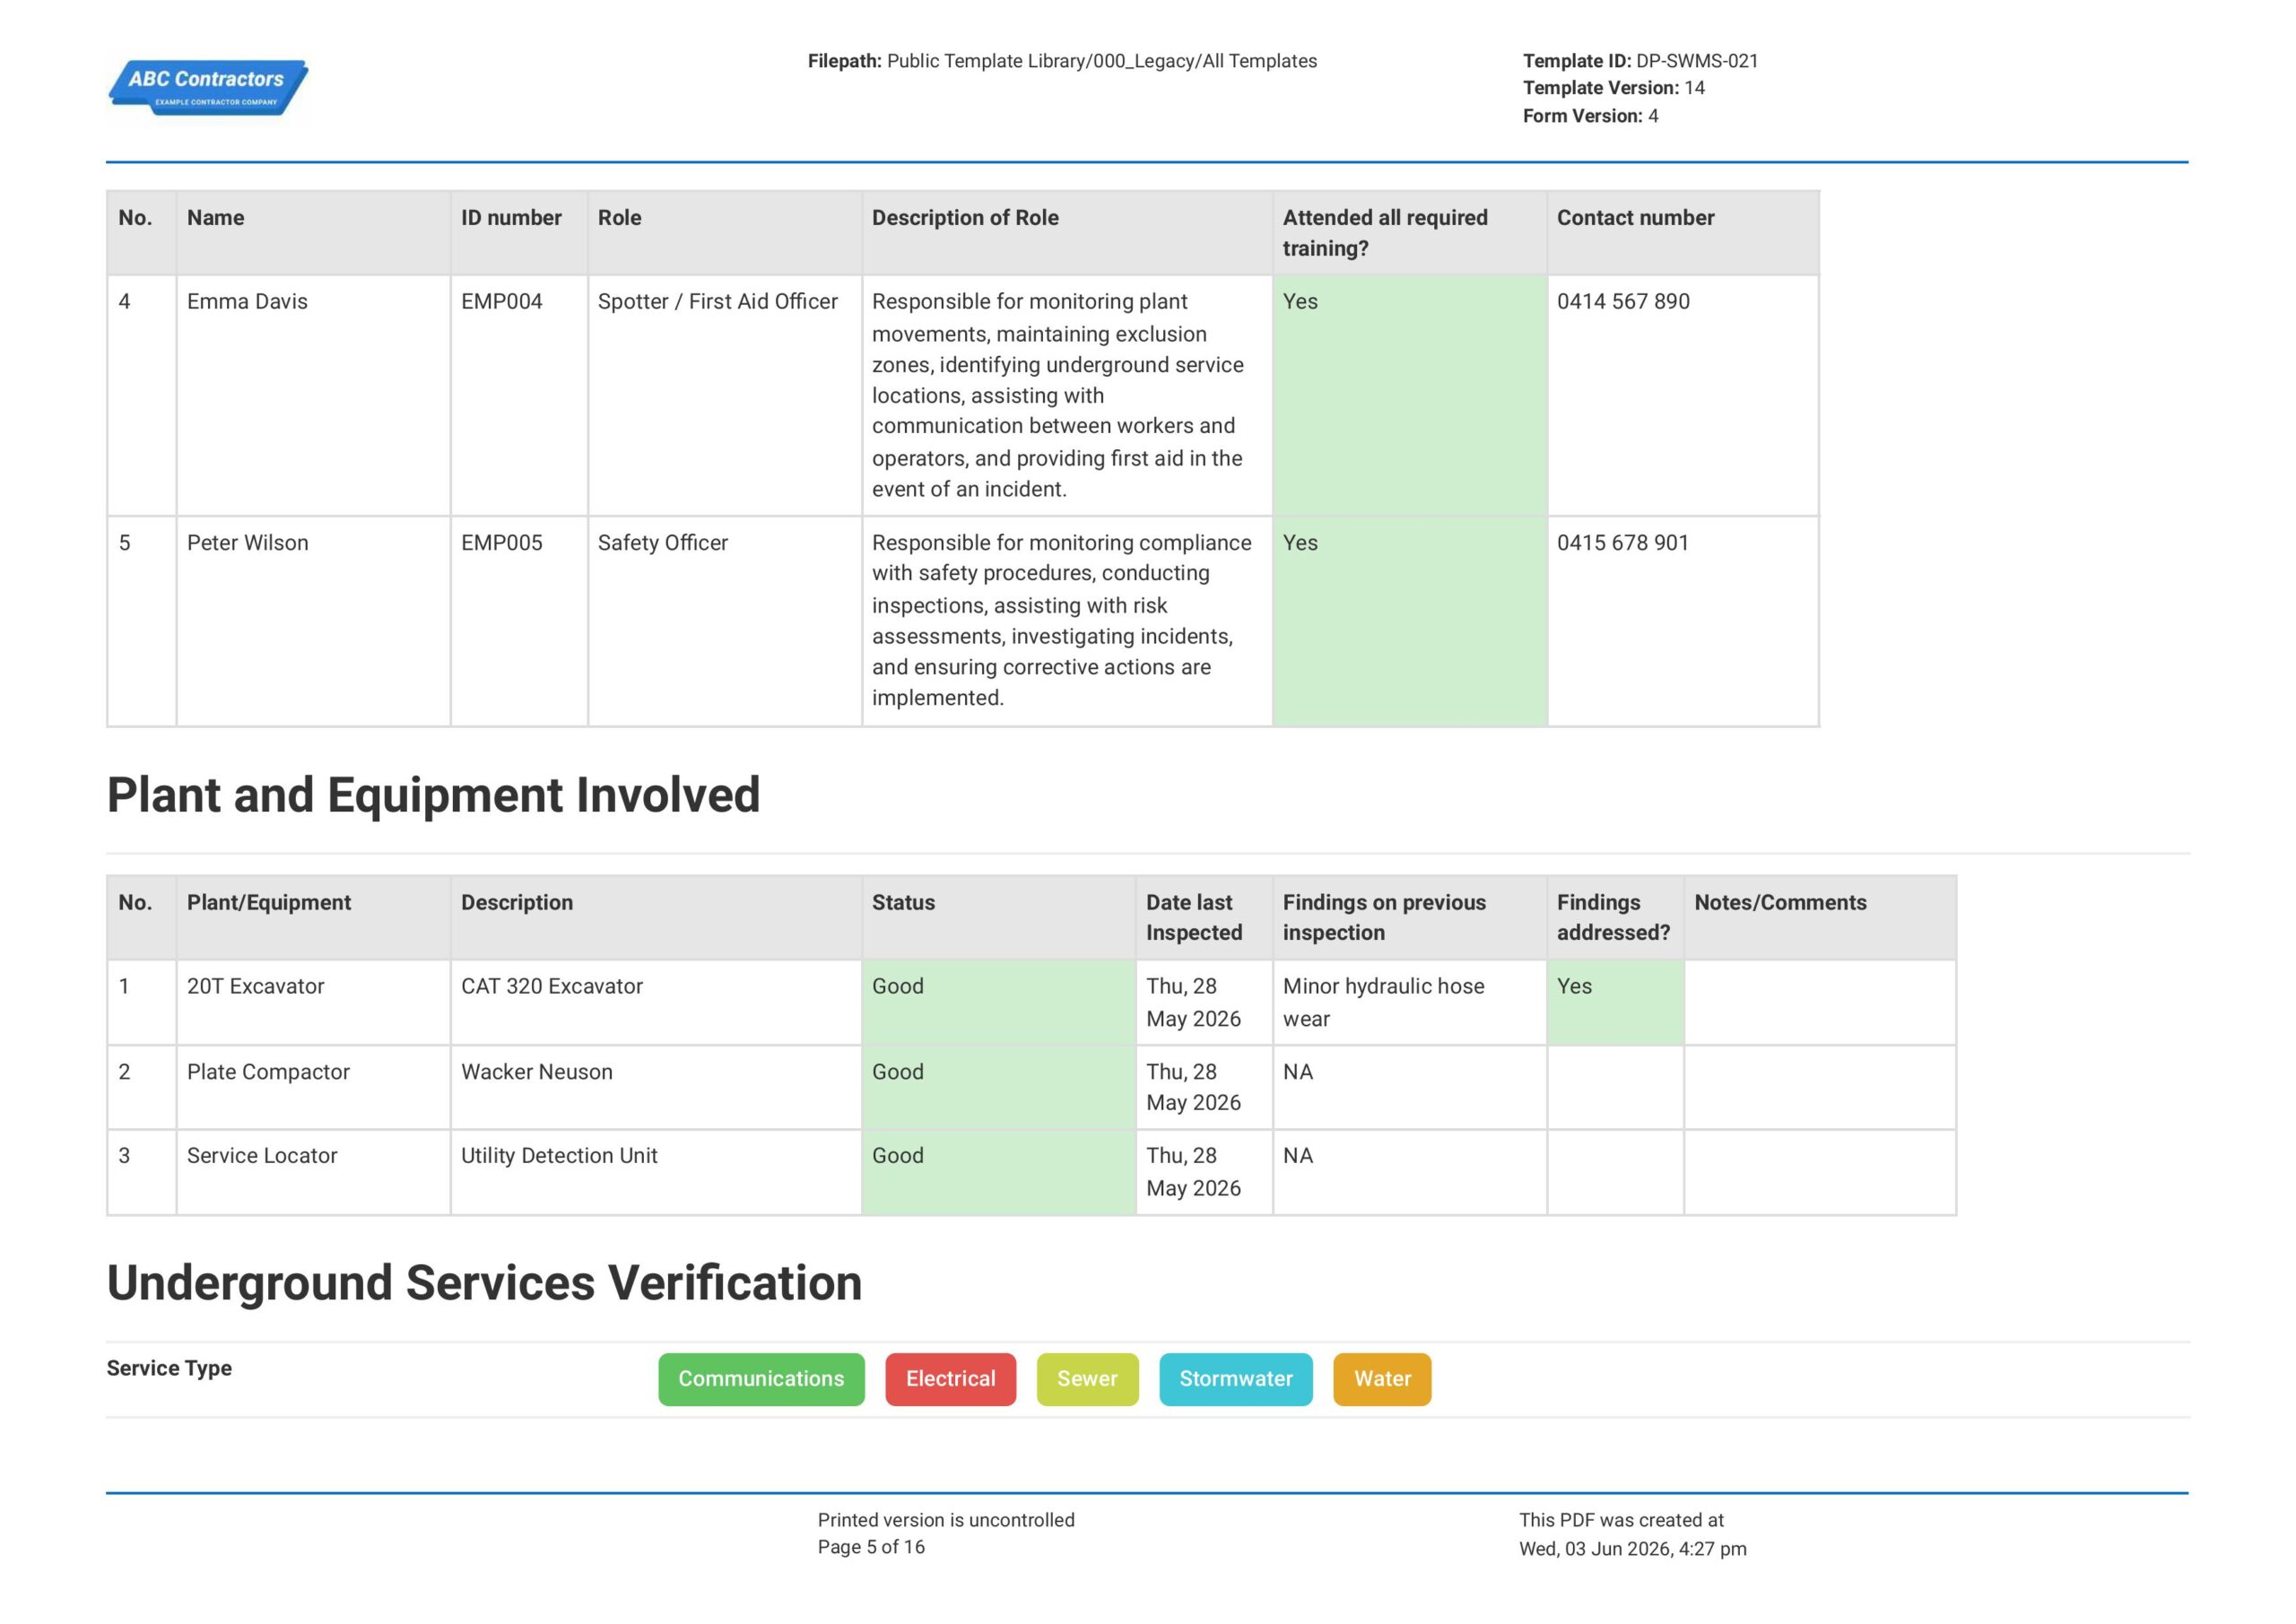
- Plant and equipment involved
- Underground services verification
- Safe work method statement (risk assessment)
- Pre-start checklist
- Emergency contact and procedures
- Required signatories
Digital Integration for Modern Excavation Safety Management
Modern excavation projects benefit significantly from digital SWMS integration with project management systems and real-time communication tools. Digital platforms enable instant notification of safety updates to all stakeholders, photographic evidence capture of site conditions, and seamless integration with permit-to-work systems. This technological approach transforms traditional paper-based safe work method statements into dynamic, living documents that adapt to changing site conditions while maintaining comprehensive audit trails for compliance demonstration.
How to Create an Excavation Safe Work Method Statement Template (SWMS)
Creating an effective Excavation Safe Work Method Statement Template (SWMS) requires systematic hazard identification, thorough risk assessment, and collaborative input from experienced excavation personnel.
Prerequisites in creating SWMS
These are the following key items needed to create an effective Excavation Safe Work Method Statement:
- An established plan and scope of work
- Site information and drawings
- Underground services information
- Complete training for personnel involved
- Service ready equipment and machinery
- Compliance records for health and safety
-
Add a document control section
The following key items must be found in the document control section:
- Date
- Project Name
- Contractor
- Client
- Location
- Revision number
-
Add a scope of work section
Provide the following in this section:
- Start and completion date of project
- Excavation type
- Width and depth of excavation
- Ground conditions
- Procedures
-
Add training, roles, and responsibilities
This section must have the following key items:
- Required training
- Scope of training
- Required attendees of training
- Roles
- Responsibilities
-
Add plant and equipment involved
These are the key items needed for this section:
- Plant or equipment
- Description of plant or equipment
- Status of plant or equipment
- Date last inspected
- Findings of last inspection
- Status of findings
-
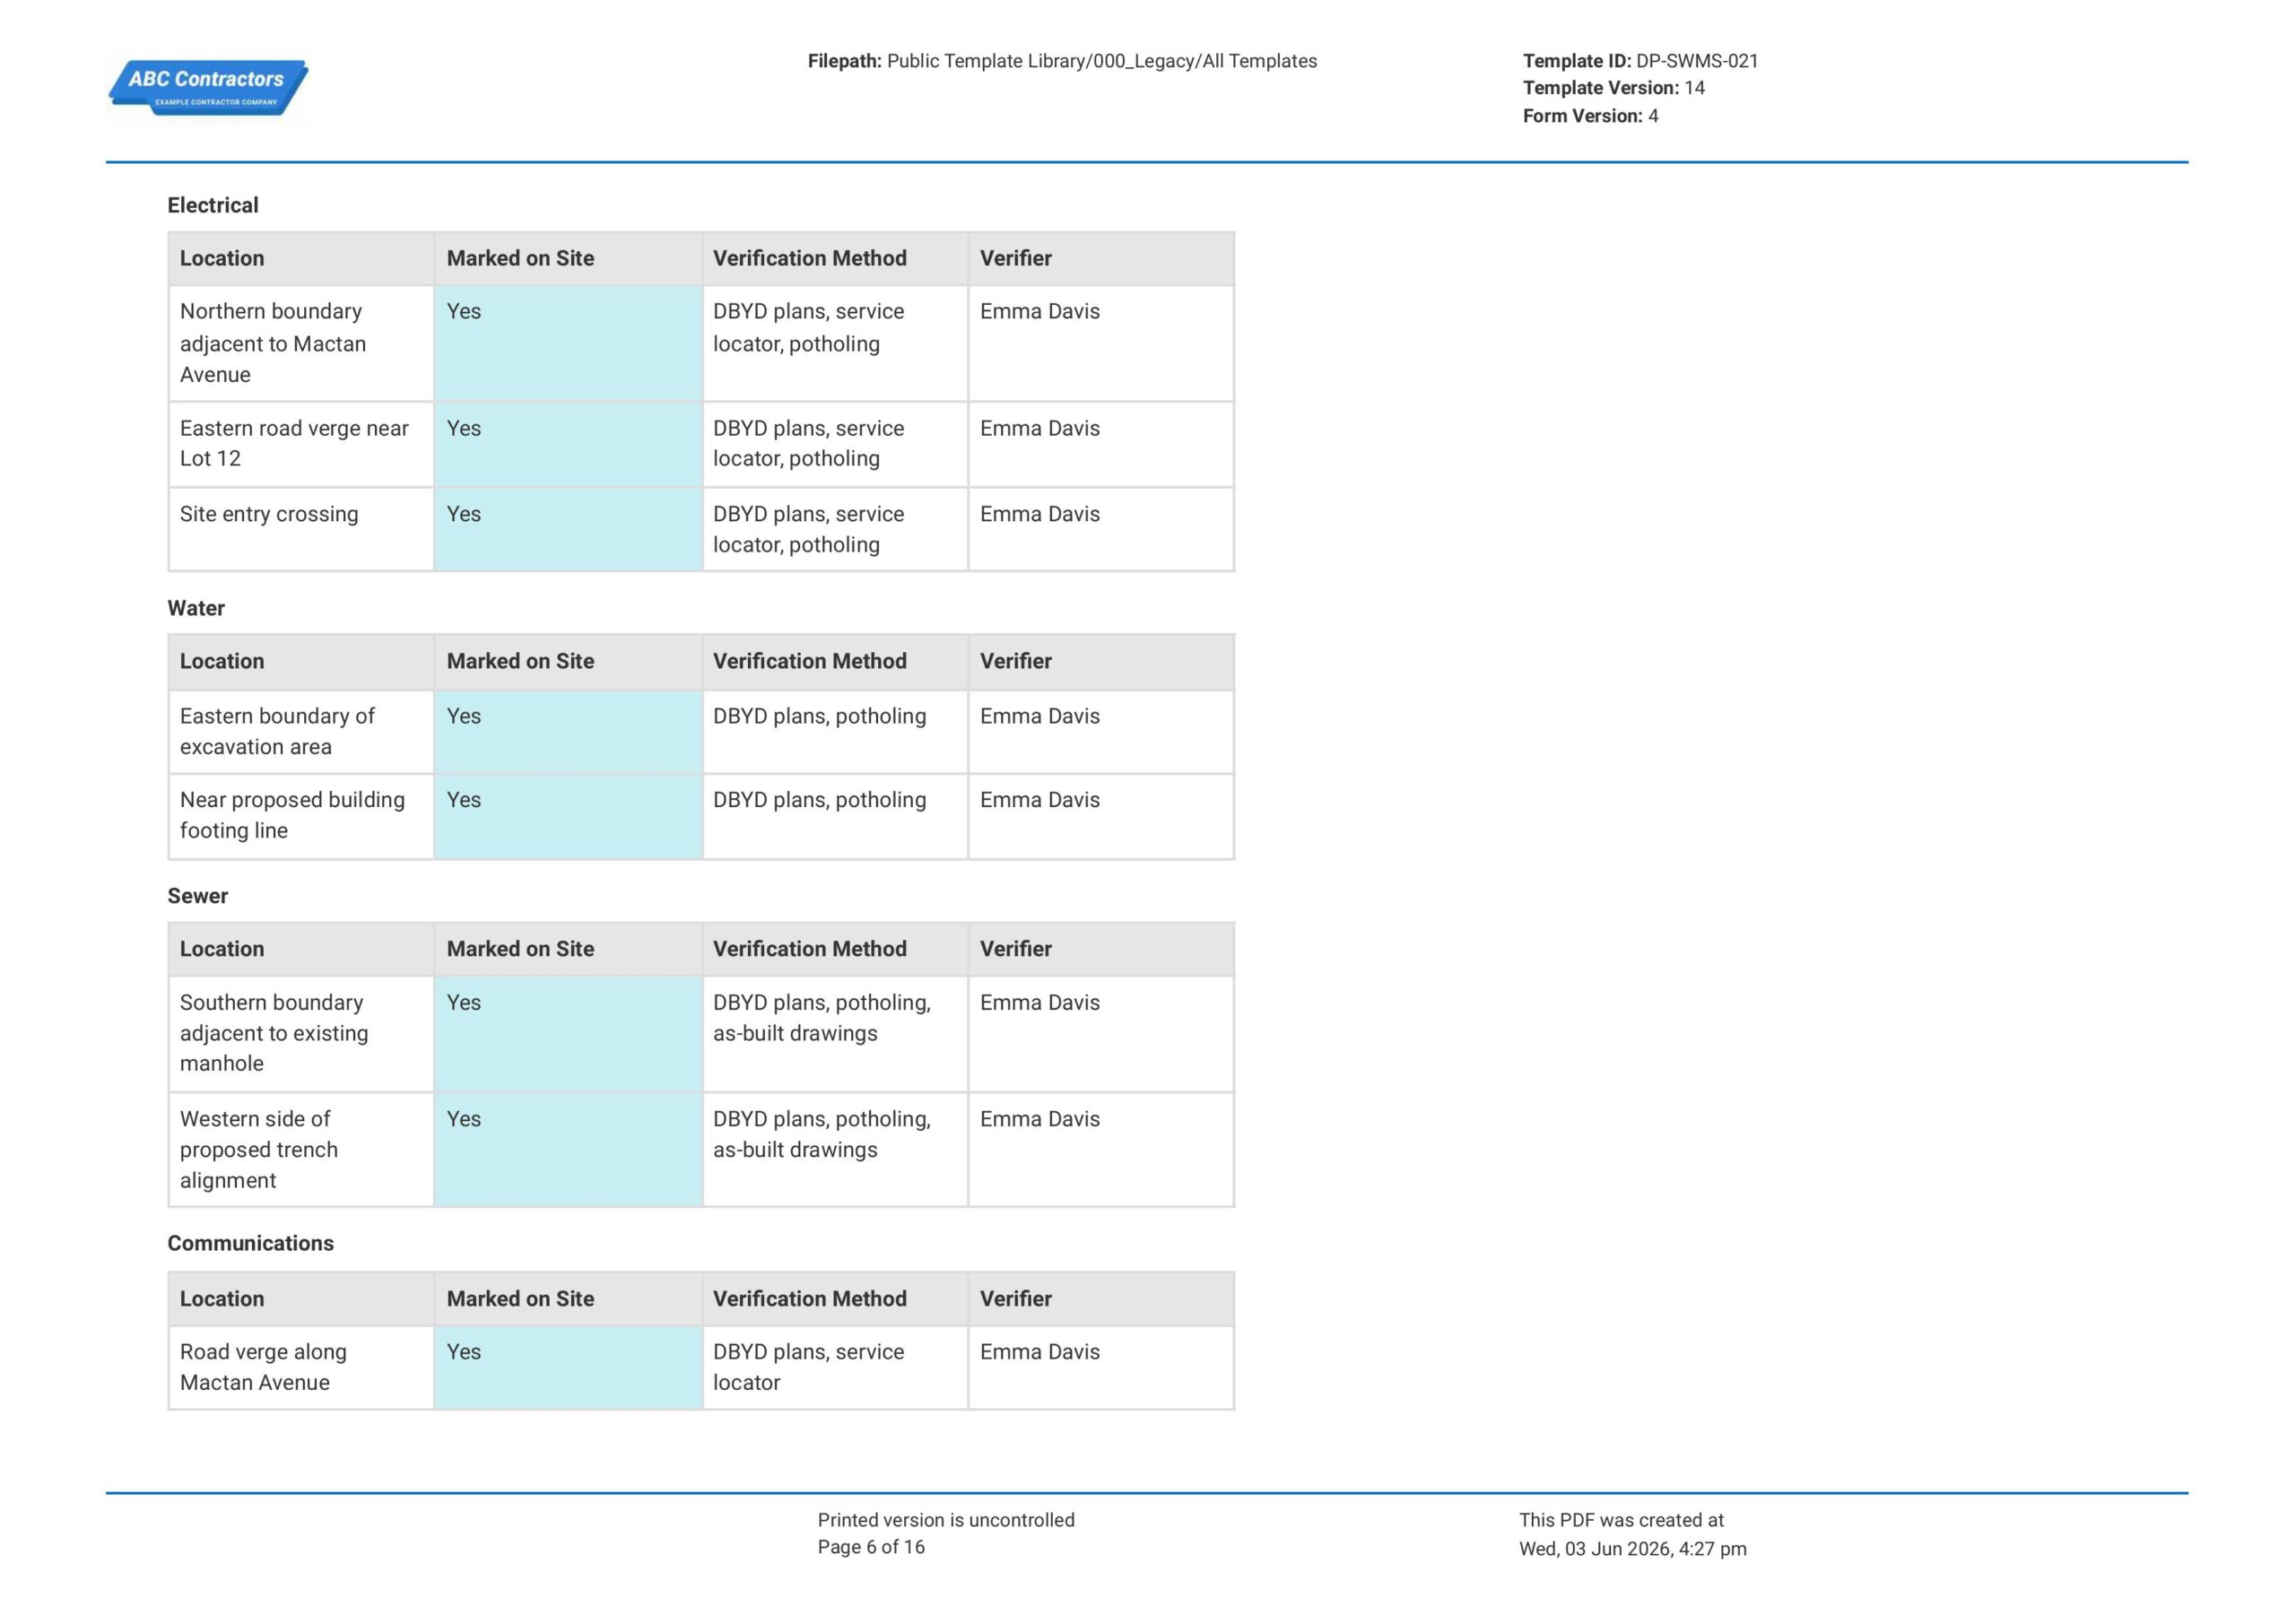
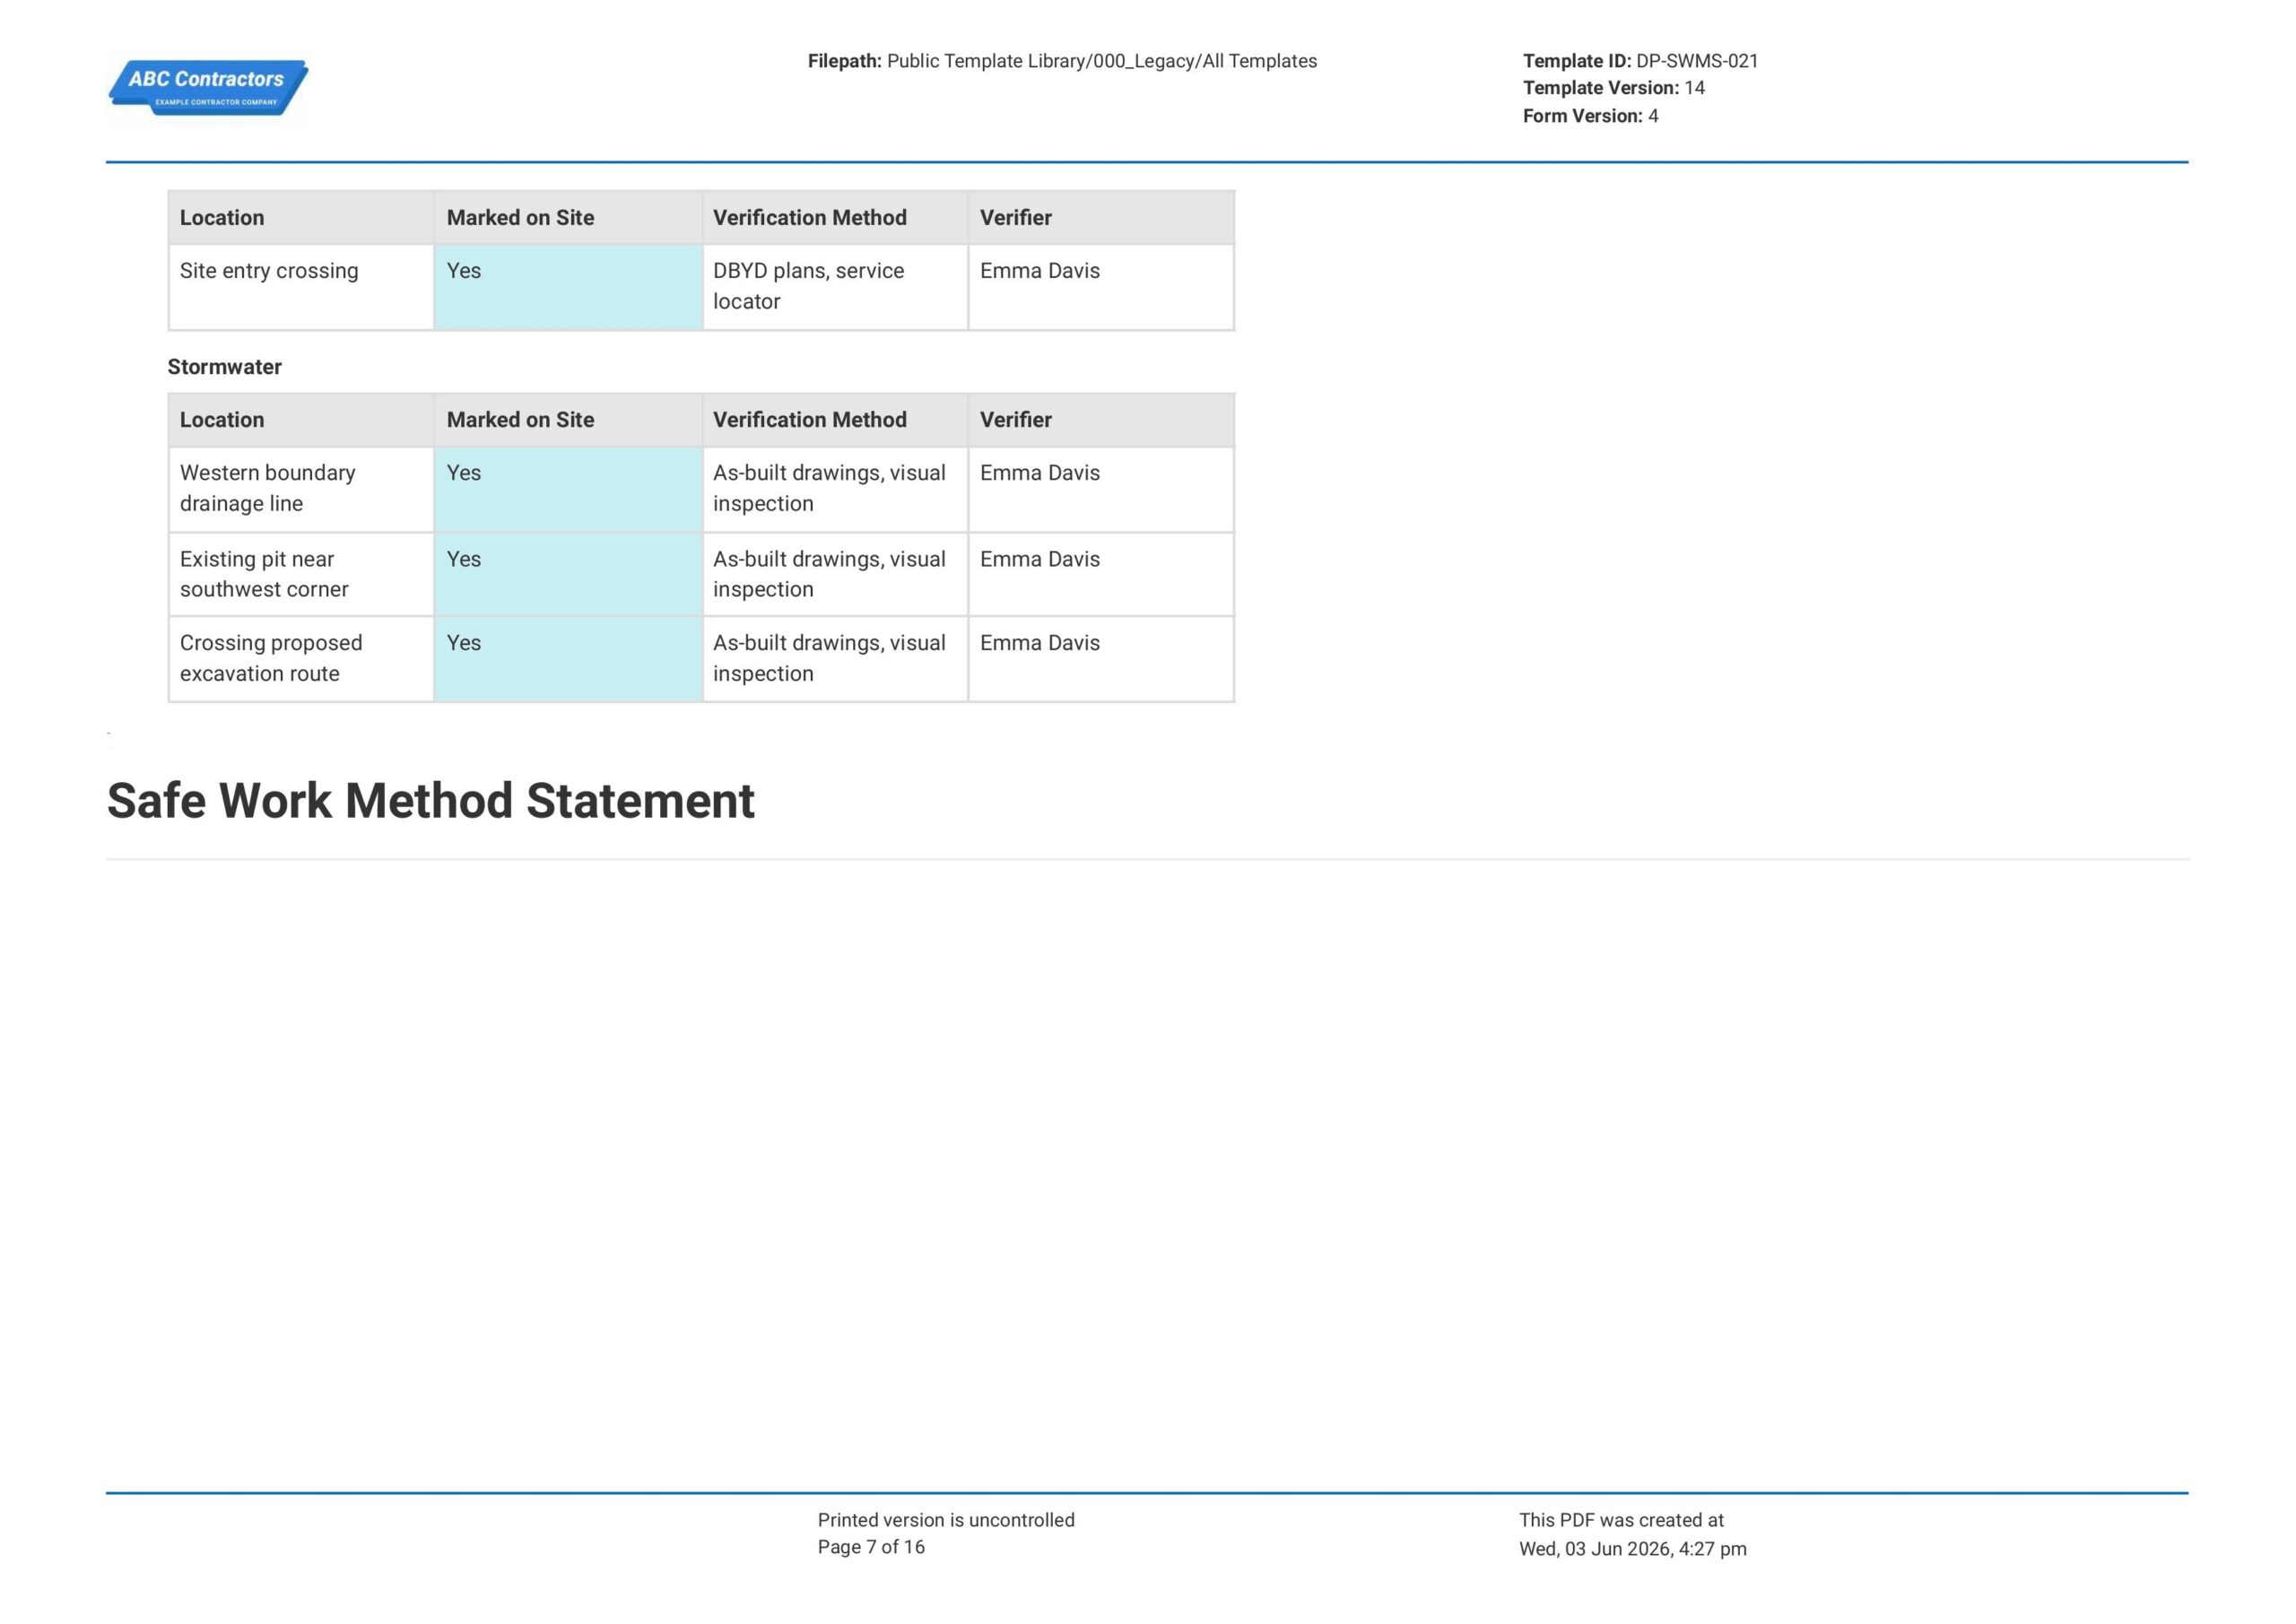
Add an underground services verification
Provide the following key items in this section:
- Service type
- Location
- Verification if marked on site
- Verification method
- Verifier
-
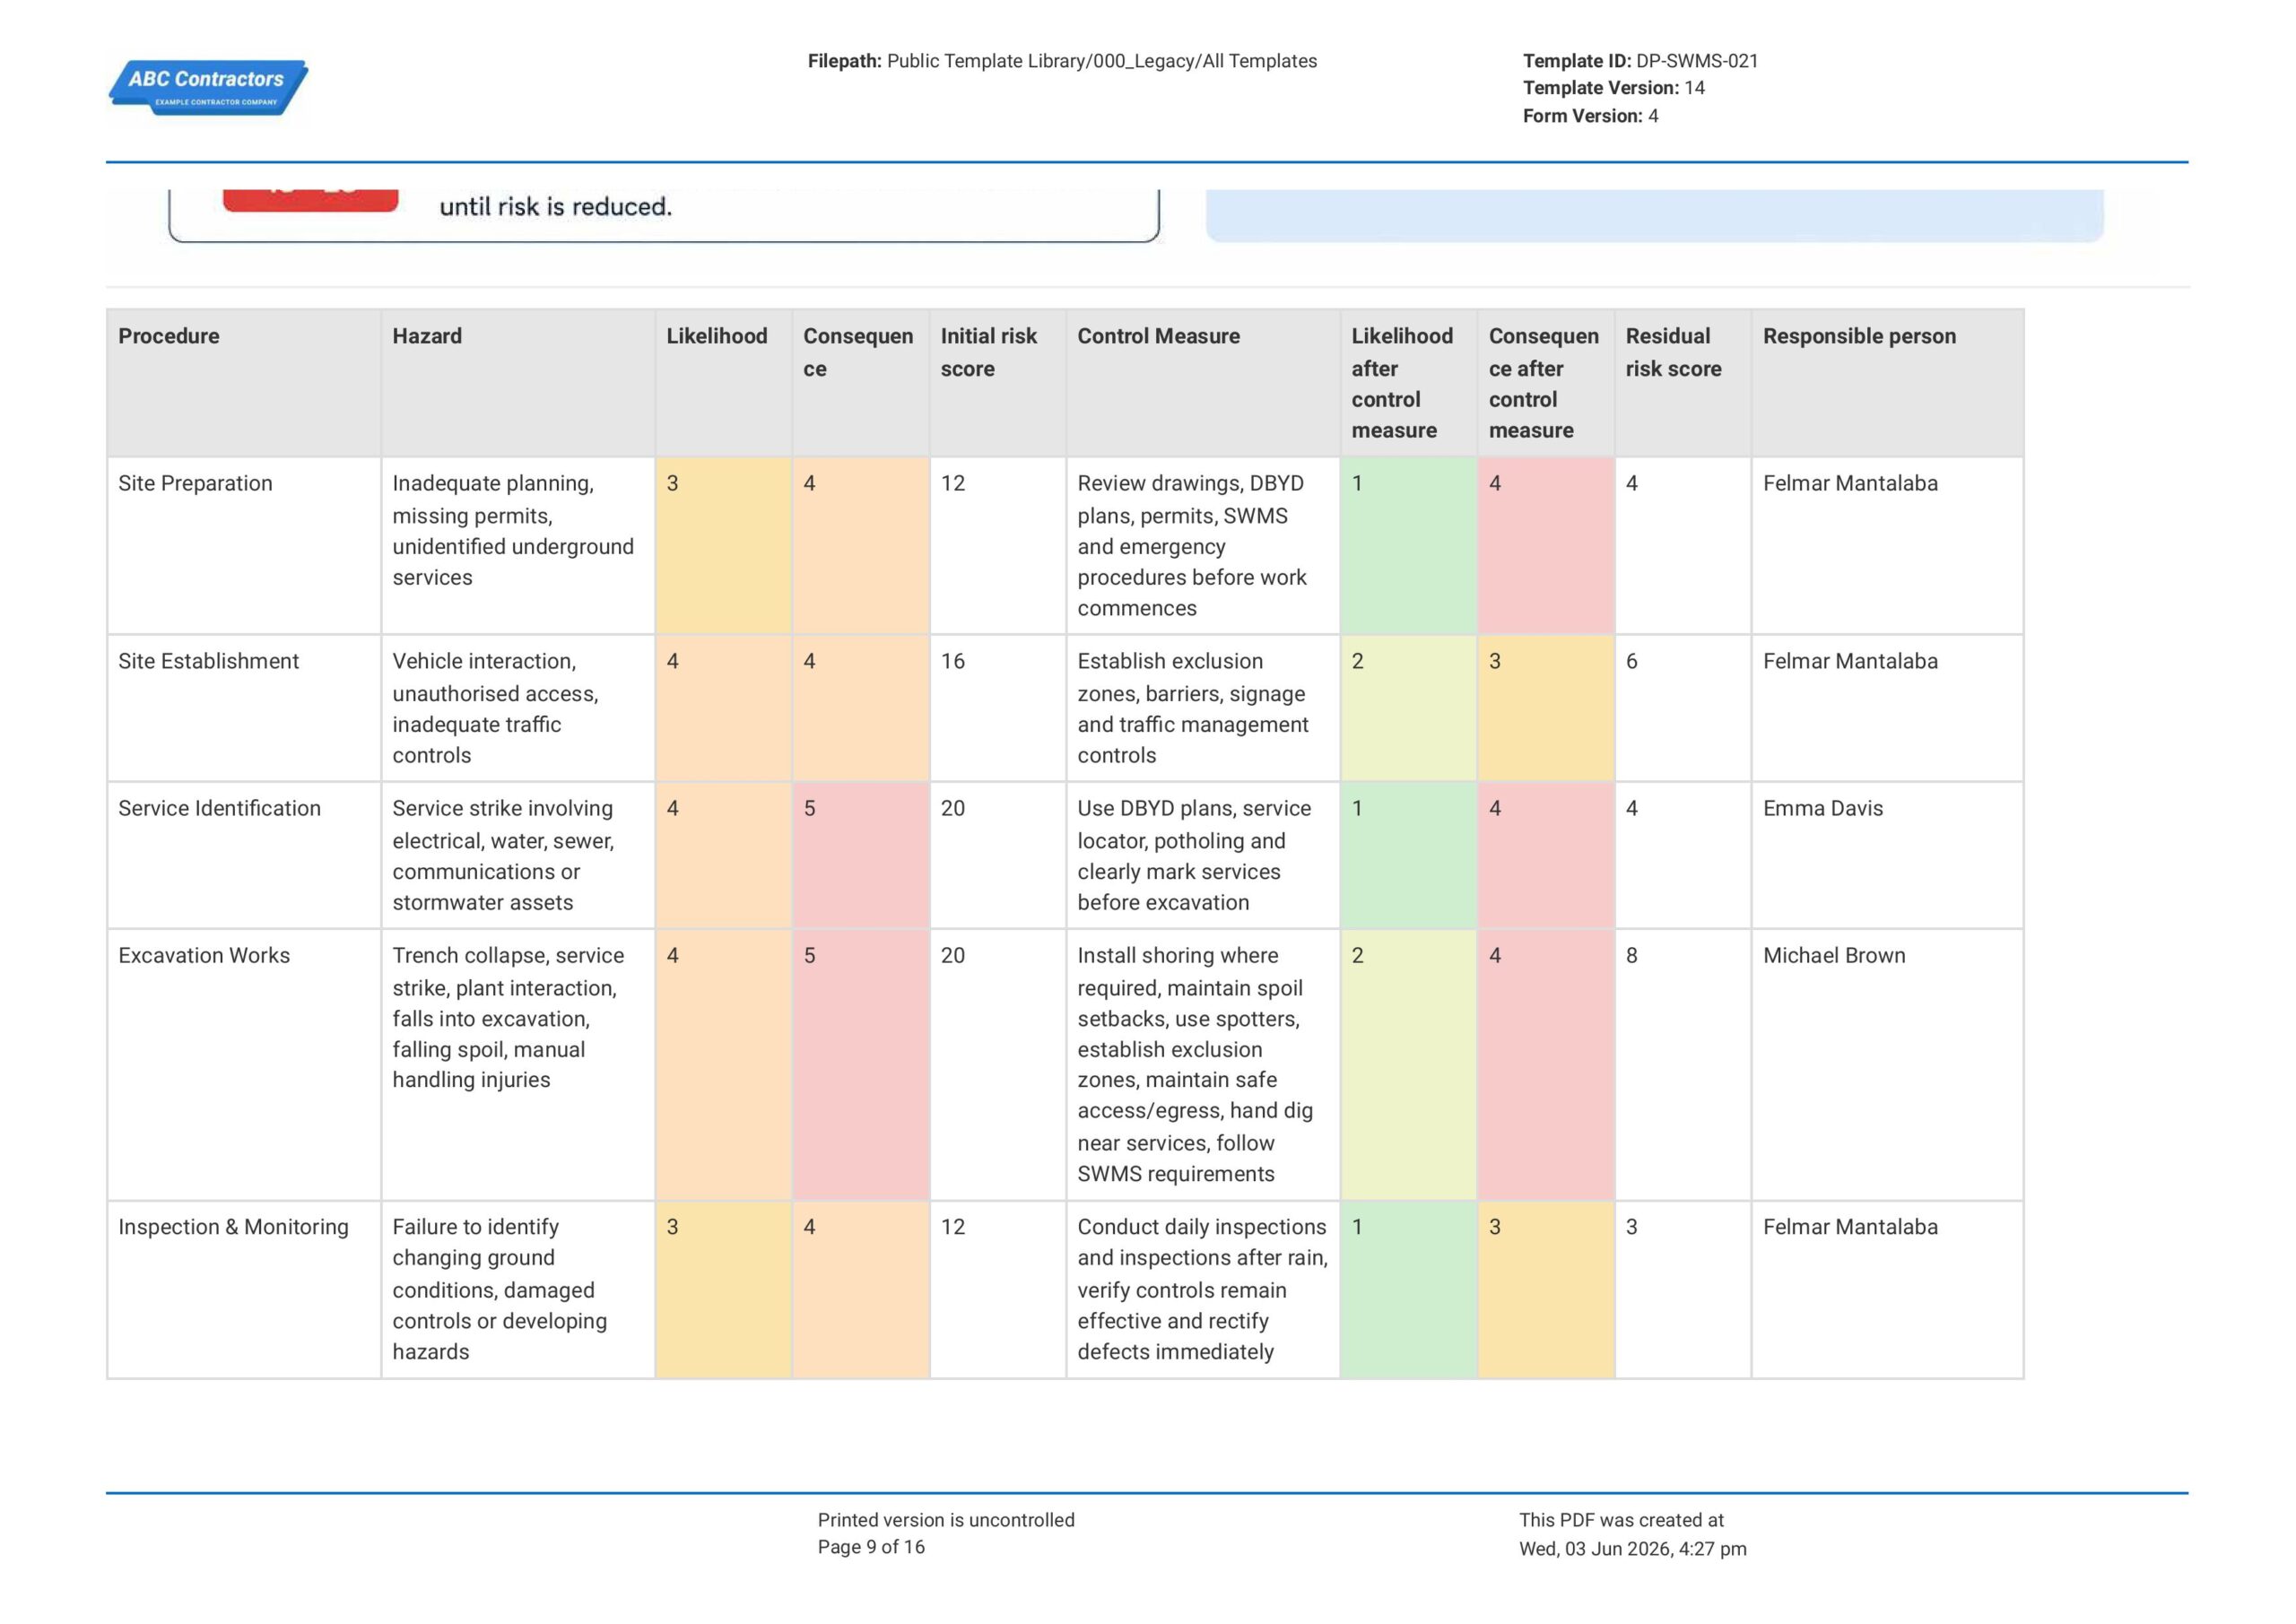
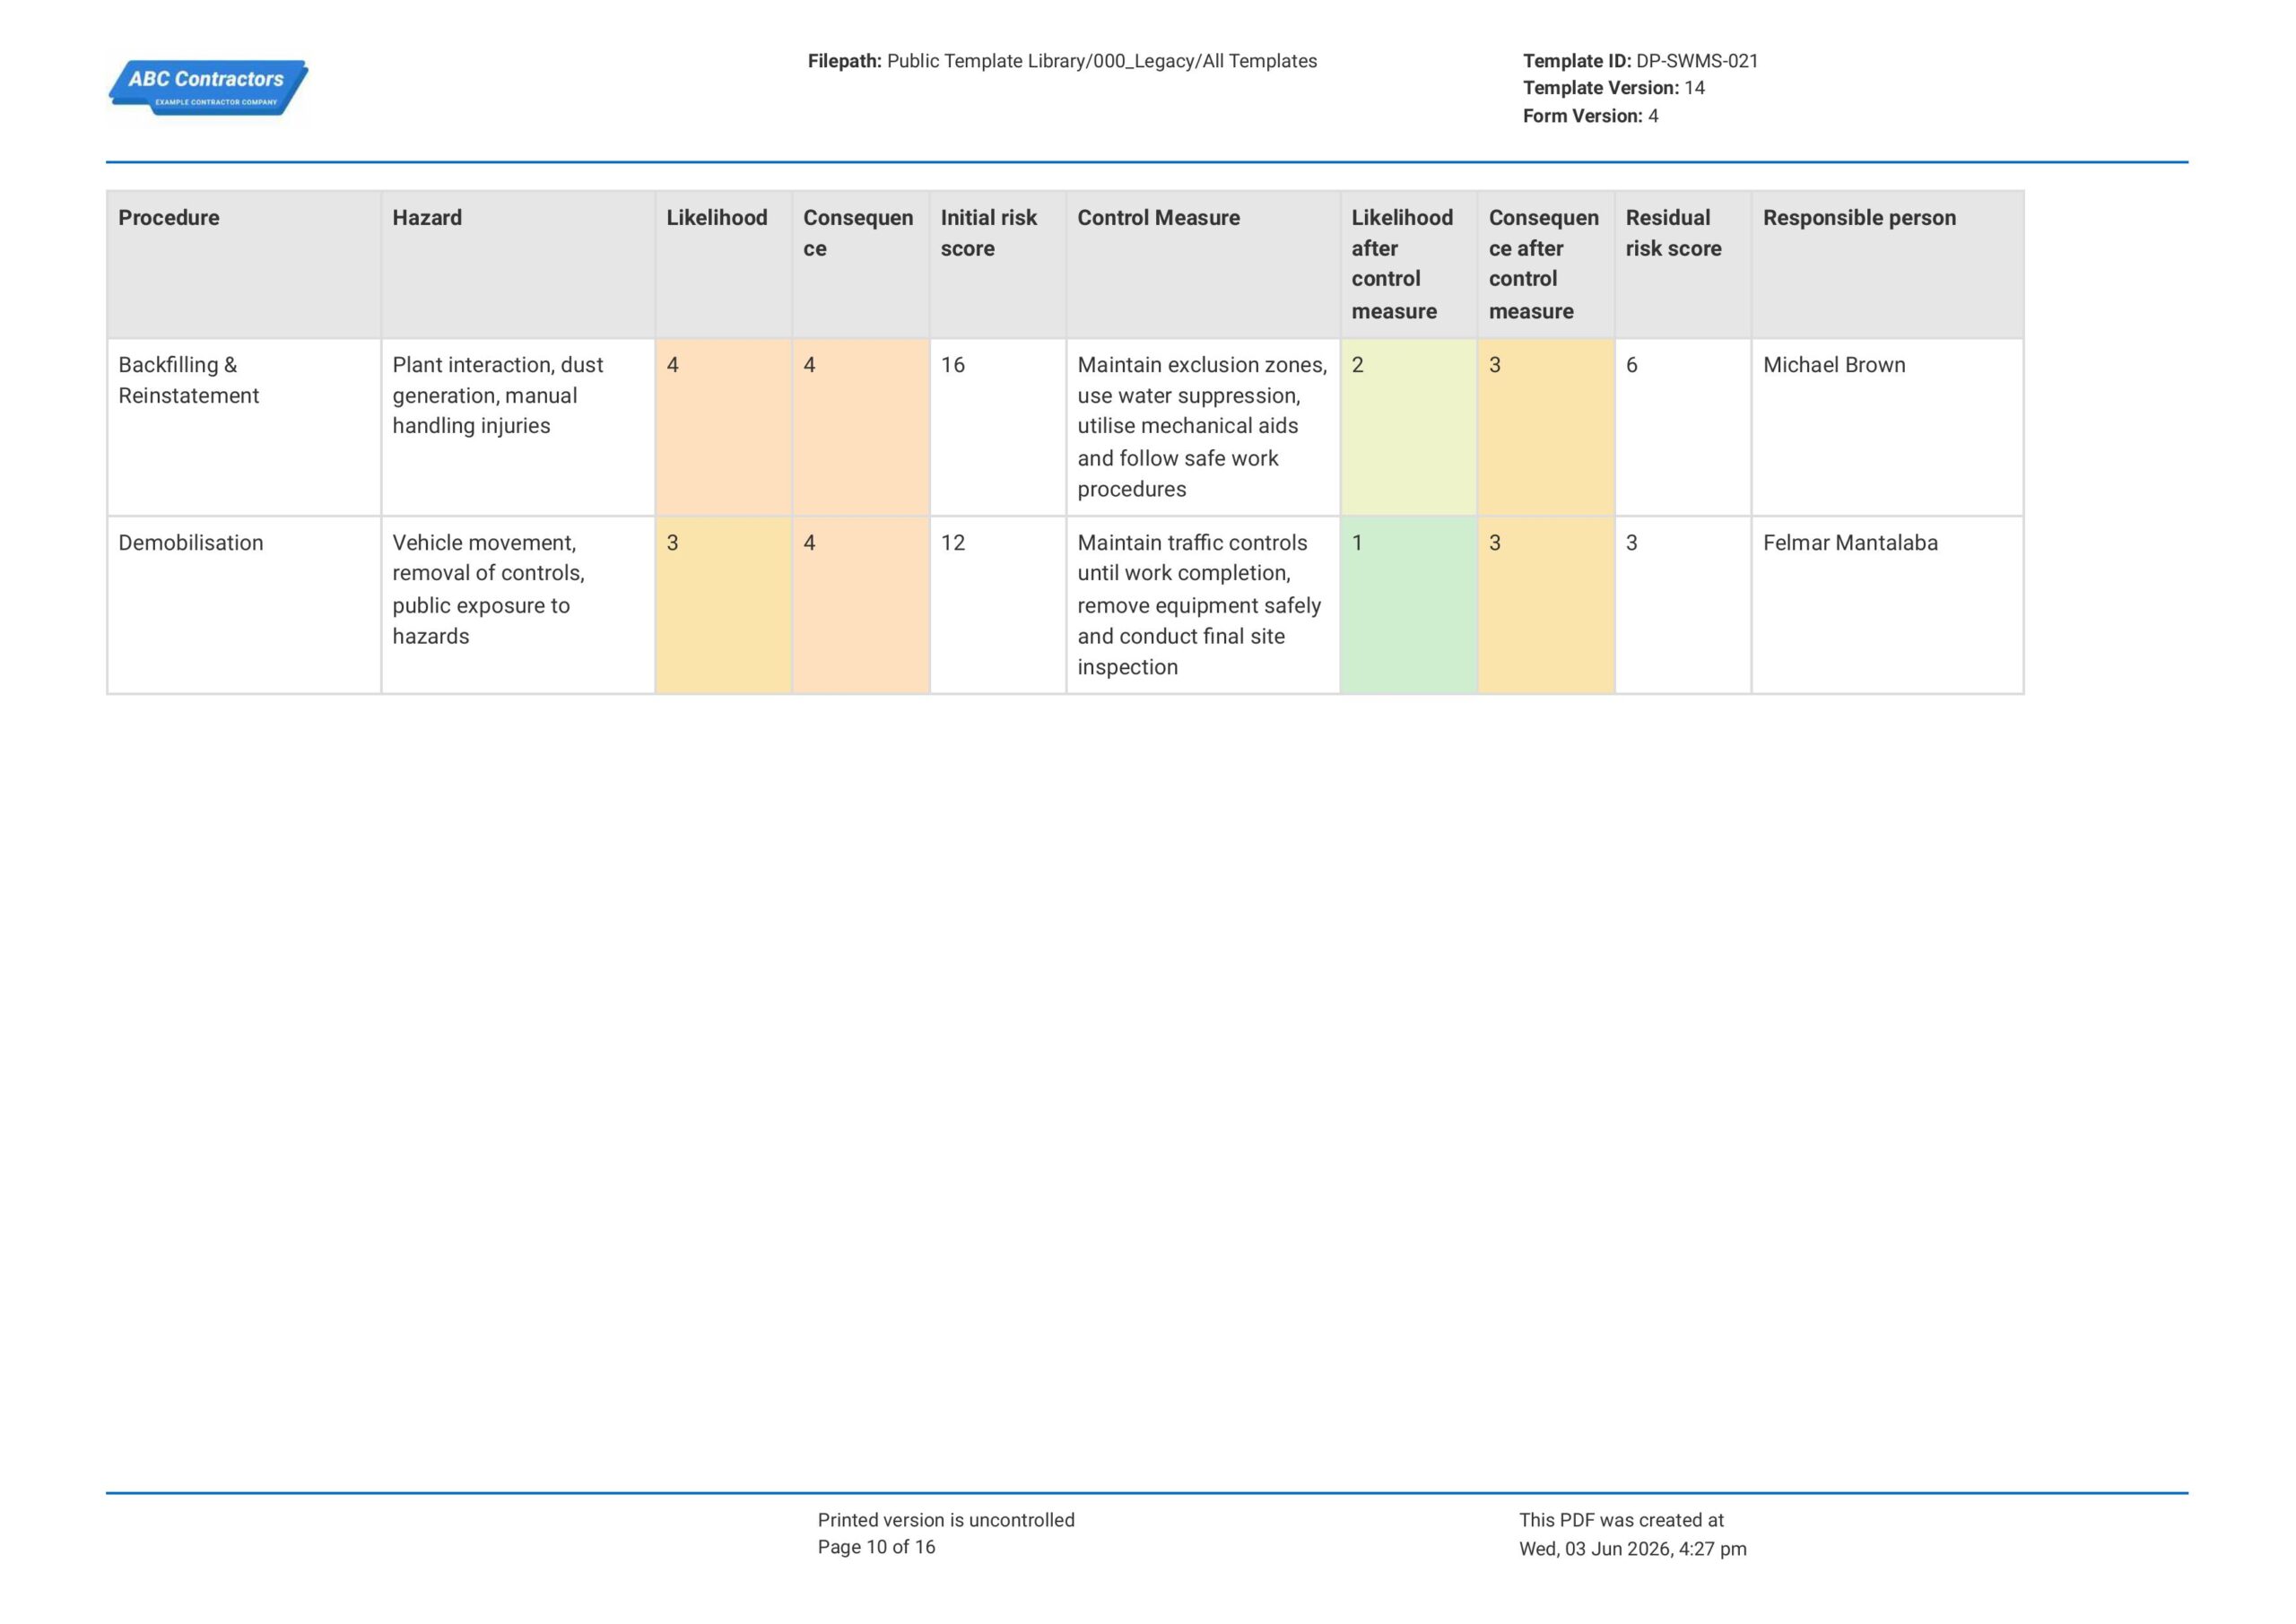
Add a Safe Work Method Statement (risk assessment)
Here are the items needed to ensure this section is complete and effective:
- Procedure
- Hazard
- Likelihood of hazard
- Consequence of hazard
- Initial risk assessment score
- Control measure
- Likelihood after control measure
- consequence after control measure
- Residual risk score
- Responsible person
-
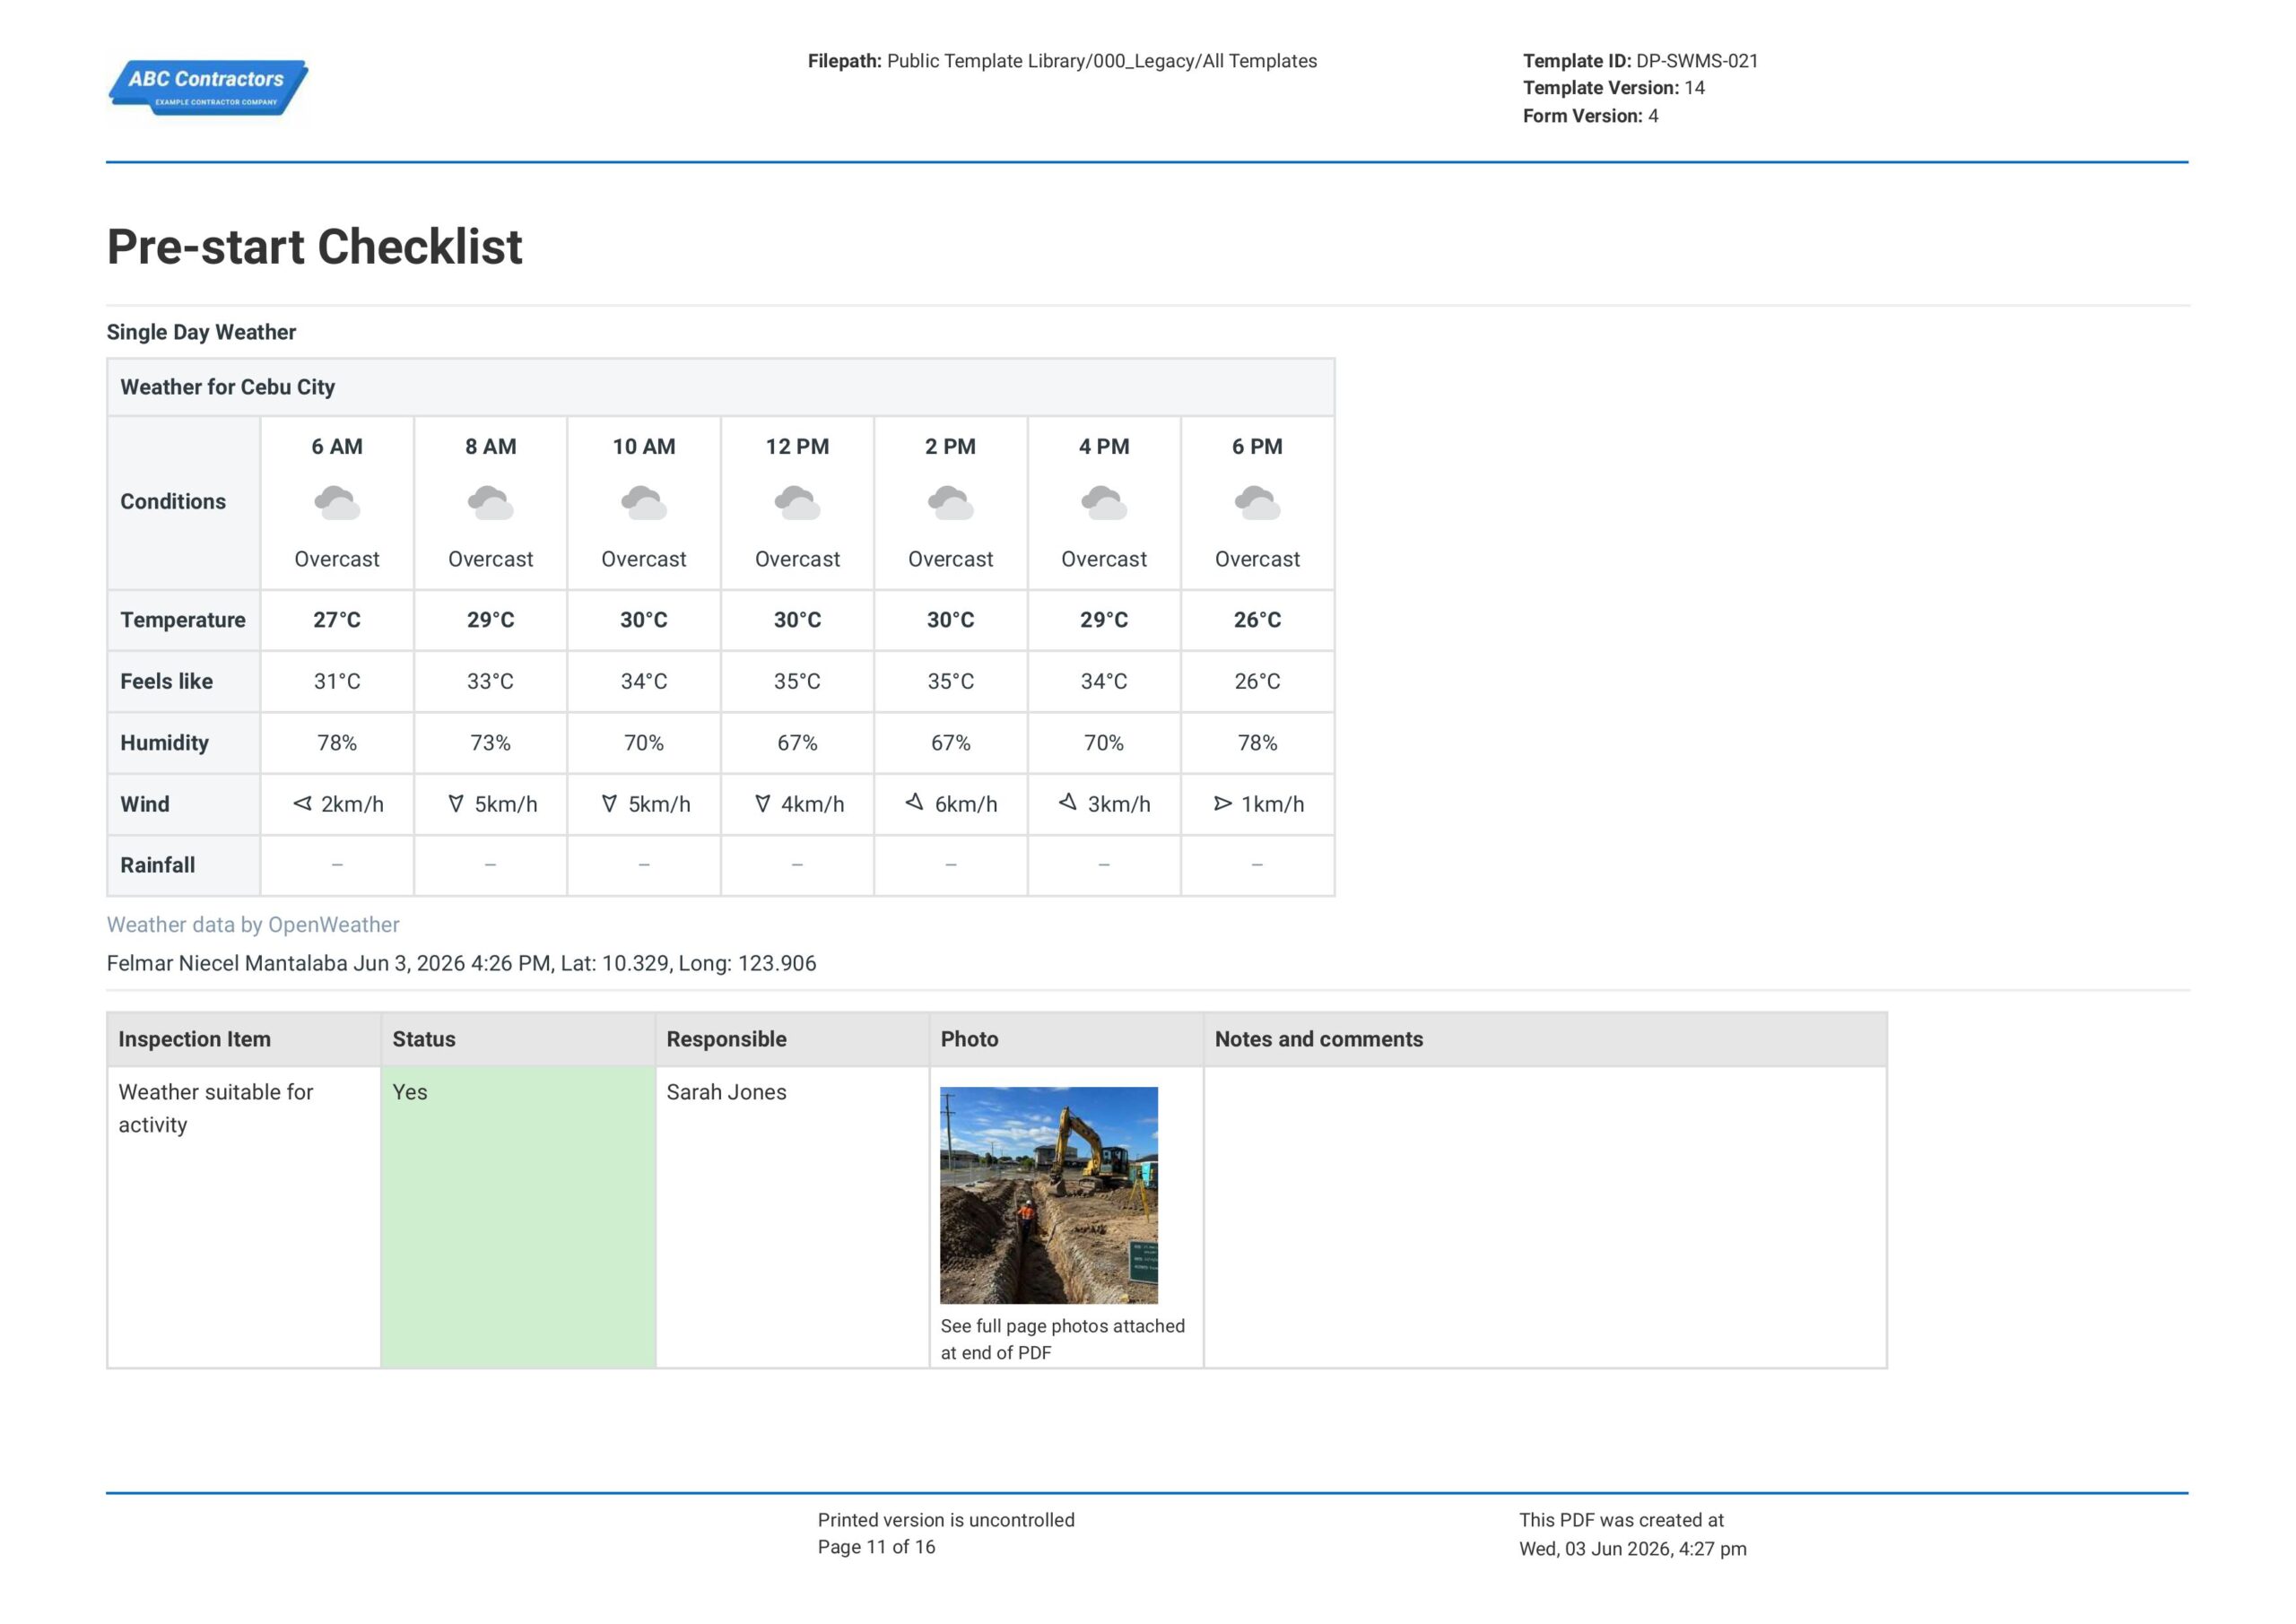
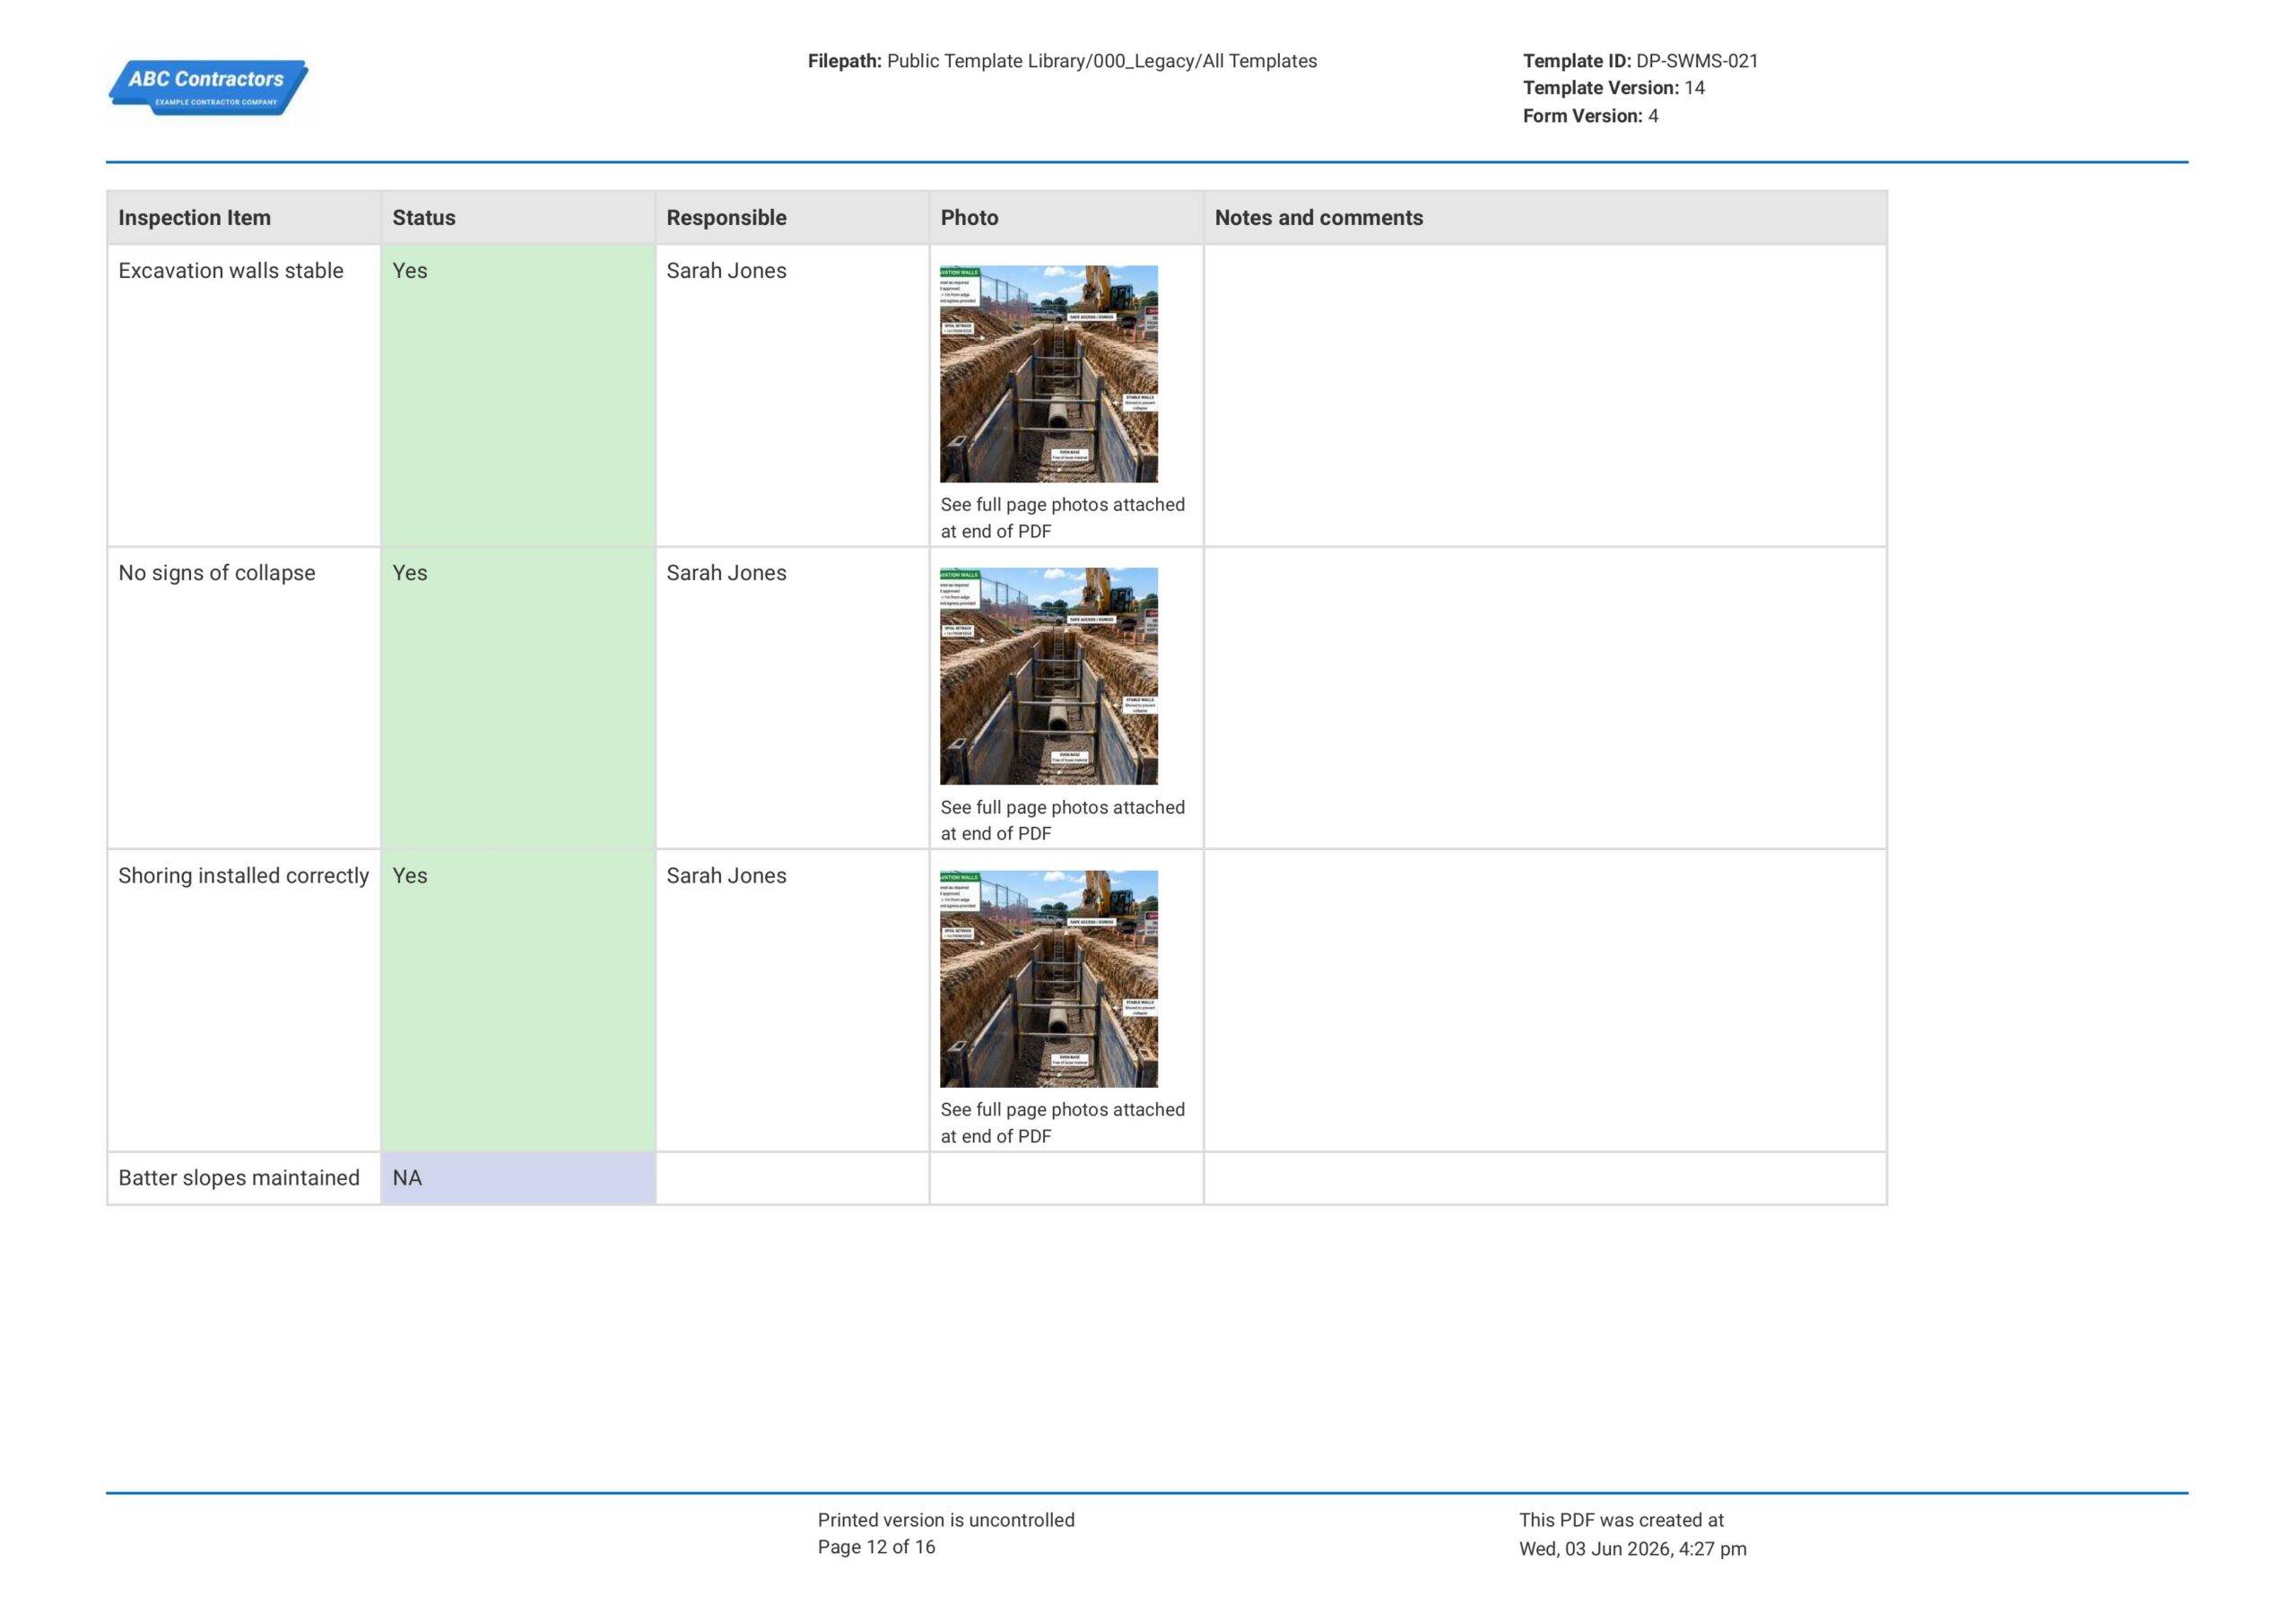
Add a pre-start checklist
Here are the following key items needed in this section:
- Weather conditions
- Inspection item
- Status of inspection item
- Responsible person
-
Add emergency contacts and procedures
These are the following key items needed in this section:
- Emergency procedure
- Responsible person for emergency procedure
- Emergency contact name
- Emergency contact number
Frequently asked questions
How to create your Excavation Safe Work Method Statement in an App or Software System
Digital excavation safety management transforms traditional paper-based processes into dynamic, collaborative systems that adapt to changing site conditions. Real-time updates ensure all team members work from current safety information, while mobile accessibility enables instant access to critical procedures during active excavation work. Automated workflows streamline approval processes and ensure consistent documentation standards across all excavation activities.
Integrated communication tools facilitate immediate hazard reporting and safety issue resolution, reducing response times and preventing incidents. Digital platforms also provide comprehensive audit trails and analytics that support continuous safety improvement and regulatory compliance demonstration.
45 minutes
Medium difficulty
-
How to make an Excavation Safe Work Method Statement in an app?
Using an app that employs digital forms instead of paper-based ones may help improve the process by:
- Assistance with artificial intelligence (AI).
- Having fewer manual data entries.
- All produced forms are stored in a single access cloud.
- Reformatting is straightforward and can be adapted to new protocols or updated standards.
- Formula integration is much more simple.
- Workflows and notifications may be automated and scheduled.
- Improved template design and look.
-
Creating the Document Control Section
- Add a date field
- Add text fields for the following information: project name, contractor, client, work location, revision number
-
Creating the Scope of work section
- Add a date range field for start and completion dates.
- Add text fields for maximum depth and width.
- Add a drop-down list for excavation type selection. Each selection item could be integrated with colours to make the form more appealing and professional. The following are the selection items you can use in this list: trench excavation, basement excavation, cut and fill excavation, dredging, roadway Excavation, others
- For the “others” selection item, add a logic sequence where a text field pops out to allow users to input the type of excavation that is not found on the list.
- For ground conditions, add a multiple-choice field. Each selection item could be integrated with colours to make the form more appealing and professional. Here are the following selections you can use: stable rock, weathered rock, clay, silt, gravel, fill material, compacted ground, waterlogged ground, unstable ground, and others.
- For the “others” selection item, add a logic sequence where a text field pops out to allow users to input the ground condition not found on the list.
- For the procedures, add a default table element with 8 columns. The default table element will allow users to indefinitely add more rows. Here are the instructions for each column.
- Format the first and second columns as text fields so users can enter procedures and sub-procedures.
- Format the third and fourth columns as date fields to allow users to input the start and completion dates of each procedure.
- Format the fifth column as a text field so users can input the required safety permits for each procedure.
- Format the sixth column as a selection field to allow users to verify whether the safety permits are present or not. Each selection item can be integrated with colours, such as green and red, to make the form more appealing and professional.
- Format the seventh column as a text field so that users can input the responsible person for each procedure.
- Format the last column as an attachment field to allow users to directly upload the related permits.
-
Creating the training, roles, and responsibility section
- Provide a default table element with 6 columns for required training. The default table element will allow users to indefinitely add more rows. Here are the instructions for each column.
- Format the first three columns as text fields to allow users to input the following: required training, scope of training, and required attendees.
- The fourth column should be formatted as a date field to input the training schedule.
- The fifth column should denote if the training was already completed, is still scheduled, or has no action. A selection field would be appropriate for this column, where colors are integrated into each selection item.
- The last column should be formatted as a text field to allow users to input additional notes and comments.
- Provide a default table element with 6 columns for roles and responsibilities. The default table element will allow users to indefinitely add more rows. Here are the instructions for each column.
- Format the first four columns as text fields to allow users to input the following: name, ID number, role, and description of the role.
- The fifth column should indicate whether the employee has attended all the required training. A selection field would be appropriate for this column, where colors are integrated into each selection item.
- The last column should be formatted as a text field to allow users to input employee contact number
-
Creating the plant and equipment involved section
- Provide a default table element with 6 columns for roles and responsibilities. The default table element will allow users to indefinitely add more rows. Here are the instructions for each column.
- Format the first two columns as text fields to allow users to input the plant or equipment and description.
- The third column should indicate the status of the equipment. A selection field would be appropriate for this column, where colors are integrated into each selection item. Here are the selection items you can use: good, minor maintenance required, major maintenance required, and defective
- Format the fourth column as a date field to input the date last inspected.
- Format the fifth column as a text field to input previous findings.
- The sixth column should indicate the status of the latest inspection. A selection field would be appropriate for this column, where colors are integrated into each selection item.
- The last column should be formatted as a text field to input additional notes or comments.
-
Creating the underground services verification section
- Provide a multiple-choice field for this section. Each selection item in this section can be integrated with colours to make the form more appealing and professional. Here are the selection items you can use: electrical, gas, sewer, water, communications, stormwater, Others
- Add a logic sequence where a 4-column default table pops out when the users click each selection item. The default table should allow users to add more rows when they need to. Here are the instructions for creating the table:
- Format the first column as a text field to allow users to input the location of the underground service.
- Format the second column as a selection list field to allow users to select whether the underground service has been marked on site or not.
- Format the last two columns as text fields to allow users to input the verification method and verifier.
-
Creating the safe work method statement (risk assessment) section
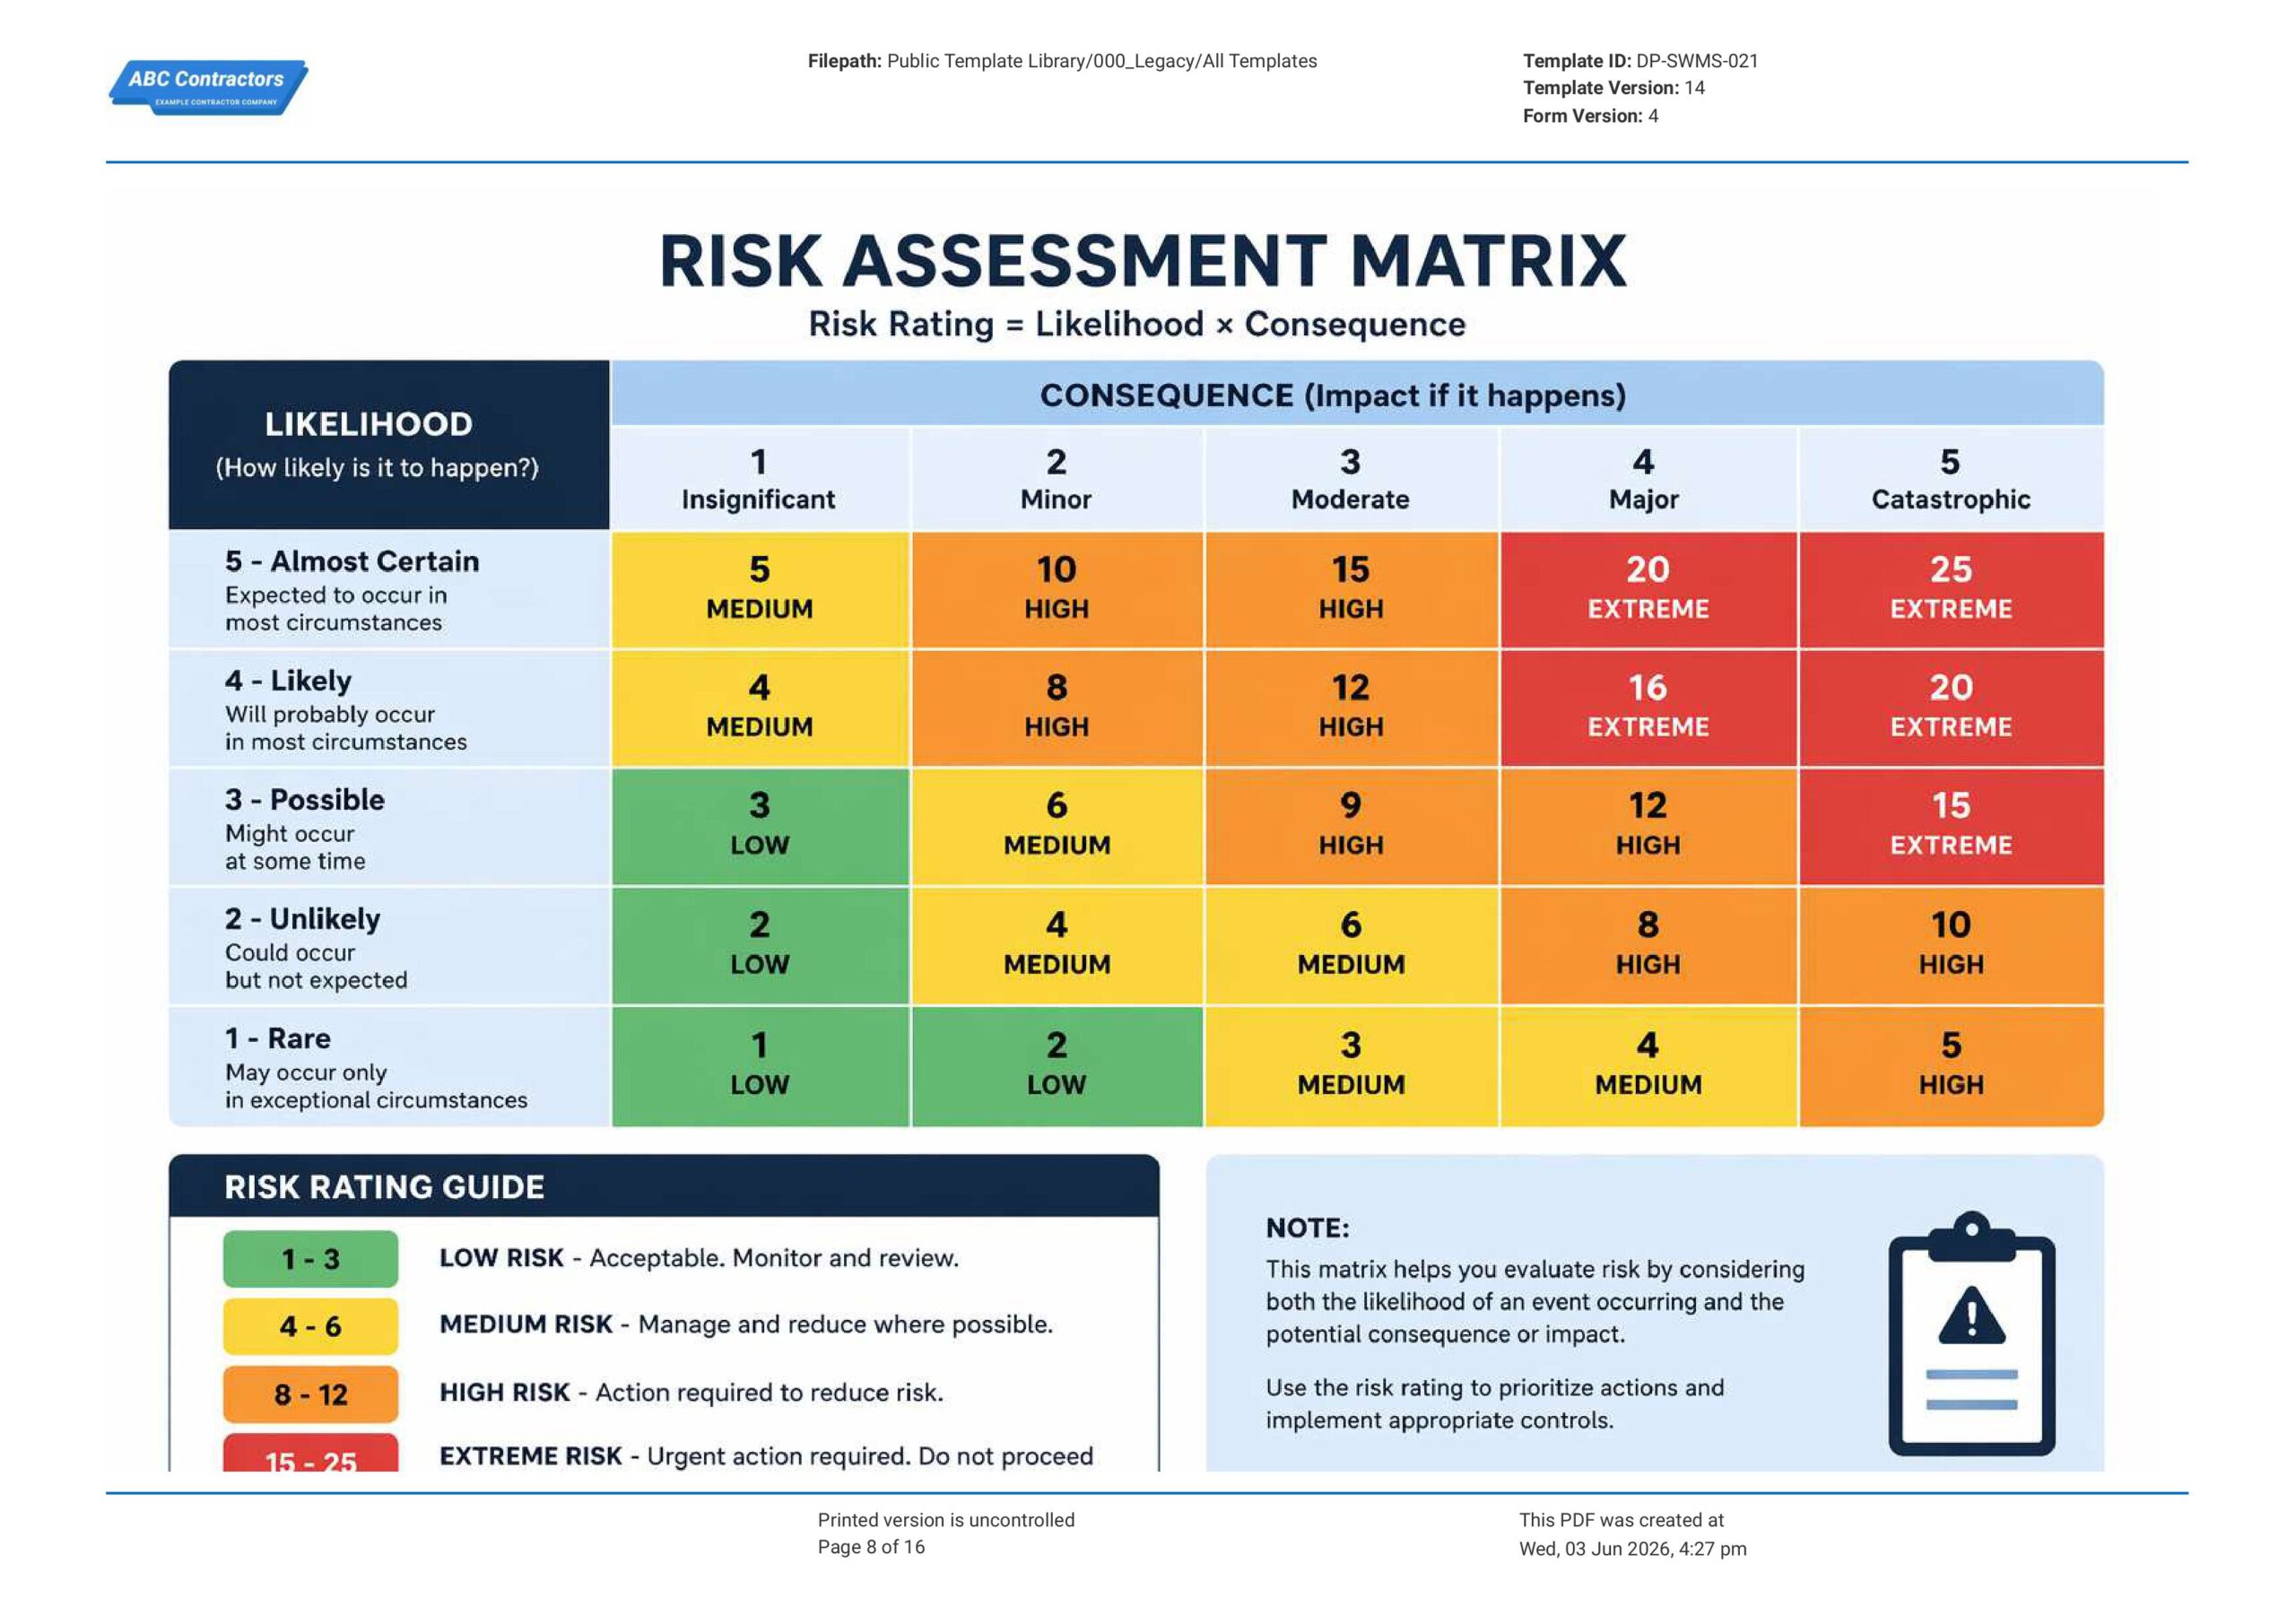
- Add a prefilled text field and upload an image of a risk assessment matrix.
- Provide a default table element with 10 columns for this section. The default table element will allow users to indefinitely add more rows.
- Format the first two columns as text fields to input the procedure and hazards identified.
- Format the third and fourth columns as selection fields, with selection items ranging from one to five. This will allow users to score the likelihood and consequence of the hazard. Each selection should be integrated with the following colors: 1-green, 2-yellow-green, 3-light orange, 4-deep orange, 5-red
- Format the fifth column as a formula field that automatically calculates the initial risk score. The initial risk score should be calculated by obtaining the product of the likelihood score and consequence score. Initial Risk Rating = Likelihood score x Consequence score.
- Format the sixth column as a text field to input the needed control measures.
- Format the seventh and eight columns as selection fields, with selection items ranging from one to five. This will allow users to score the likelihood and consequence of the hazard after the control measures are implemented. Each selection should be integrated with the following colors:, 1-green, 2-yellow-green, 3-light orange, 4-deep orange, and 5-red
- Format the ninth column as a formula field that automatically calculates the residual risk score. The residual risk score should be calculated by obtaining the product of the likelihood after the control measure and the consequence after the control measure score. Residual Risk Rating = Likelihood after the control measure score x Consequence after the control measure score.
- Format the last column as a text field for entering the responsible person.
-
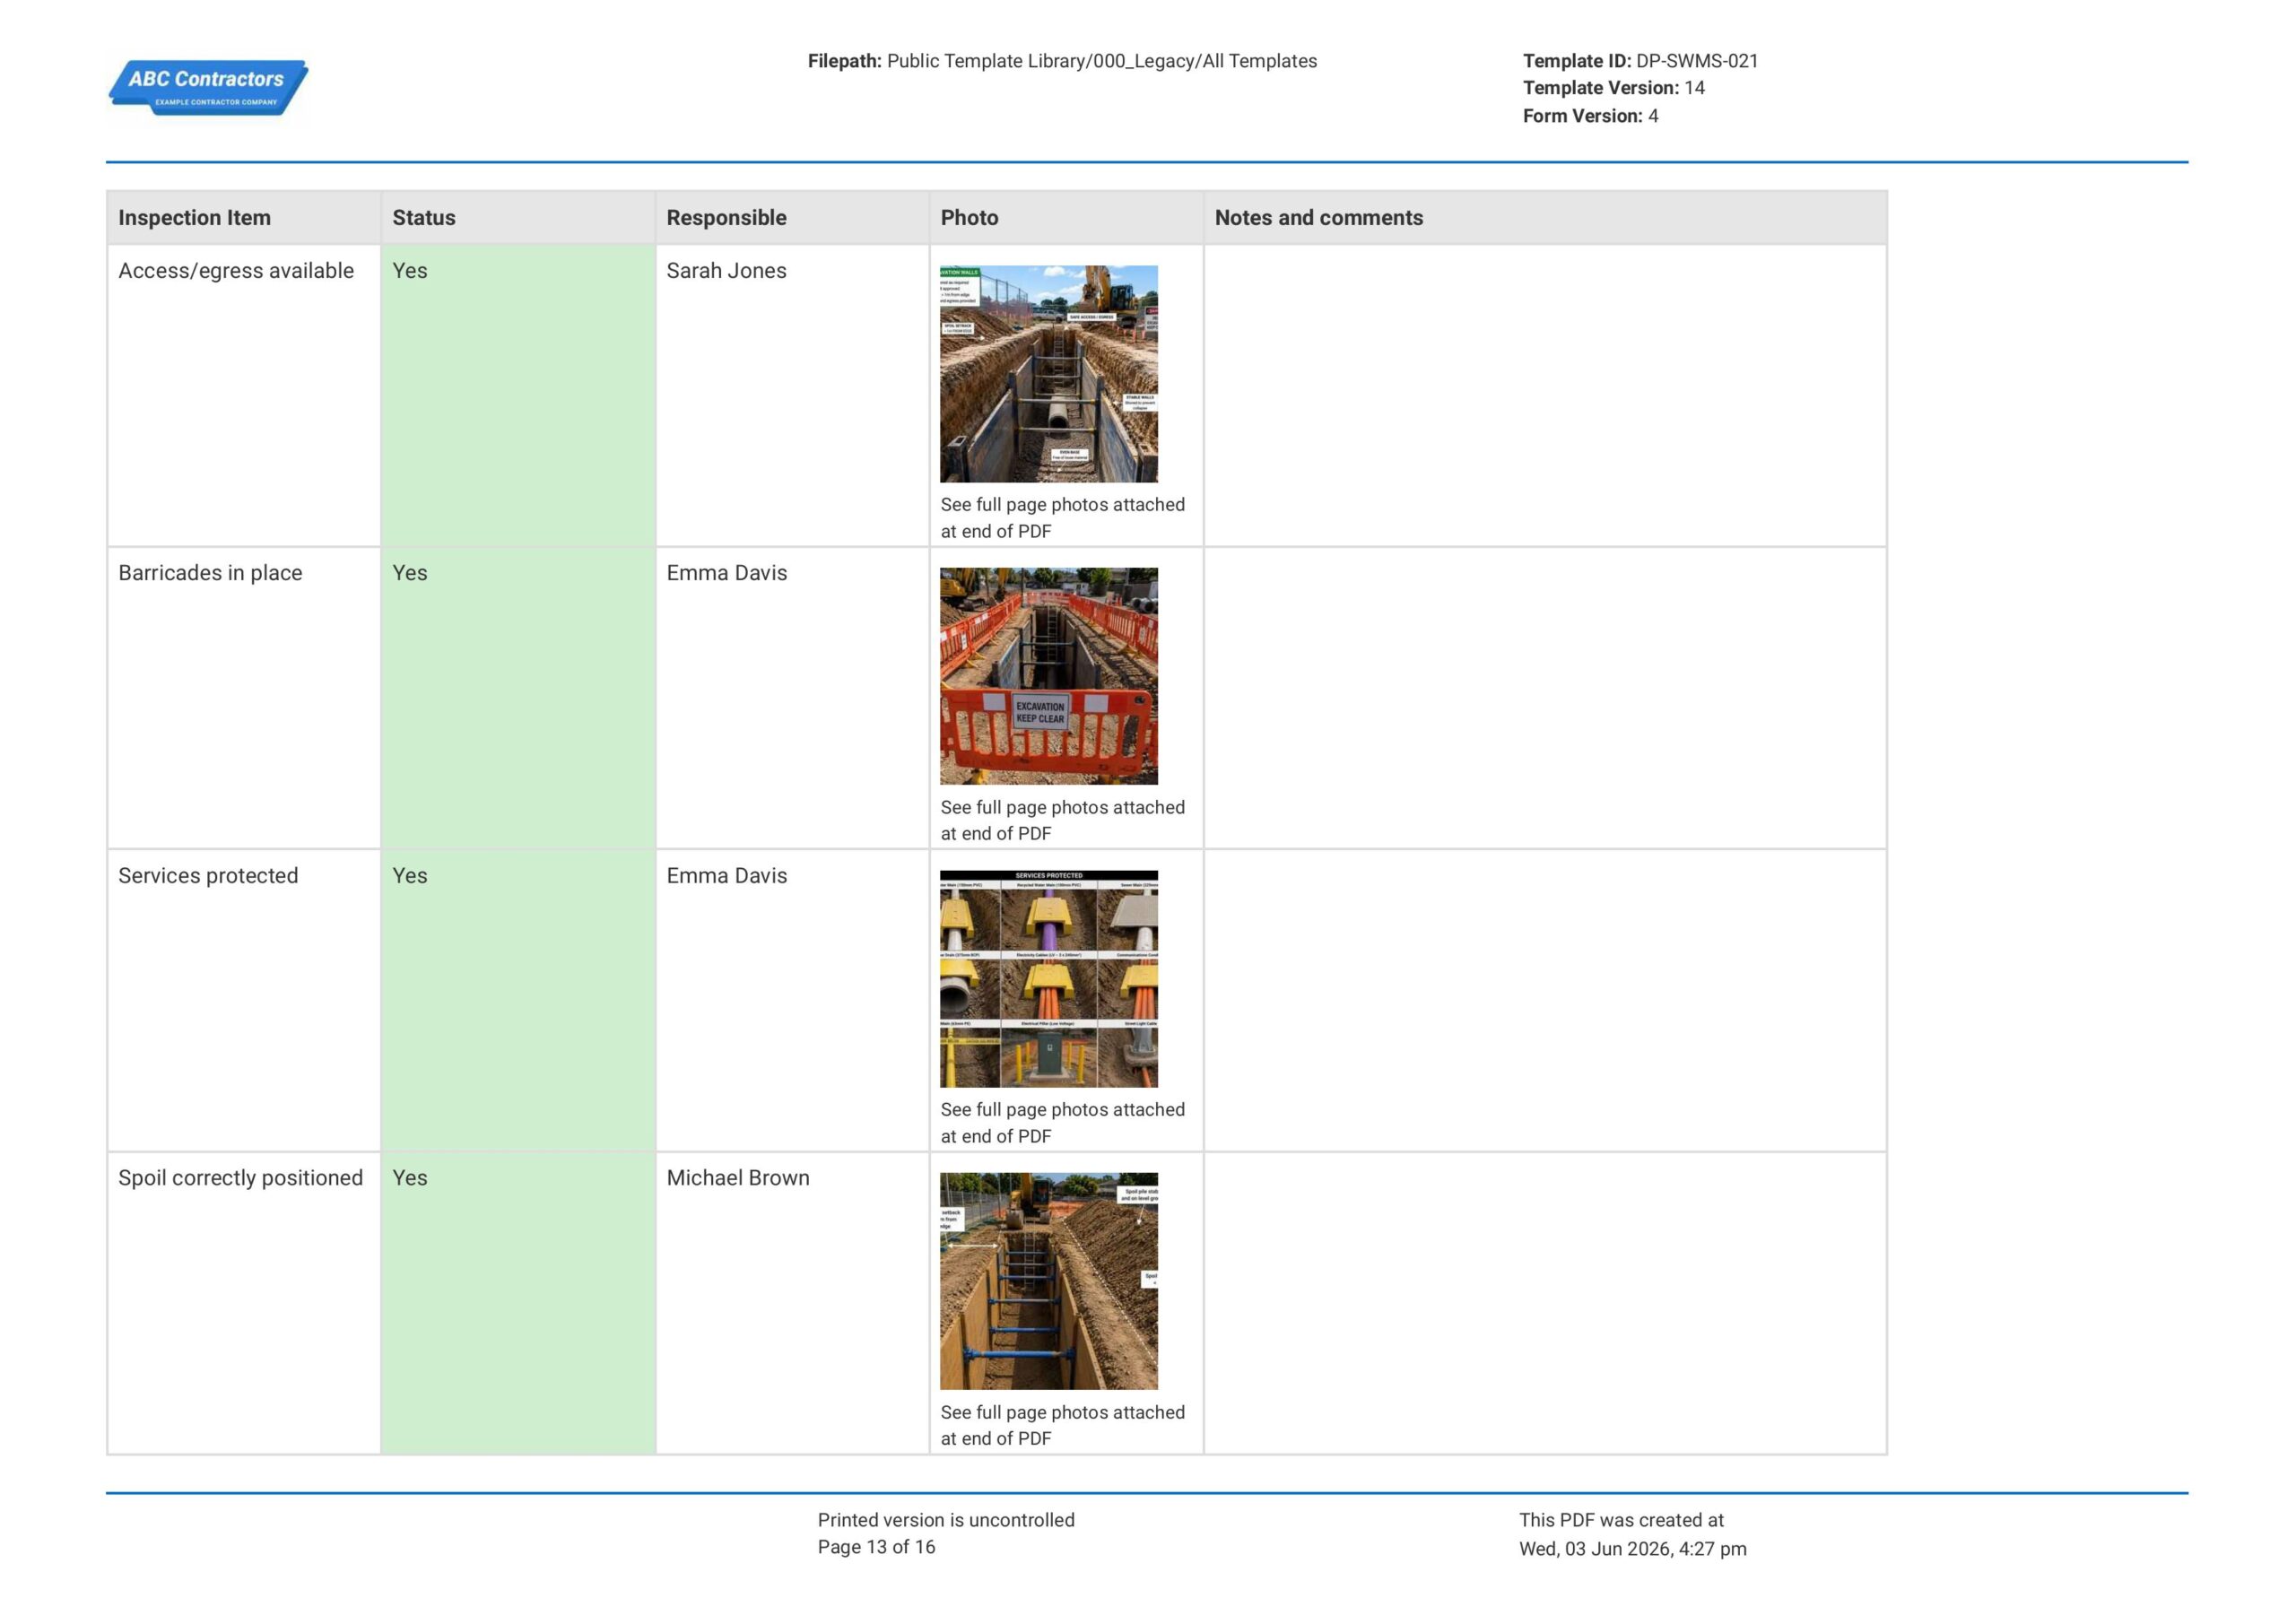
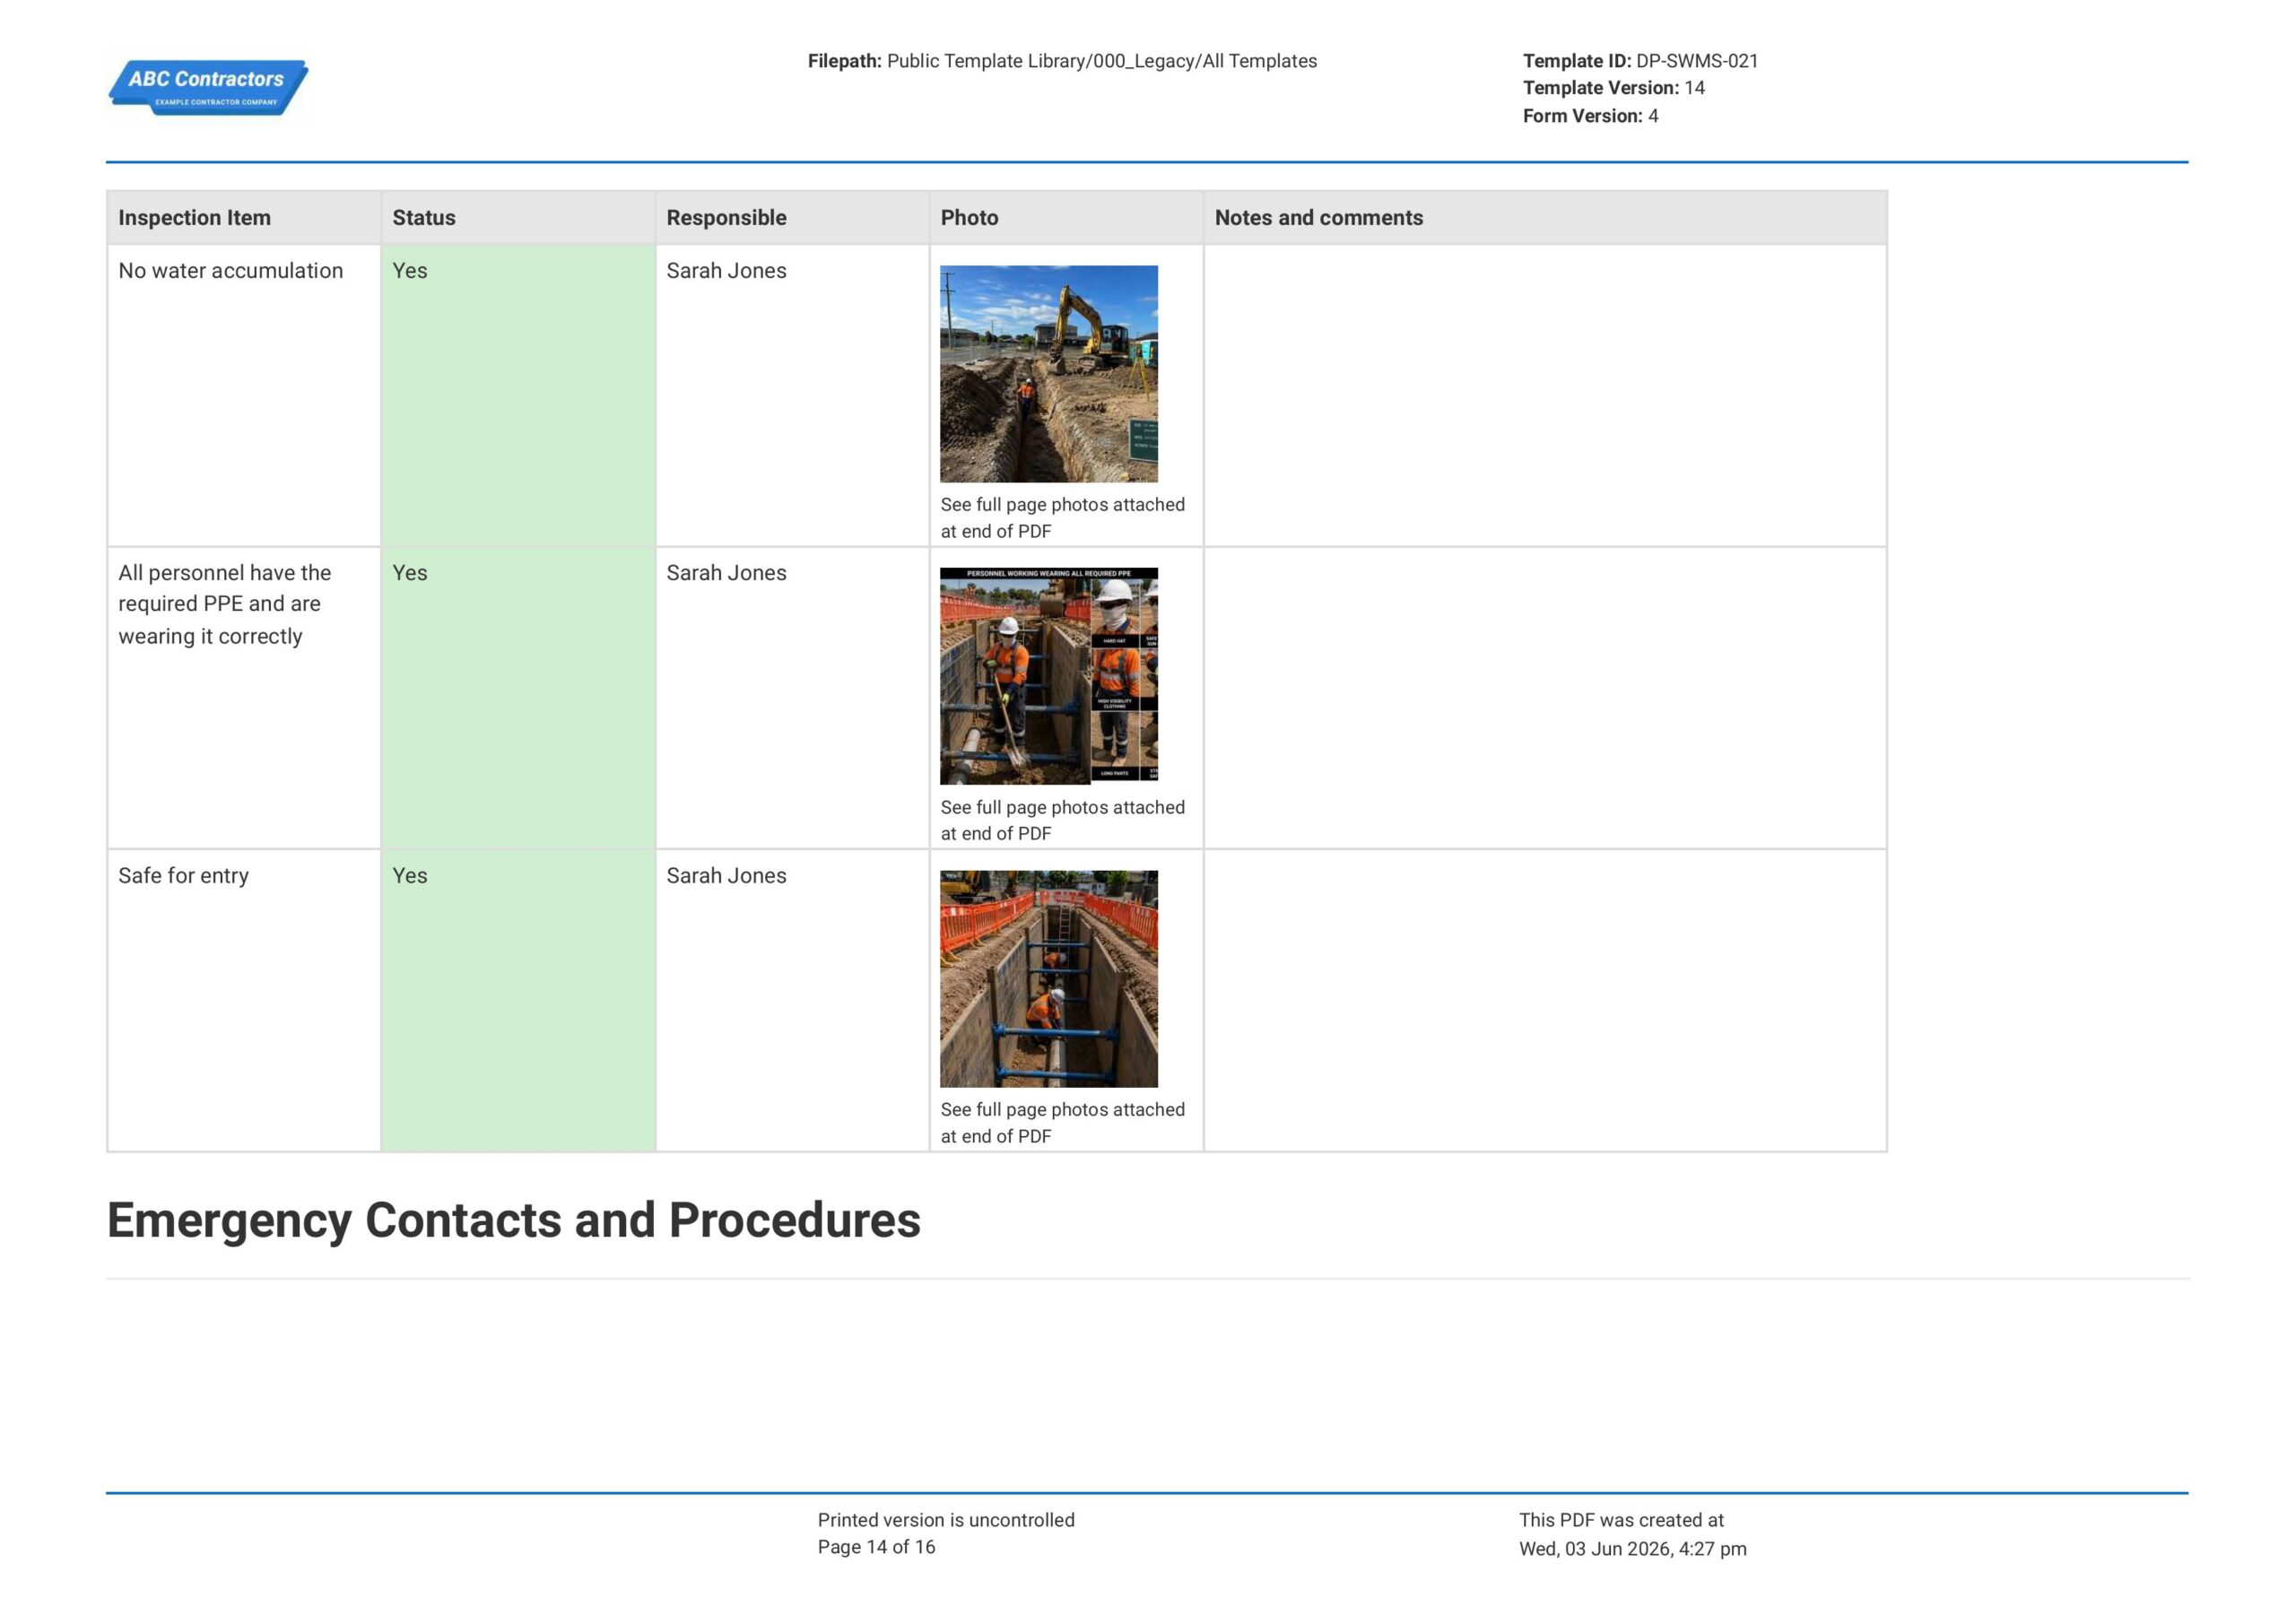
Creating the pre-start checklist section
- Add a weather field to automatically collect weather information.
- Add a prefilled table element with 5 columns and 12 rows.
- Format the first column as a prefilled text field to input the needed inspection items.
- The second column should indicate the status of the inspection item. A selection field would be appropriate for this column, where colors are integrated into each selection item.
- Format the third column as a text field for entering the name of the responsible person.
- Format the fourth column as a photo field to allow users to upload photos directly into the form or use their mobile devices to take pictures of the inspection item and add them directly to the form.
- Format the last column as a text field to allow users to input additional notes and comments.
-
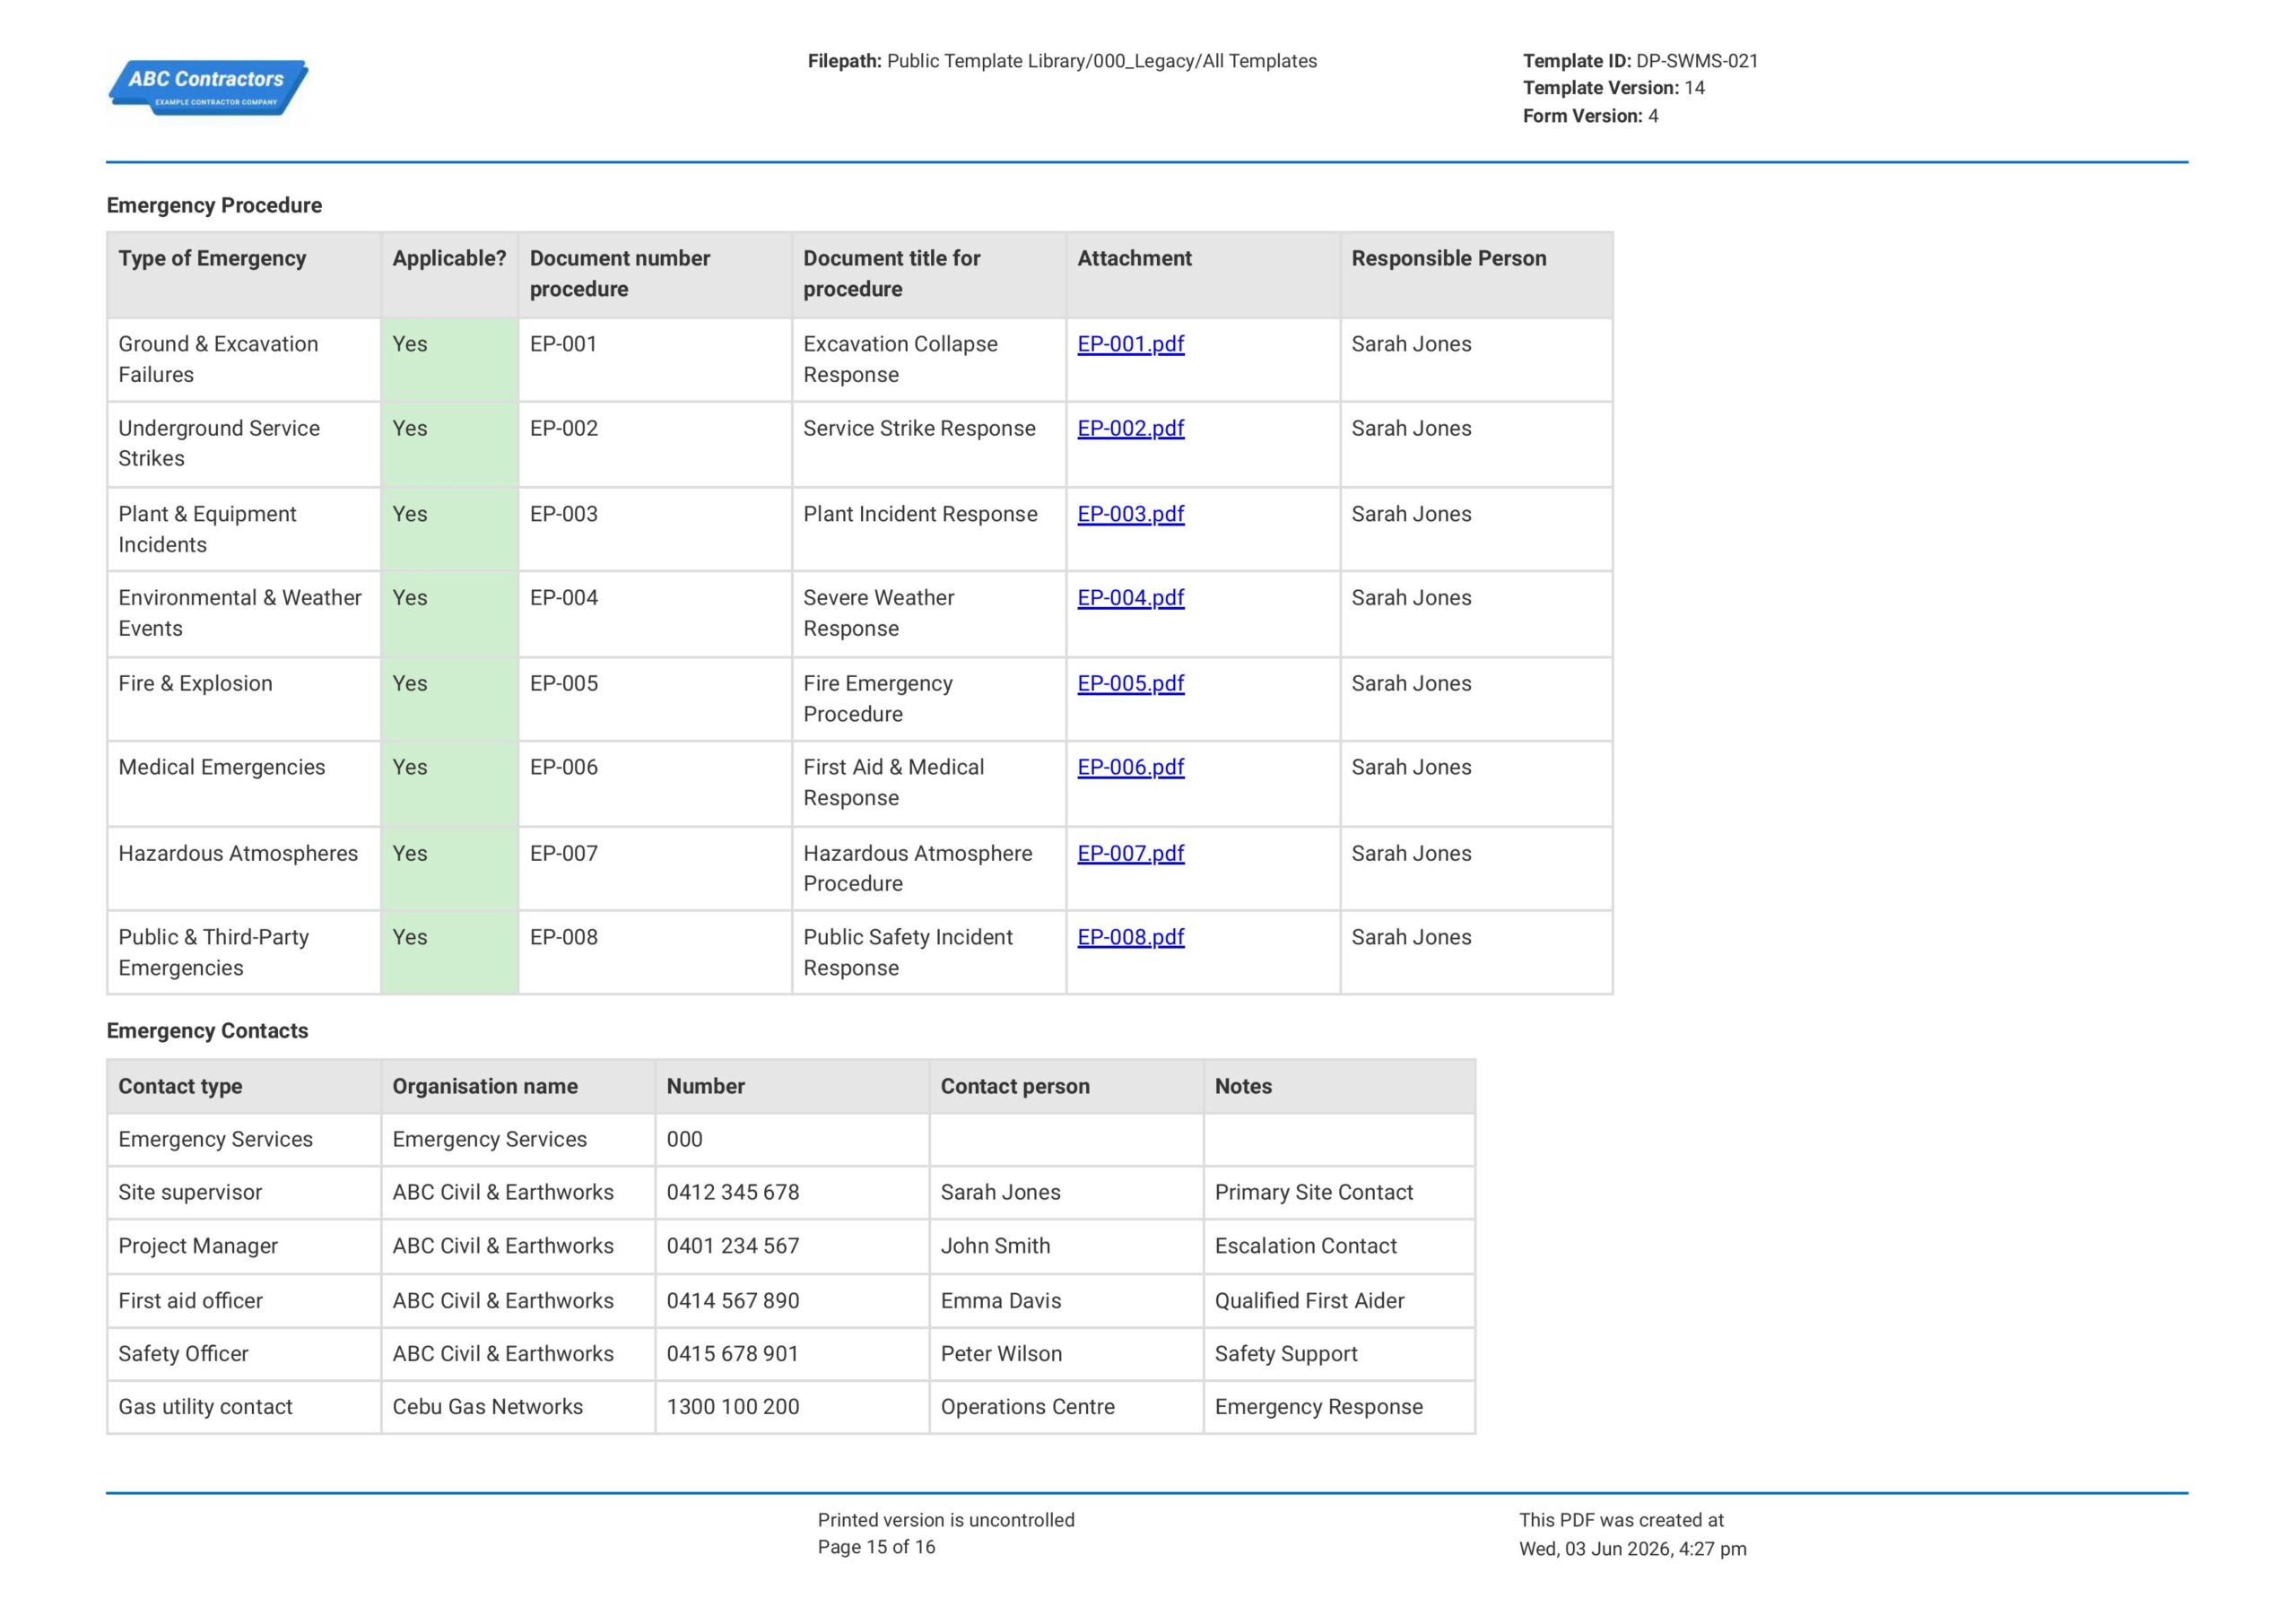
Creating the emergency contacts and procedures section
- Add a prefilled table element with 6 columns and 8 rows for the emergency procedure subsection.
- Format the first column as a prefilled text field for entering the type of emergencies, which are the following: ground & excavation failures, underground service strikes, plant & equipment incidents, environmental & weather events, fire & explosion, medical emergencies, hazardous atmospheres, and public & third-party emergencies
- The second column should indicate the applicability of each emergency type. A selection field would be appropriate for this column, where colors are integrated into each selection item.
- Format the third and fourth columns as text fields for entering the Document number and the Document title for the procedure.
- Format the fifth column as an attachment field to allow users to upload the relevant files.
- Format the last column as a text field for entering the responsible person.
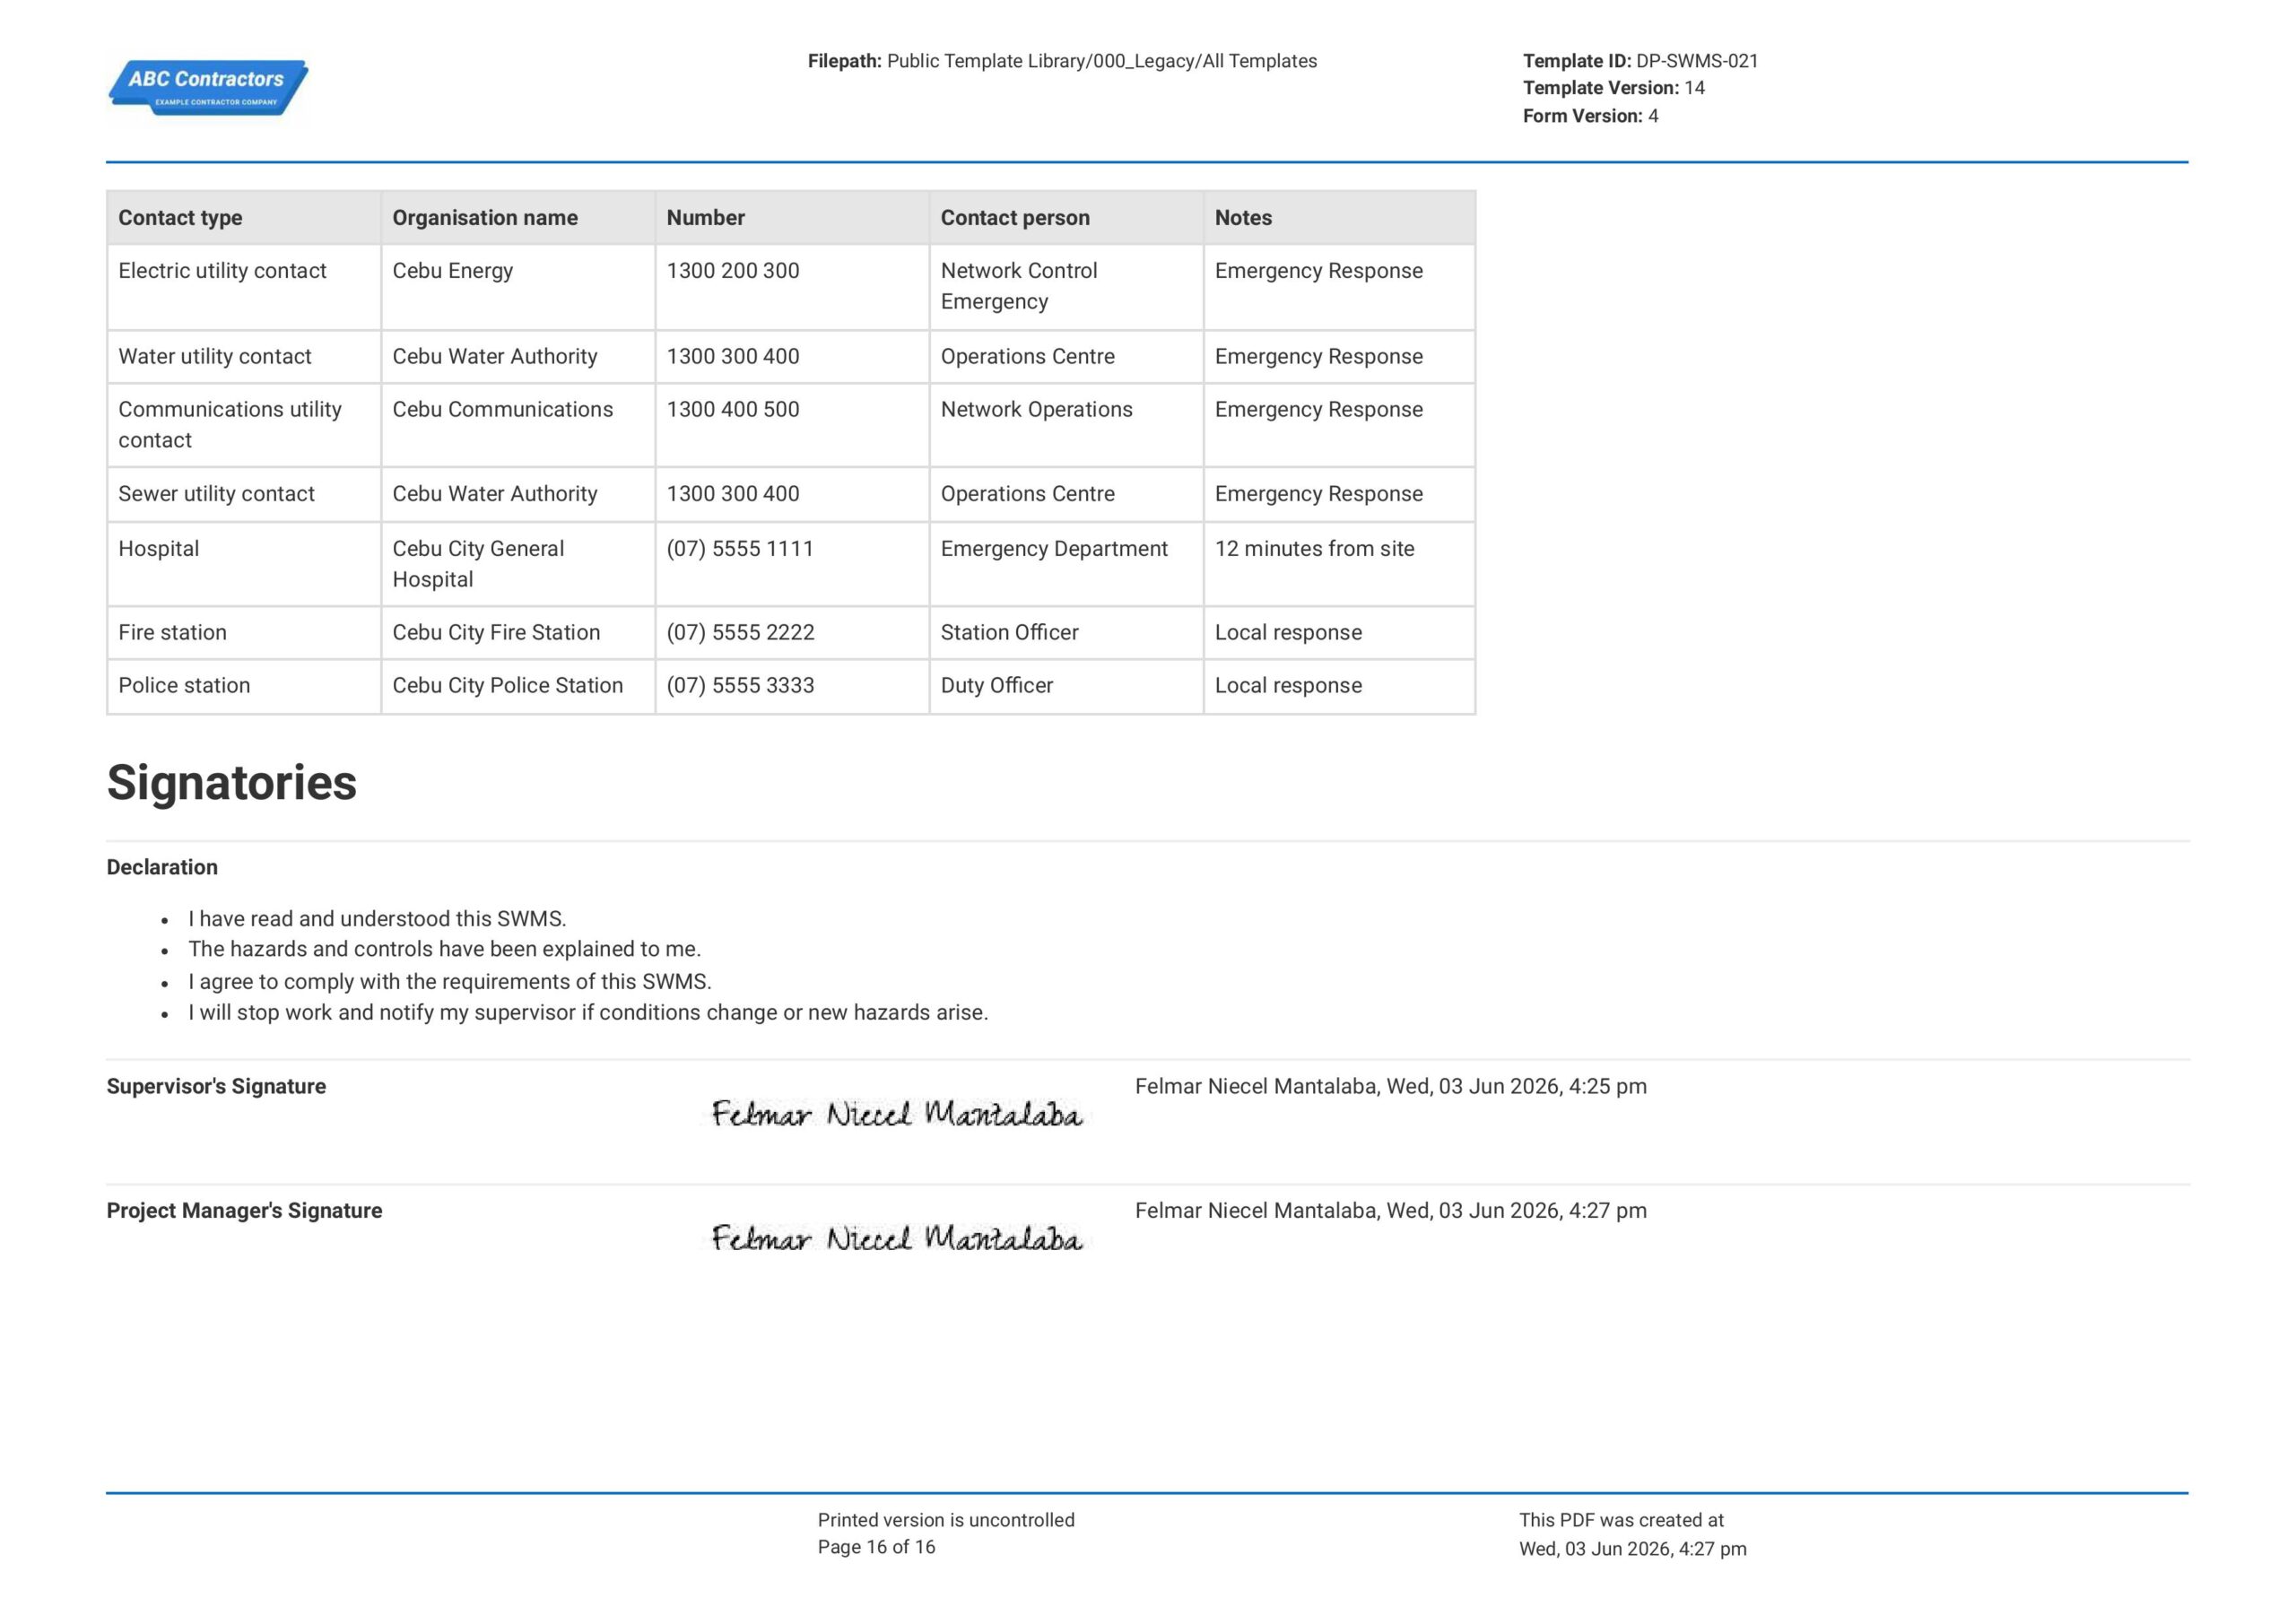
- Add another prefilled table element with 6 columns and 13 rows for the emergency contact subsection.
- Format the first column as a prefilled text field for entering the type of contact, which are: emergency services, site supervisor, project manager, first aid officer, safety officer, gas utility contact, electric utility contact, water utility contact, communications utility contact, sewer utility contact, hospital, fire station, and police station
- Format the rest of the columns as text fields to enter the following: organisation name, contact number, contact person, and notes
-
Creating the signatories section
- Provide a prefilled text field and input the following declarations: I have read and understood this SWMS; hazards and controls have been explained; I agree to comply with the requirements of this SWMS; and I will stop work and notify my supervisor if conditions change or new hazards arise.
- Add signature fields for the supervisor and project manager.
About the author

Felmar Mantalaba
Content Engineer
 LinkedIn
Education
Cebu Institute of Technology - University - Mechanical Engineering with Mechatronics
Bio
Felmar is a mechanical engineer, whose four years of experience in the mining industry inspired him to write and share stories to progress the revolution of new technologies and create smarter, smoother ways of living.
Past Projects
Safety, Health, and Environment Management System (SHEMS) CoordinationSHEMS Coordinator at Atlas Consolidated Mining, ensuring organizational compliance with ISO 14001 and ISO 45001 standards, performing risk assessments, developing policies, and conducting audits and inspections to maintain a safe and environmentally responsible workplace.
Maintenance Management and OptimizationSenior Maintenance Manager (OIC) leading equipment maintenance and operational efficiency initiatives, reducing downtime by 10%, improving Mean Time Between Failure (MTBF) and Mean Time To Repair (MTTR) for major equipment, and managing maintenance schedules, manpower, and materials, while overseeing capital project optimization.
Inspection Engineering and Equipment ReliabilityInspection Engineer responsible for technical blueprint interpretation, vendor collaboration, preventive maintenance scheduling, and data collection for vibration and temperature readings, delivering actionable recommendations and comprehensive reports to improve equipment reliability and operational performance.
End-to-End Operational Oversight in Mining EngineeringContributed to multiple facets of operational management, including SHEMS compliance, maintenance optimization, inspections, and capital project evaluation, integrating safety, reliability, and efficiency improvements across all stages of copper production operations.
Version History:
Related apps and templates
Safe Work Method Statement App
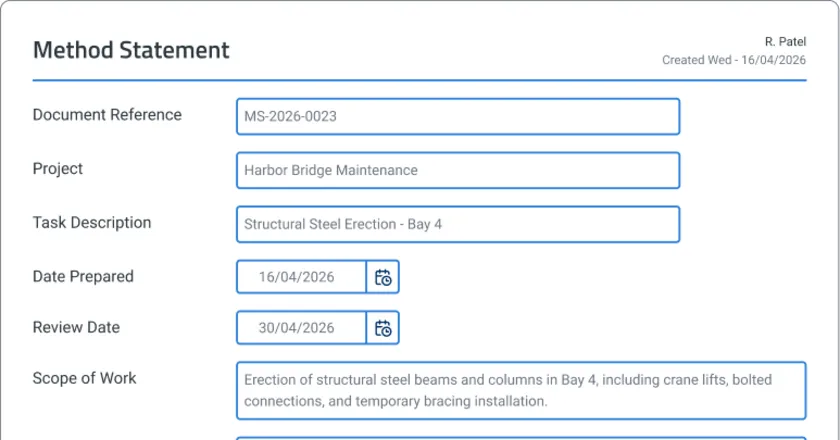
Sitemate’s safe work method statement app template helps supervisors draft, review, sign off, and store SWMS fast. Try free — no credit card
View app
Excavation Permit
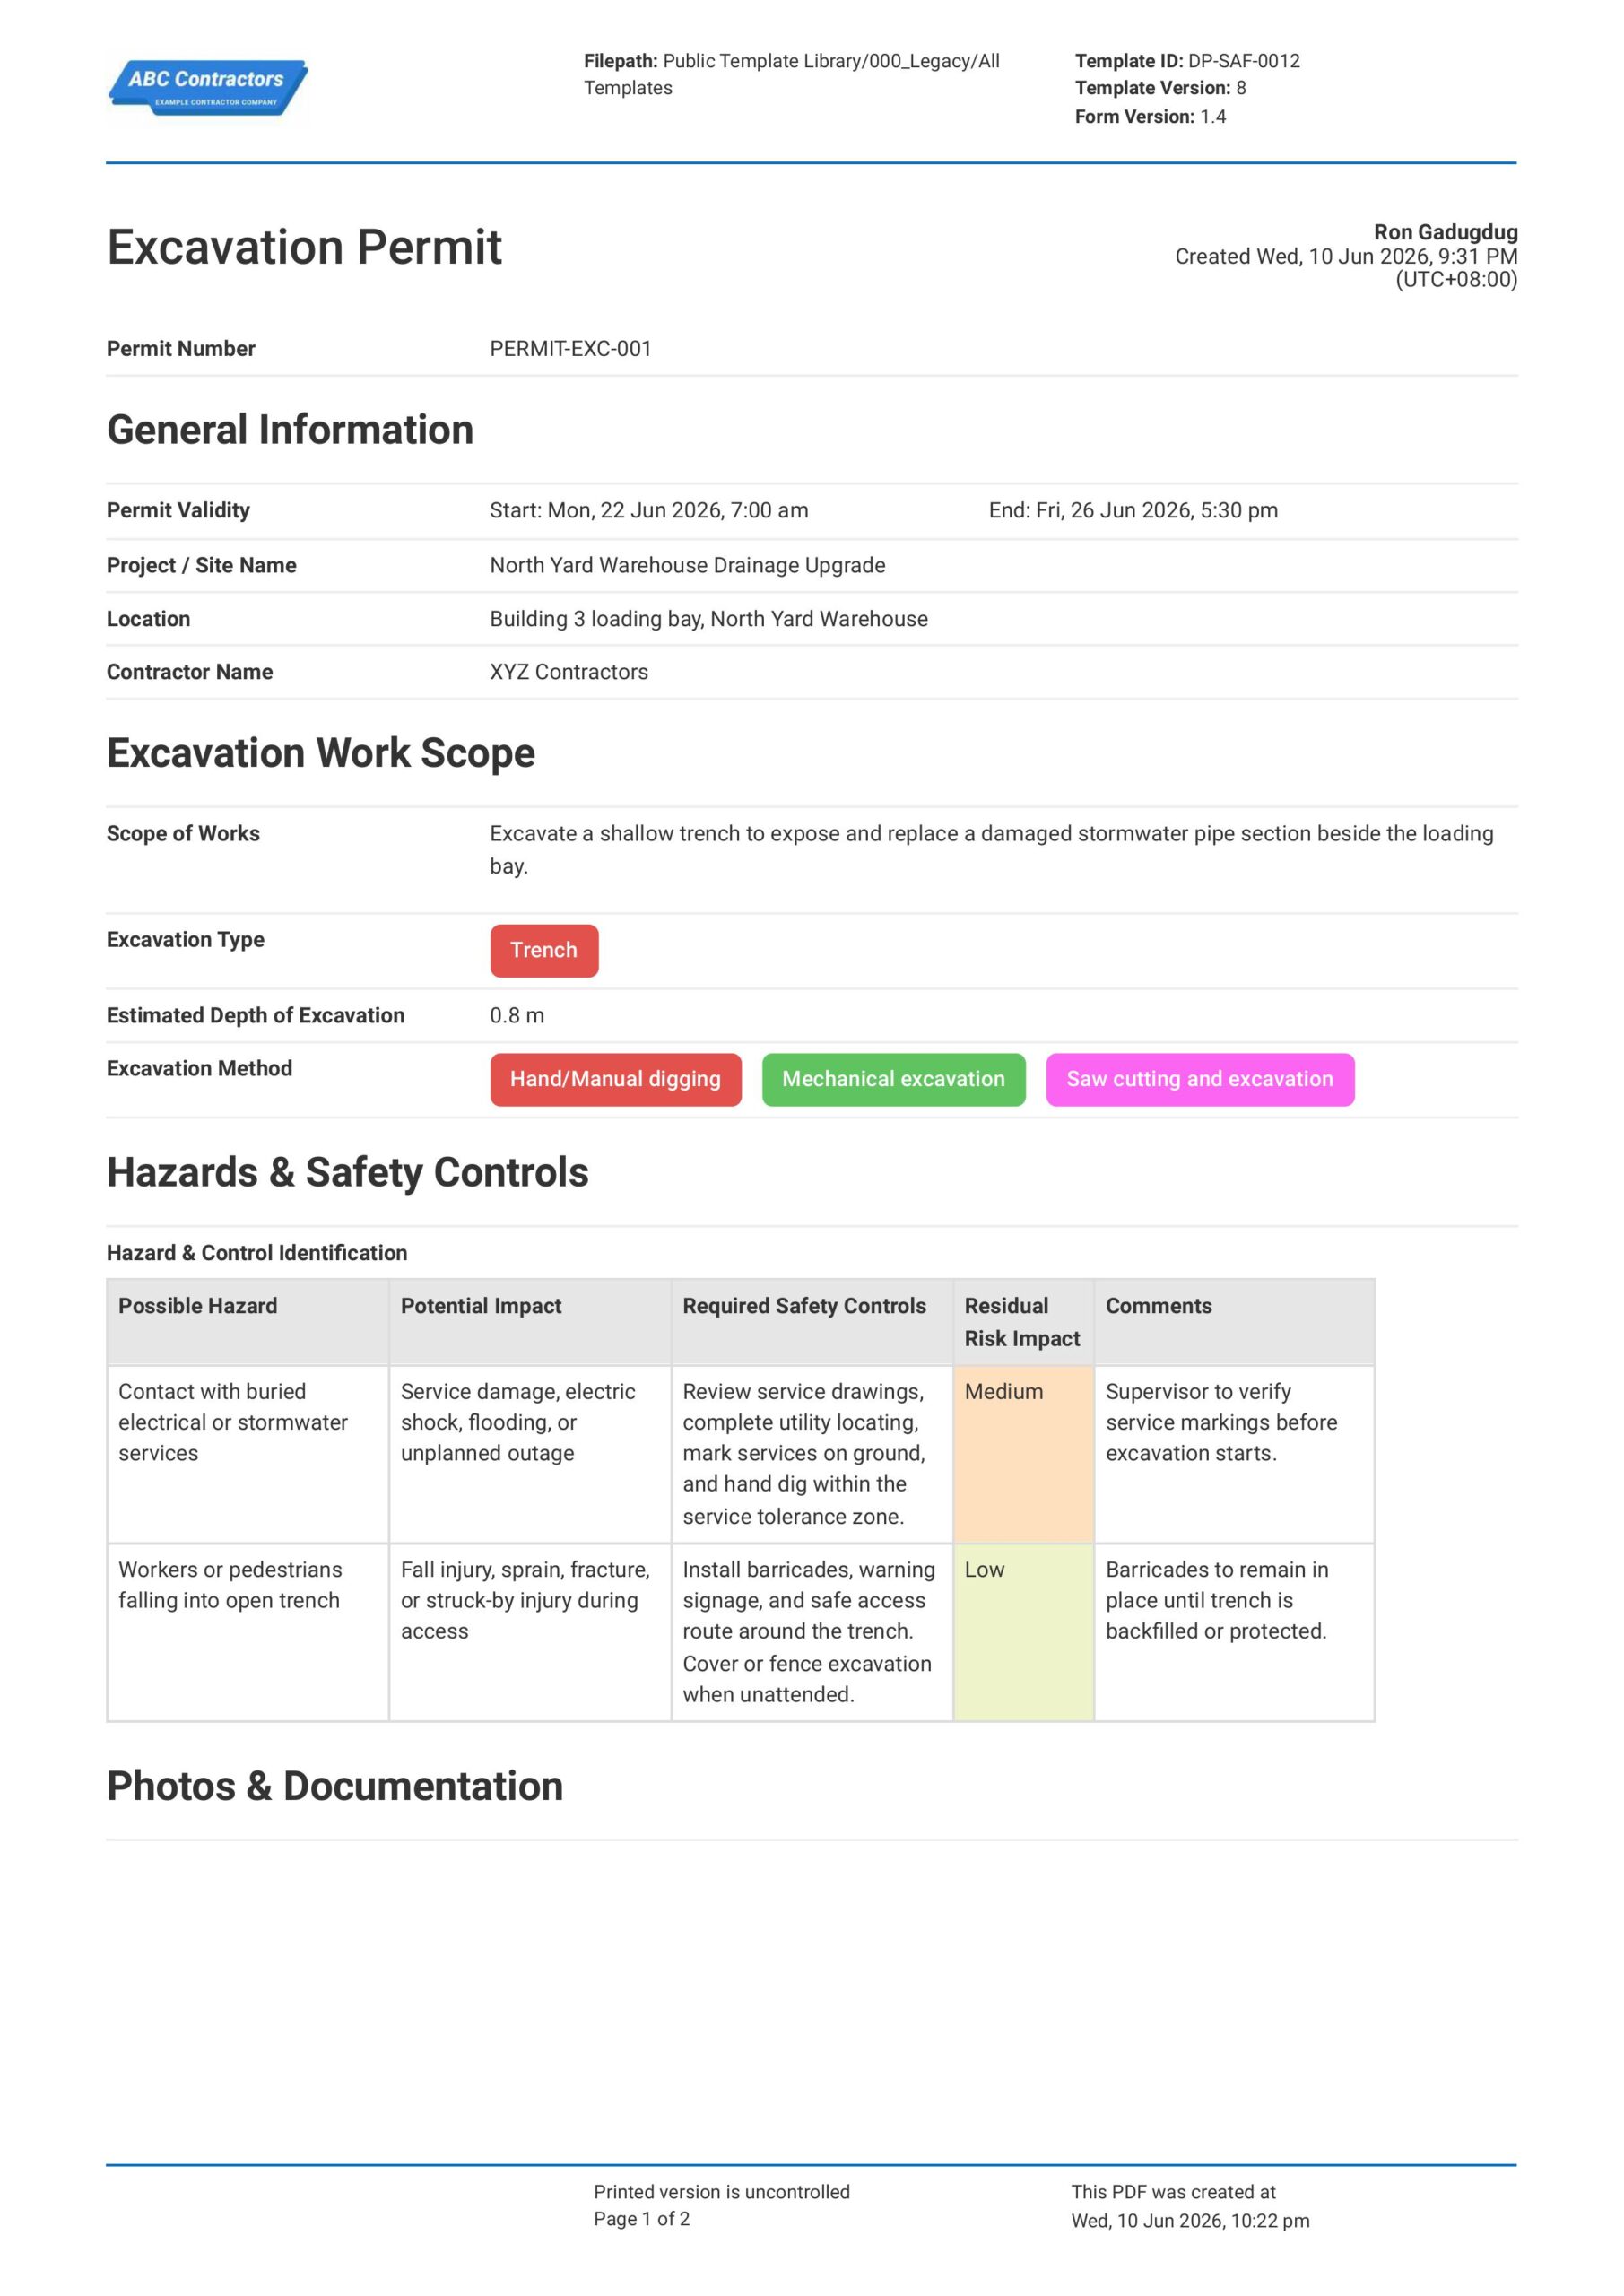
This Excavation Permit is an easy-to-use form that your workers can use to request, review, and approve excavation work before digging begins. Record important excavation details such as the work location, excavation
View template
Risk Assessment for Excavation
This free and downloadable Risk Assessment for Excavation template is fully ready to help streamline the risk assessment process, since it provides a more structured and targeted checklist, considers environmental
View templateThis form was generated with Dashpivot software
- Access, edit and complete your Excavation Safe Work Method Statement from any device - mobile, tablet or computer.
- Print, download or send your Excavation Safe Work Method Statement as perfectly formatted PDF documents with your company logo.
- Store your Excavation Safe Work Method Statement securely online, where they can be searched and found in seconds
- Invite internal and external parties to see, edit and sign off on Excavation Safe Work Method Statement online.