Safety – Hierarchy of risk control
Hierarchy of risk control
What is the hierarchy of risk control?
The hierarchy of risk control (also known as the hierarchy of hazard control) is a system or framework used to minimise, mitigate and eliminate exposure to hazards.
The hierarchy is typically referenced and implemented in industrial workplace like manufacturing, construction, oil and gas, mining etc., where incident rates are typically higher and hazards more common.
All companies operating in these industries (and most other industries) should be aware of and cognisant of the hierarchy of risk control. The hierarchy can fall under the responsibility of the safety department, safety manager, director or supervisor, depending on the make-up of the organisations and its projects.
Controlling risk and reducing hazards is one of the key obligations of everyone in the workplace, so while understanding and thinking about the hierarchy may be the focus of the safety manager, implementing and utilising the hierarchy will require the efforts of all.
Understanding the various level of control that prevent identified hazards from posing a risk to workplace health and safety is one of the most critical aspects of managing a workplace.
The hierarchy of risk control falls into phase three (3) of hazard management:
- Identifying hazards
- Assessing risks through risk assessments, checklists and more
- Controlling risks (this is where the hierarchy of risk control comes in)
- Reviewing the control measures pout in place
So let's take a deeper look at the hierarchy of risk control below.
Hierarchy of risk control pyramid
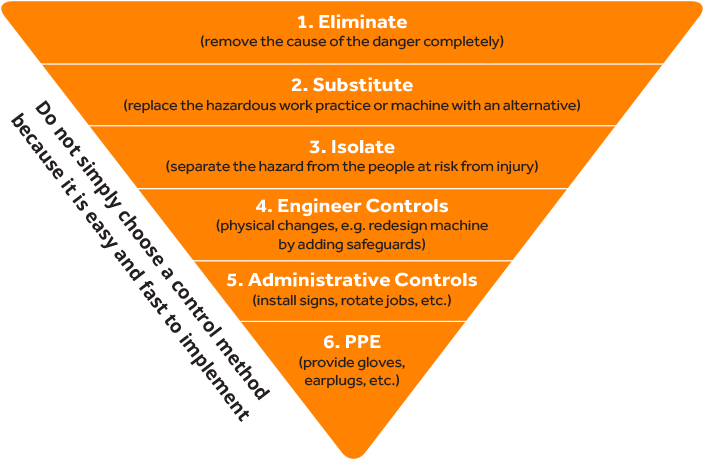
The hierarchy of risk control pyramid is the most commonly used 'template' for implementing risk controls.
Not everyone references the exact same shape or stages of control, so you may see the hierarchy of risk control represented as a different shape; you may see 4 or 5 layers to the pyramid rather than 6; and you may see some stages called slightly different things.
But in general, the hierarchy of risk control pyramid you see below is a good example of the 'accepted' pyramid.
The pyramid serves as an easy way to visualise the actual hierarchy of risk control, but it's purpose is not visual. The pyramid is intended to provide the concrete approach to controlling risk, whereby the person in charge of implementing the controls looks to top of the pyramid solutions first, before making their way down through the layers of control.
The structure of the pyramid tells any person which control measure is most effective (in almost every situation), and which should be chosen first.
The hierarchy of risk control pyramid has six (6) levels of control measures:
- Elimination - Eliminating the risk completely is the best control possible, because then the hazard 'does not exist' anymore and can not cause any harm
- Substitution - Substitution is the second best 'option' when it comes to the hierarchy of risk control. Substitution involves replacing the risk, hazard or method with a different one which doesn't include risk (or as much risk).
- Isolation - Isolation comes after substitution, and involves separating the risk from people - or as many people as possible.
- Engineering controls - Engineering controls involve making engineering changes to the risk or situation, such as an adjustment or alteration to a machine or landscape.
- Administrative controls - Administrative controls typically lessen risk by helping make people more aware of the hazard.
- Personal protective equipment (PPE) - PPE is the lowest (weakest) in the hierarchy of risk controls, and includes wearing and relying on any type of personal protective equipment. This is often counterintuitive, as many people see PPE as the first line of safety defence - while it is actually the defence of last resort.
And of course, a combination or series of controls may be used at any one time where applicable. It is very common for the administrative team to modify how work gets done, while also still utilising PPE.
The best way to think about the hierarchy of risk control pyramid is that the lowest stages or approaches should never be used exclusively to control risk. They should be used in the additional control of the risk only.
While the pyramid implies that the best approach to every risk is to eliminate it completely, we understand this isn't always possible. Like all safety topics and methods, there are trade-offs involved with implementing any safety practice.
Each layer of the hierarchy of risk control must be assessed on its own merit from a feasibility standpoint as well.
Hierarchy of risk control examples
To give you a better understanding of the hierarchy of risk control, as well as the trade-offs and combinations of each, it's worth looking at a real-life hierarchy of risk control example.
Let's use the example of a dangerous machine which has recently led to an incident on site, has been identified as a hazard, and now requires some risk controls.
Referencing the hierarchy of risk control, our approach would look something like this:
Eliminating the hazard altogether:
The first and 'best' approach to controlling the risk of this machine would be eliminating the risk or hazard altogether. In this case, this would involve getting rid or removing the dangerous machine.
While this may be the best way to reduce the risk completely, the machine may be necessary for the work or project.
Substitute the hazard
The next best hazard reduction approach will be substitution.
If the source of risk - this machine - can not be removed completely, then we may be able to find a safer, newer or different machine to do the job.
This is often possible on many sites, where old and dates machinery can be replaced with new (typically safer) machines.
The machine being subbed in must of course be more safe (less risky), and be able to do the job to the required standard. Once again, the company may have to assess whether or not a reduced risk is worth a slight dip in productivity or output.
Isolate the hazard
If the machine can not be removed or substituted, then our next idea would be to isolate it. For this machine, this would likely involve moving the machine into its own room away from 'other' people, and operating it remotely.
Use engineering controls
If there is something specific about the machine which is causing risk, like an overexposed blade or something similar, we may be able to implement some engineering controls.
This might include attaching a guard to the machine to protect users.
Use administrative controls
Even if we have implemented some of the upper hierarchy of risk controls, we will still look for opportunities at the lower levels of the hierarchy for safety improvements.
Some administrative controls for this specific machine would include training workers on how to use the machine safely, creating better safety checklist processes, and placing signage and other 'flags' around the machine.
Use PPE
And finally, there will be some controls and rules put in place around the PPE required to use and operate the machine. This may include safety boots, safety gloves and goggles for this specific machine.
How to document, track and measure your risk controls
Our job doesn't end once our risk controls are put in place, even if we utilise and implement the hierarchy of risk control perfectly.
The next phase of hazard and risk management beyond risk controls involves reviewing the controls we choose to put in place. Reviewing the controls we put in place and understanding whether they had a positive impact is the only way that we can learn and gather feedback beyond the hierarchy of risk control.
The hierarchy isn't perfect, and it definitely isn't perfect for every situation. From your reviews, you may learn that specific risks or hazards work better when there is a specific combination of controls, for example.
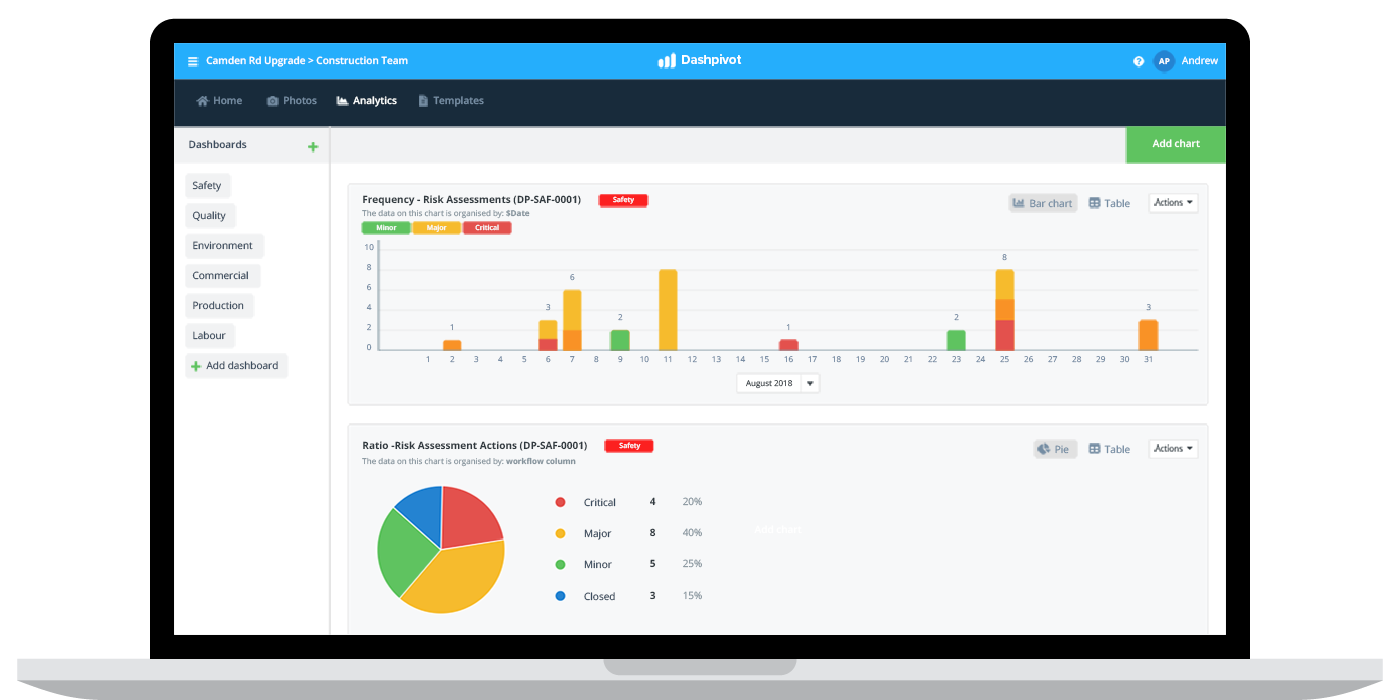
The problem with tracking and measuring your controls is that it can be time-consuming and difficult. The best way to streamline how you document, track and measure all of your risk controls is through safety software.
Instead of scrambling to find all of your paper, PDFs and word docs checklists and safety documents, and then reconciling all of that data into spreadsheets, you can sit back and watch as all of your information is piped straight into safety dashboards and charts which show you exactly how you are performing in real-time.
This closes the loop on your hierarchy of risk controls, and closes the loop on identifying, assessing, controlling and then reviewing your hazards and risks.
Learn more about this smart safety management system.
Controlling risk from the ground up
Like many high level safety systems, procedures and approaches, the hierarchy of risk control is typically managed and implemented from the top-down.
Safety directors and other managers come together to brainstorm current hazards and risks, and then implement controls based on frameworks like the hierarchy of risk controls.
While this is a good and practical approach, it often leaves many workers in the dark and doesn't result in the best safety outcomes on site or in the field.
While management has good intentions, its understanding of site risk as well as the types of controls they implement may not be well received or well appreciated by the people on the ground.
To ensure that your hierarchy of risk control is as effective as possible and that your sites and workplace are as safe as possible, it's critical to connect your ideas and controls to workers.
This can involve good engineering controls, administrative controls and PPE requirements, and it can (and should) also include softer safety procedures like safety meetings and short safety talks.
These meetings and talks enable you to loop workers in on your new risk and hazard controls, and to get real-life feedback from the workers experiencing the risks as well as the new controls.
The hierarchy of risk control is a great framework for your organisation, but it must be part of a broader and more connected safety effort which includes and requires participation from all.
People in 80+ countries use this safety management software to better manage safety.
