
Air Brake Test Checklist Template
Start with a free 30-day trial. No credit card required.
 Fully editable Air Brake Test Checklist
Export your Checklist results to PDF or CSV
Access Air Brake Test Checklist on any mobile or tablet device
Numerous other templates including other maintenance forms


~10,000 employees

~500 employees

~10 employees

~25,000 employees

~200 employees

~1,500 employees

~1,500 employees
What is Air Brake Test Checklist?
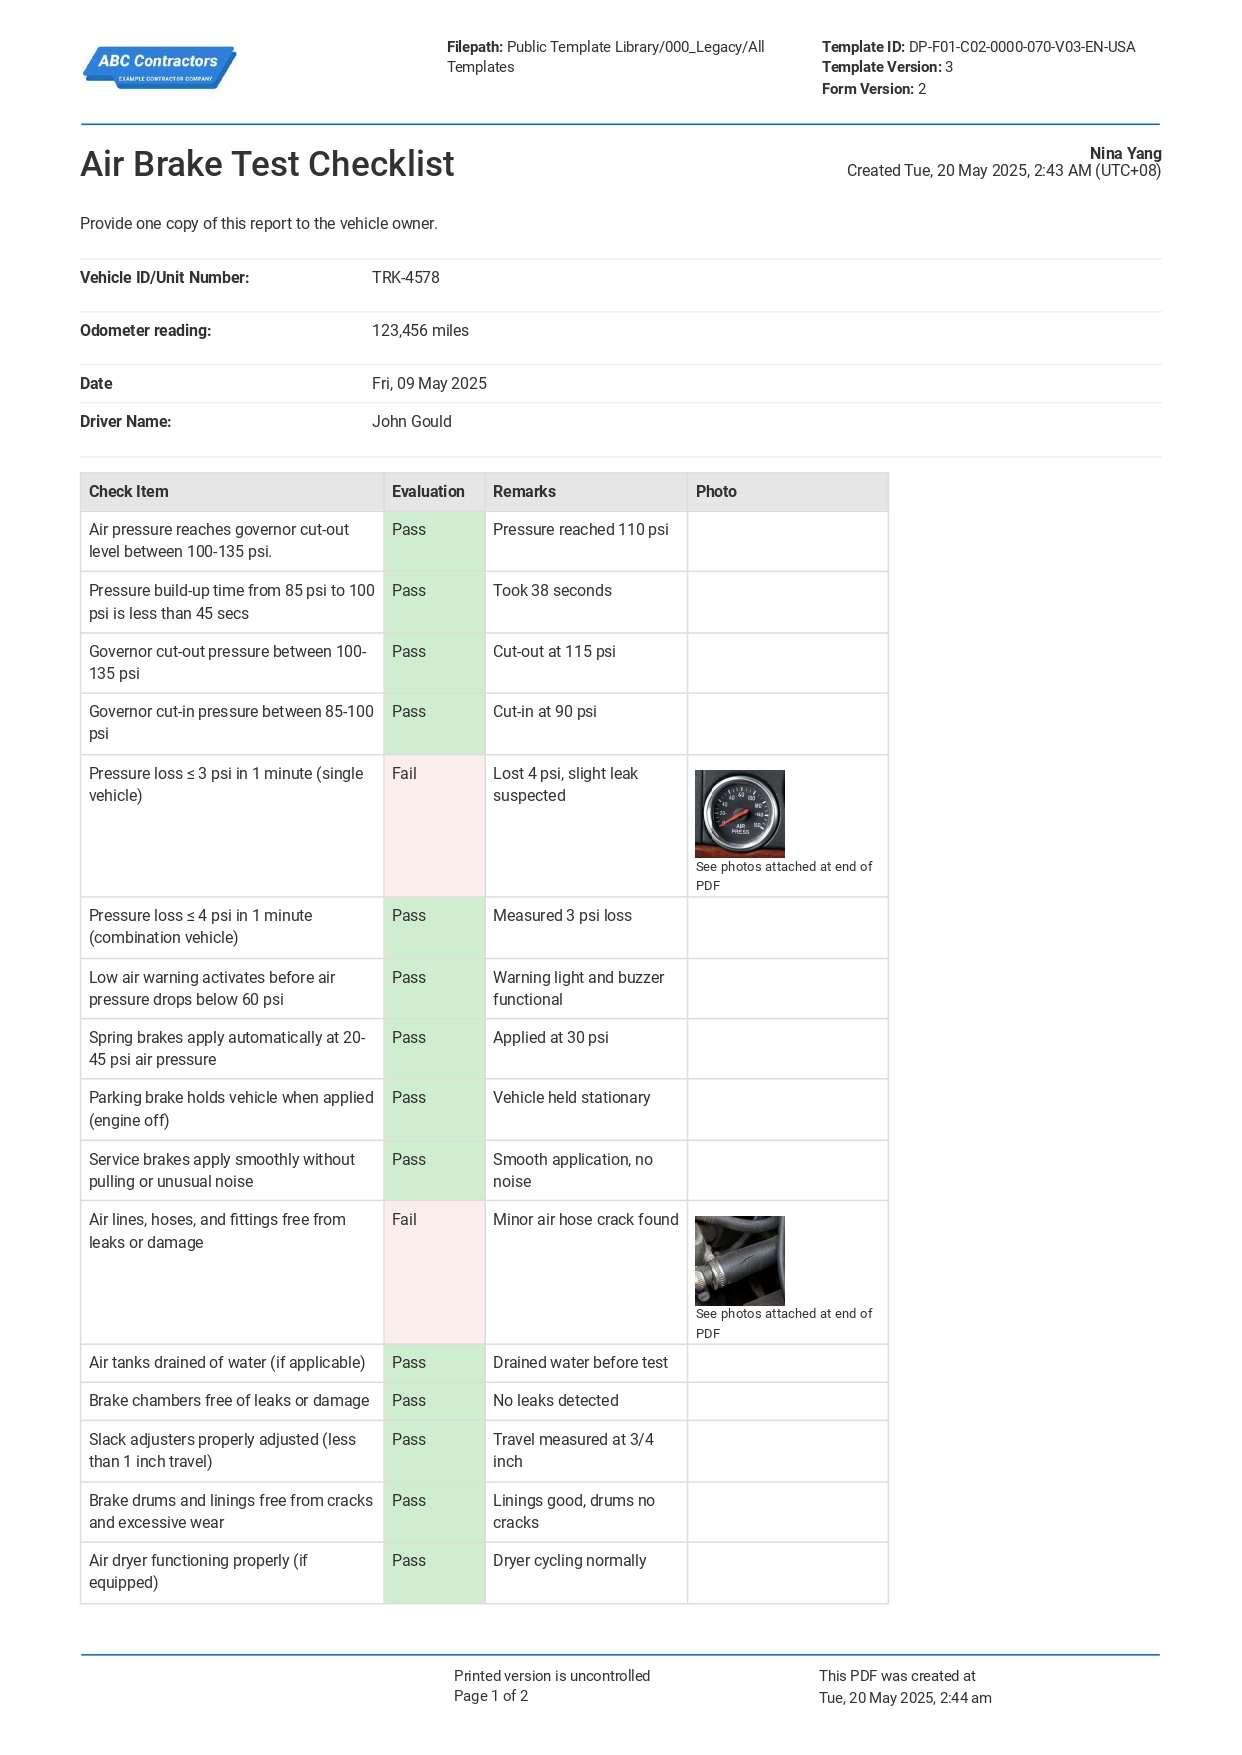
An Air Brake Test Checklist is documentation for the inspection check items on an air brake test procedure. Air brake testing is a requirement for large and heavy commercial vehicles such as tractors, dump trucks, or cement mixers, to verify their air brake systems to ensure safe and efficient braking. In the context of the Commercial Driver’s License (CDL) application or renewal, an air brake test is critical and compulsory for all vehicles that have an air brake system, which are part of Class A or B vehicles. According to the Federal Motor Carrier Safety Administration (FMCSA), drivers must demonstrate proficiency in this during the skills and knowledge test when applying for a CDL for vehicles with an air brake system.
Compare this digital Checklist to paper-based forms made using Word, Excel
Use this Air Brake Test Checklist template for free.
Air brake test procedures
There are a few practical methods to conduct air brake tests broken down to a few steps to 3-step, 5-step or 7-step procedure to make it more systematic and more convenient to perform depending on the priority. These are also demonstrated on a CDL skills test which an applicant should be able to verbally explain. Let’s look at the 3-step and 7-step air brake test procedures and how it should be done.
How to do the CDL 3-Step Air Brake Test?
A 3-step air brake test is one of the ways to conduct Air Brake Test. It’s more compact and broken down to what’s mandatory or the core components required for CDL skills test. Apart from doing the following to get a CDL, this is also perfect to remember for a roadside inspection. These 3 essential steps are:
1. Test for Air Leakage – This first step is to check there are no leaks in the system. It can be done by building full pressure in your truck by turning the truck engine off and turning the switch back, release the parking brake the hold the brake pedal down and observe the pressure drop then count 60 seconds. If it loses excessive pressure (around 4 psi for combination vehich) then it indicates a system problem.
2. Test the Low Air Pressure Alarms- This second step is making sure that the low air alarm activates when it’s triggered. This is done by pumping the brake pedal dropping the air pressure. The low air warning light/buzzer should activate which indicates that it’s working
3. Test the Protection Valve or Emergency Spring Brake -The last step is ensuring protection valves pop out which is essential to ensure the truck’s brakes is not applied unexpectedly. This is done by continually pumping the brake until the protection valves pop out.
How to do the CDL 7-Step Air Brake Test?
The 7-step air brake test is a more comprehensive method typically used in a fleet, or CDL schools training but not usually common on CDL skills test. Before beginning the 7 essential steps below, make sure you have conducted a thorough visual inspection of the vehicle to make sure there are no other issues.
1. Test for Air-Compressor Build-Up – The first step is to check if the air-compressor cuts out when it reaches its maximum level or cut-out pressure (120-135 psi). You start by starting the engine of the vehicle and just let it idle until it builds up the pressure. If it stops pumping air, then the air-compressor works.
2. Test for Air Governor Cut-In – The next step is to fan the brakes and hold it until the air pressure drops below cut-in (around 80 psi).
3. Test for Air Leakage – The same as the first step in the 3-step procedure, this is done by turning off the engine, then switching it on again. Release the park brake, hold it, and watch the pressure drop, making sure it does not exceed 4 psi for combination vehicles (Class A) or 3 psi for (Class B) single vehicles.
4. Applied Brake Test – This is done by releasing the spring brakes, building the pressure, then shutting off the engine. Hold the brake pedal, observe the air-pressure readings, and notice the drop to confirm if there’s any problem in the system.
5. Test the Low Air Pressure Alarms – With the engine turned on, pump the brake pedal to drop the air pressure. If the low air warning light or buzzer activates, then it’s working.
6. Test the Protection Valve or Emergency Spring Brake – Ensure the protection valves are pushed in or open, then continually pump the brake to reduce air pressure until the protection valves pop out.
7. Tug Test – This final step is ensuring the parking brake and service brakes are working. Test the service brakes are working by moving the vehicle slowly at 5mph, when the service brake is applied it should stop smoothly.
Finally, whichever procedure you follow or remember during CDL tests, the most important reminder is to never operate the vehicle if there’s any issue with the air brake system. There are ways to ensure your team remembers each step, such as conducting inspections regularly to perform it naturally. Some may use a “cheat sheet” to easily remember the steps. If there’s an issue, perform a thorough inspection using an Air Brake Test Checklist to conveniently go over the check items and figure out the root cause.
Frequently Asked Questions
Who can use this Air Brake Test Checklist template?
This can be used by Commercial Driver's Licensed (CDL) drivers, fleet managers and maintenance technicians who needs a straightforward and pre-built digital checklist to align with maintenance inspection best practice.
Is this template compliant with FMCSR standards?
Yes - this template is configured to align with Federal Motor Carrier Safety Regulations which is to systematically inspect, repair and maintain vehicles including brakes.
Can I edit this Air Brake Test Checklist for my project or company?
Yes - the template is completely editable with easy drag-and-drop functionality. You can create thousands of potential document setups using different field types including tables, formulas, sketches, photos and more, to cater to any type of data capture, as well as add your company logo, custom headers and other important structure. All of this configuration is powered by Dashpivot's template builder.
What formats is this Air Brake Test Checklist available in?
This template can be used across all devices - computer, mobile and tablet. This means you can edit and fill out forms on your computer, or access and complete checklists directly from the field. Once filled out, any record in the system can be geneerated or exported as PDF or CSV, meaning you get the best of Word Doc, PDF and Excel, with the power of modern software.

Other popular templates you can use and edit for free

Vehicle Safety Inspection Checklist
Easily complete your vehicle safety inspections using any device conveniently and even while on-the-go.

Fuel Truck Inspection Checklist
Never miss a refueling record with this handy checklist that you can access on your phone to log refueling anytime.

Toolbox Talk Vehicle Safety
Conveniently highlight safe driving practices and vehicle safety to help reduce workplace accidents.

This smart checklist was generated with Dashpivot software
Transform your documentation process with an upgraded inspection workflow and integrated with advanced quality management software
- Access, edit and complete Air Brake Test Checklist from any device - mobile, tablet or computer.
- Print, download or send your Air Brake Test Checklist as perfectly formatted PDF documents with your company logo.
- Store and manage checklist securely online where you can quickly locate it.
- Invite internal and external parties to see, edit and sign off on inspections online.

Sitemate builds best-in-class software tools for built world companies.
