Safety – Lock out tag out procedure 6 steps

Lock out tag out procedure 6 steps - The 6 key steps to a safe LOTO
What are the 6 steps for a safe lock out tag out?
Lock out tag out procedures are one of the most important safety procedures across the industries because of how frequently they occur as well as the dangers and consequences of not dealing with hazardous energy properly.
In order to ensure that people do deal with hazardous energy properly - companies and people working on these systems engage in a systematic procedure for locking or tagging out that piece of equipment or machinery.
The heavy machinery on these sites and workforces is extremely hazardous when it is being used or operated, which is why people need to use PPE, permits to work and other safety guidelines and rules.
But this type of equipment can also be hazardous when not in use as well, as hazardous energy can be discharged or energised in a multitude of ways - with potentially fatal consequences.
An effective lock out tag out procedure usually consists of 6 essential steps (sometimes expanded to 8 steps). The lock out tag out procedure 6 steps are:
- Preparation - Documenting important machine/equipment information
- Shut down - Notifying affected employees
- Isolation - Deactivating energy sources
- Isolation verification - Verifying the lock out and tag out, and verifying that the energy sources have been isolated
- Sign-off and keep procedure in force
- Re-energising the equipment
About each of the 6 steps of LOTO safety
Lock out tag out step 1 - Preparation
The main purpose of a 6 step lock out tag out procedure is to ensure that people always follow a specific formula which has been created and maintained to prevent people from forgetting important parts of the procedure and making mistakes.
Preparation is an important step in any process, and for a lock out tag out, preparation is mostly about understanding who and what will be effected by the LOTO, as well as documenting important information about the area, environment, person performing the lock and tag out and the equipment and machinery.
After step 1 has been completed, the person conducting and documenting the lock and tag out should have a thorough understanding of this particular LOTO - as well as documented the machine/equipment information, date of isolation etc. etc. in a professional, concise and audit proof manner.
Lock out tag out step 2 - The shut down
Step 2, the shutdown, is all about preparing people and the lock out tag out space, environment and machines or equipment for the shutdown and resulting lock and tag out.
The major part of this step is to inform affected employees. Everyone who will be or could be affected by the shutdown should know what's happening and why.
Once this is done and all the preparation is complete, the worker can shutdown the equipment properly and begin with step 3.
Lock out tag out step 3 - Isolation
The two major steps involved with the actual lock and tag out are steps 3 and 4.
Step 3 is the isolation of the machine or equipment, which involves disconnecting and deactivating all of the machine/equipment energy sources.
How extensive this step is will depend on the type and power of the machine being deactivated, with some machines having multiple energy sources which must be locked out with specific devices.
This step also involves documenting details of the isolation, so that another person can see and find the isolation location point, and device and method used.
Lock out tag out step 4 - Verification of isolation and lock out/tag out
Step 4 is an essential check and verification that the hazardous energy has been effectively isolated and locked or tagged out.
These checks can involve intentional attempted restarts as well as verifying pressure status and other checks, all with the goal of ensuring that there is no secondary or residual energy or energy source.
Once these checks are made, a verified person will lock or tag out each energy source/lever/button - and then verify it is isolated and locked/tagged
Lock out tag out step 5 - Sign off and keep procedure in force
It's important to make responsible people accountable for the decisions they make during the process in order to keep themselves and other people safe.
It's also important to keep the procedure in force during the shutdown. The purpose of the lock and or tag is to keep the procedure in force, but vigilance should be maintained throughout the procedure.
Lock out tag out step 6 - Re-energise the equipment
The final step involved in a lock and tag out is to remove the lock and or tag and re-energise the equipment.This is the final steps in the process, and is simply a re-engineering of the process which de-energised the equipment in the first place.
Once the machine or equipment is energised safely, employees can be notified again and work can continue as normal - until the next lock or tag out.
How to ensure people follow these critical 6 steps
All companies and people have good intentions when it comes to site and worker safety, but many companies and people 'fall over' at the hurdle of implementing procedures and processes which ensure that people conduct work in a safe manner.
Some companies display procedures, policies and processes in break rooms and on walls, but the best way to ensure that people follow a procedure is to put that procedure in their hands and make them tick off items and document each step in the process.
The form below shows you what this 6 step lock and tag out procedure looks like when completed in a 'document' format. This lock out tag out template standardised how every worker conducts and follow the 6 step procedure.
Each of the 6 steps has been documented and followed, instructions have been read, and the important verifications have been signed off.
This type of lock and tag out procedure implementation reduces margin for error, ensures transparency between workers on site and management, and improves safety and LOTO record keeping for internal and external purposes.
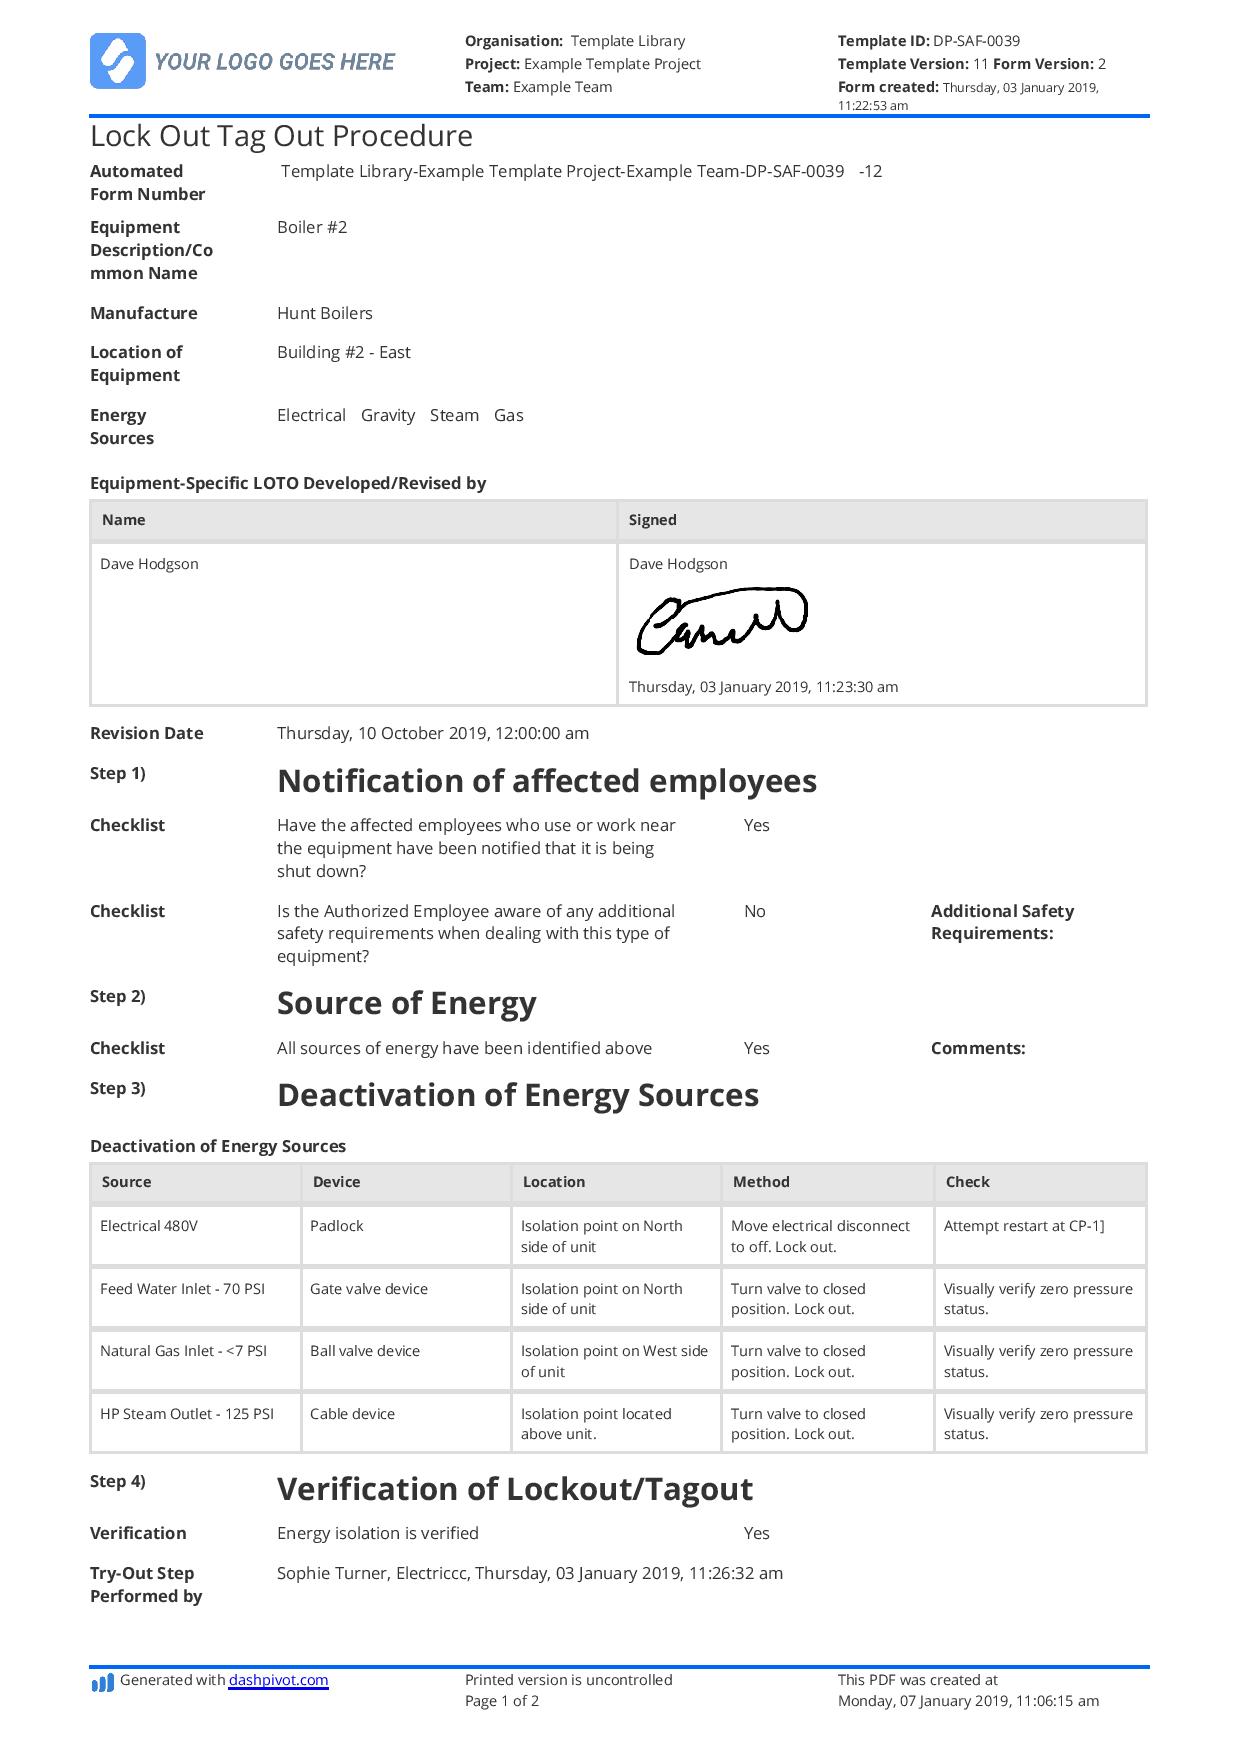

Use and customise this lock out tag out form for your own lock and tag outs.
Other tools for promoting lock out tag out safety on site and in the workplace
While the above lock and tag out form and process can build in firmer guidelines and reduce the chance of procedural mistakes being made, another method and way of improving lock and tag out safety is through education and discussion.
Lock out tag outs are one of the most common toolbox talks and training subjects. These type of informal and formal training methods work well for increasing the general understanding and safety practices of all employees.
While a certified person who is conducting the lock and tag out has a good understanding of the procedure and safety priorities, other employees affected by the shutdown and general process may not.
Discussing LOTO safety with all team members is an effective way to improve people's understanding of electrical safety, lock out tag out safety, and to make everyone feel comfortable with spending their time prioritising worker safety.
When everyone understands exactly what's happening when they see a lock or a tag on a piece of equipment, lock out tag outs become instantly more safe for everyone.
You can follow this 6 step procedure for yourself, your company and your teams using the 6 step procedure below - or cover lock out tag outs in a lockout tagout toolbox talk using the template below.

People in 80+ countries use this safety management system to improve their safety processes and outcomes.

See how you can easily streamline your systems and processes with Sitemate today
